


Choosing the Right Sandpaper for the Job: A Complete DIY Guide for 2026
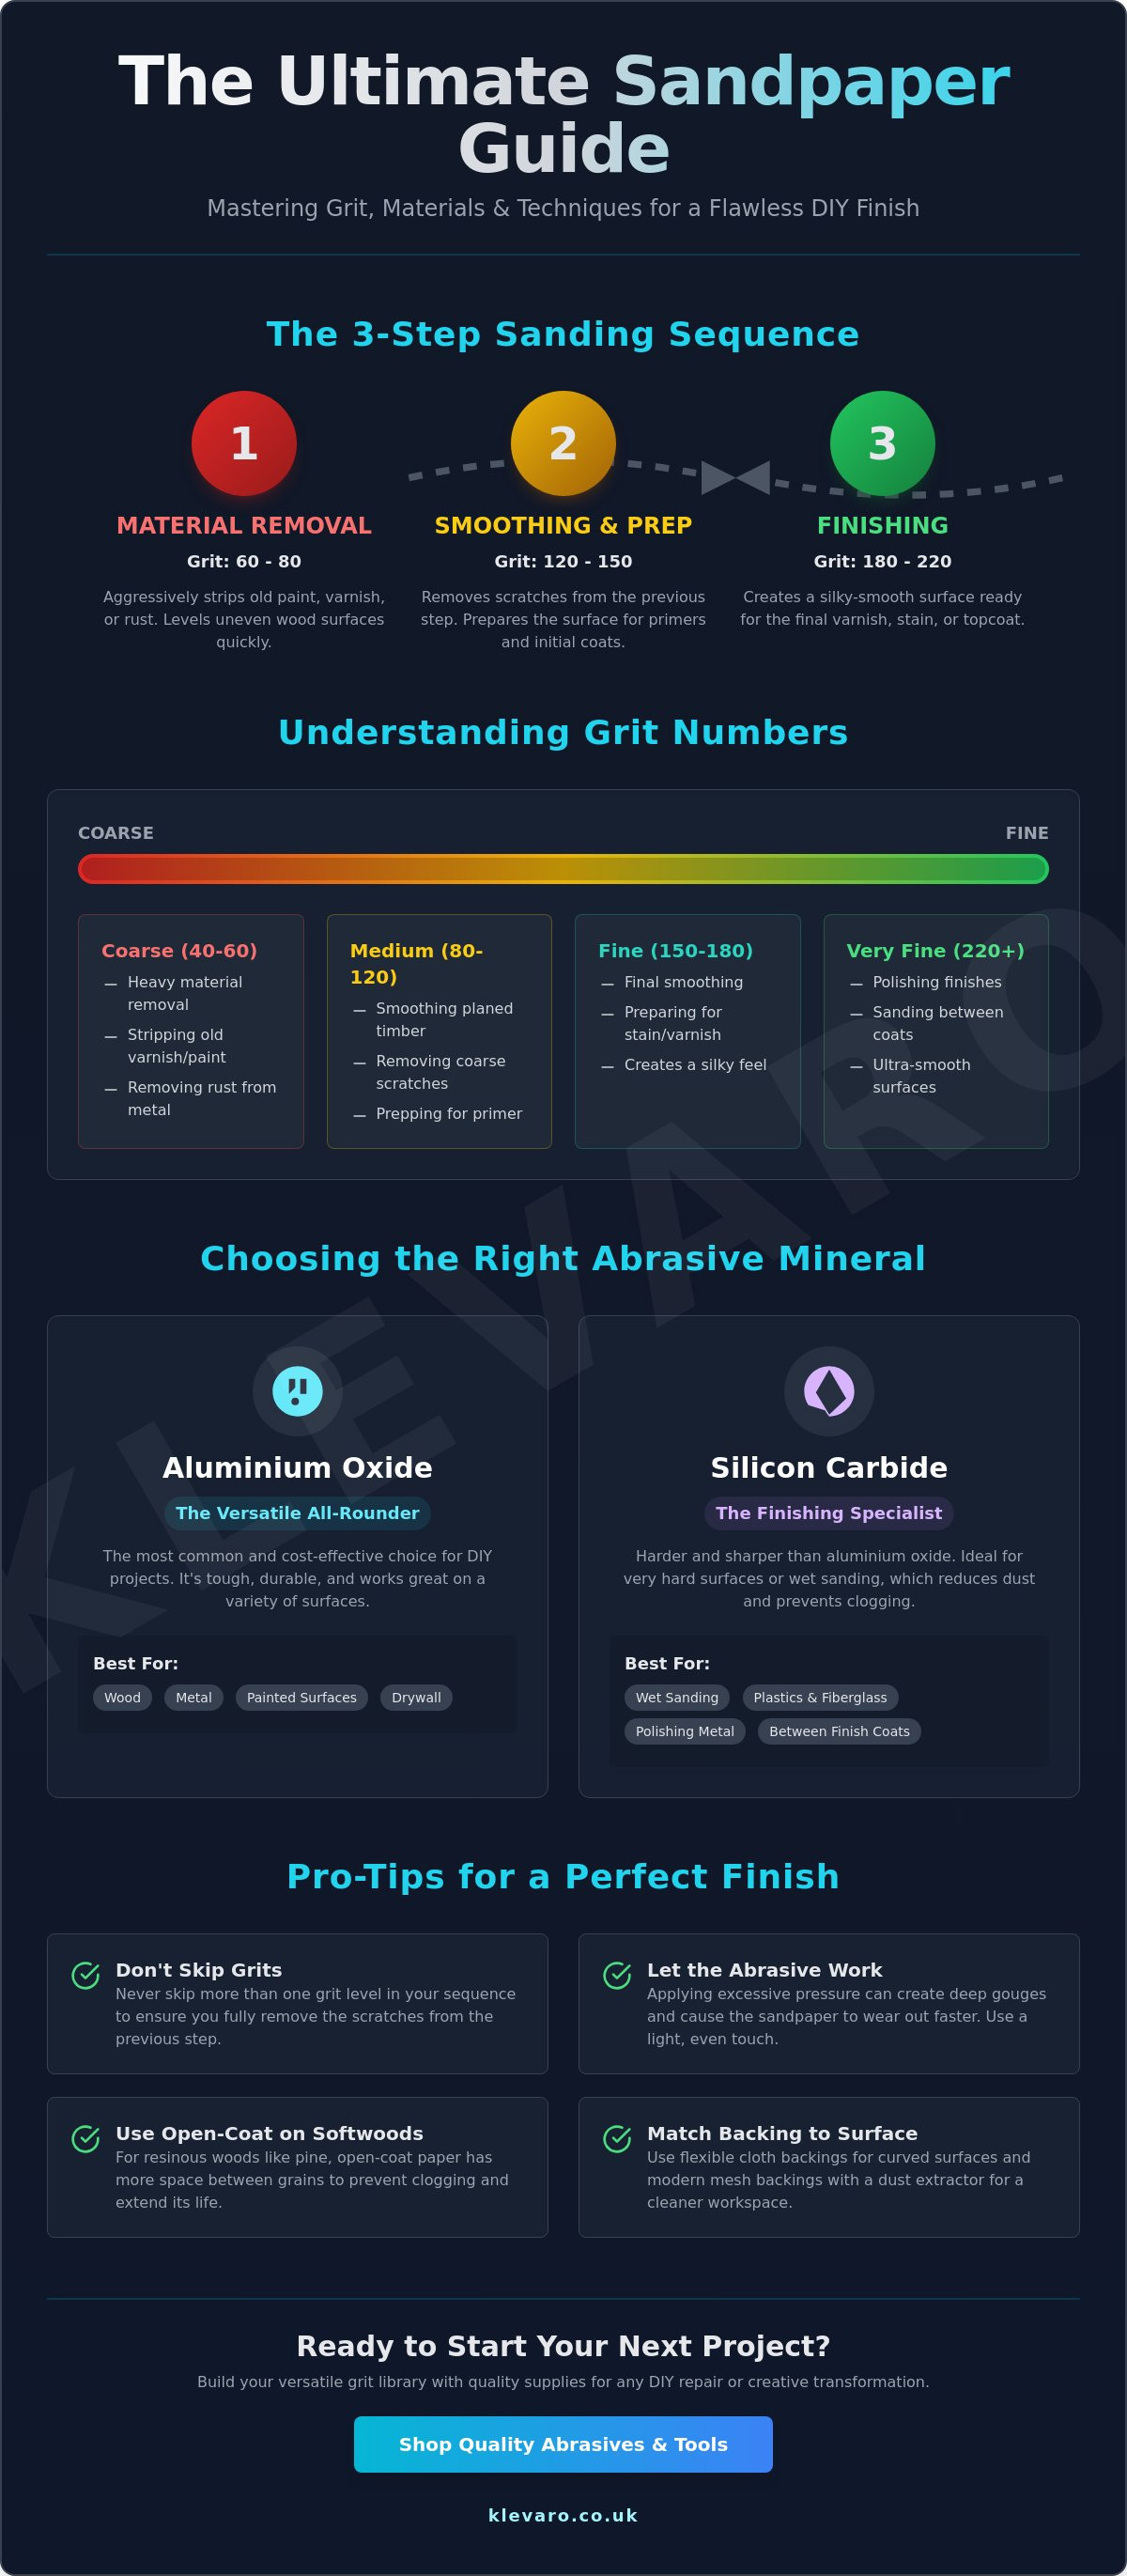
Choosing the right sandpaper for the job is the primary factor that determines the quality and durability of your final finish. A professional sanding sequence begins with a coarse 60 to 80 grit for material removal, moves to a medium 120 to 150 grit for smoothing, and concludes with a fine 180 to 220 grit. Aluminium oxide is the most versatile mineral for UK DIY projects because it works on both wood and metal. Silicon carbide is the industry standard for wet sanding or finishing hard materials like plastic. This logical three-step progression ensures a flawless surface while preventing you from wasting time or damaging the workpiece.
Many DIY enthusiasts feel frustrated when they ruin a surface with a grit that's too coarse or waste hours using paper that's too fine. We understand that confusing terms like "open coat" or "FEPA standards" can make choosing the right gear difficult. This guide teaches you how to match grit sizes and abrasive materials to your specific project needs for a professional result. We'll break down the grit numbering system, compare different minerals, and provide practical techniques to help you fix, build, and create with confidence.
Key Takeaways
- Master the grit numbering system to ensure you remove material efficiently without damaging your project surface.
- Identify the best abrasive minerals like aluminum oxide or silicon carbide for specific wood and metal applications.
- Simplify your next project by following a proven three-step logic for choosing the right sandpaper for the job.
- Learn professional sanding techniques that prevent swirl marks and produce a flawless finish ready for paint or varnish.
- Build a versatile grit library with quality supplies to handle any DIY repair or creative home transformation with confidence.
Sandpaper Grit Numbers Indicate the Coarseness or Fineness of the Abrasive Surface
Sandpaper grit is the specific measurement of abrasive particles found on each square inch of the paper's surface. Lower grit numbers signify larger particles that remove material quickly, while higher grit numbers indicate smaller particles designed for polishing and smoothing. Choosing the right sandpaper for the job requires you to follow a logical progression, often called "sanding through the grits." This process involves starting with a lower number and gradually moving to higher numbers to erase the scratches left by the previous step. You should never skip more than one grit level in a sequence if you want a professional, blemish-free result.
The industrial standards for Sandpaper ensure that a 60-grit sheet from one brand performs similarly to a 60-grit sheet from another. These abrasive particles are glued to a backing material, creating a tool that can strip, shape, or polish almost any surface. Understanding this numerical system turns a confusing trip to the shop into a simple task. You'll save time and money by buying only the specific grades your project requires.
Coarse Grits (40 to 60) for Heavy Material Removal
Coarse grits ranging from 40 to 60 are your primary tools for aggressive material removal. Use these grades when you need to strip old, stubborn varnish or level out a piece of uneven timber. They're also highly effective for removing rust from metal garden furniture before applying a fresh coat of protective paint. You can explore our range of hand and general tools to find the right equipment to pair with these aggressive abrasives.
Be careful when using 40-grit paper on softwoods like pine. These coarse grains leave deep, visible scratches in the fibers that require significant effort to remove later. Always use a light touch and let the abrasive do the work rather than pressing down hard. Once the surface is level or the old finish is gone, stop immediately to avoid removing too much material.
Medium to Fine Grits (80 to 180) for Surface Preparation
The 80 to 120 grit range is the true workhorse for most UK DIY enthusiasts. These medium grits are perfect for removing the heavy scratches left by coarse paper or for smoothing out planed timber. If you're preparing a surface for a primary coat of paint, 120 grit provides enough "tooth" for the primer to bond without leaving a rough texture.
Fine grits between 150 and 180 provide the final smoothing needed before applying a finish. Use 150 grit to eliminate any remaining imperfections from the 120-grit stage. For a professional look, a final pass with 180 grit will leave the wood feeling silky and ready for varnish. This step is crucial because even tiny scratches will become highly visible once you apply a dark stain or a glossy topcoat.
Different Abrasive Materials Excel on Specific Surfaces like Wood or Metal
Abrasive materials are selected based on their hardness, durability, and how they break down under friction. Choosing the right sandpaper for the job means matching these mineral properties to your specific project surface. Aluminium oxide is the primary choice for most wood and metal projects, while silicon carbide is the industry standard for wet sanding and hard finishes. Garnet remains a favourite for fine woodworking because it produces a smoother scratch pattern on bare timber. According to a comprehensive sandpaper grit guide, using the wrong material can lead to surface contamination or premature clogging.
The backing material also dictates how the abrasive performs during your project. Paper backings are lightweight and affordable for flat surfaces, but cloth backings offer the flexibility needed for curved furniture legs or intricate mouldings. Mesh backings are a modern alternative that allows dust to pass through, significantly reducing clogs and keeping your workspace cleaner. You must also consider the coating density. Open-coat sandpaper has gaps between the abrasive grains to prevent resin and dust from building up on woods like pine. Closed-coat sandpaper provides total grain coverage for maximum material removal on hardwoods and metals.
Aluminium Oxide: The Versatile All-Rounder
Aluminium oxide accounted for 38.2% of the global abrasive market in 2025 because of its unique friable nature. This means the mineral fragments during use, constantly exposing new, sharp edges that keep the paper effective for longer. It's highly resistant to heat, making it the perfect choice for high-speed power tools like orbital or belt sanders. Whether you're prepping a door for paint or smoothing a metal pipe, this material provides a consistent and reliable finish. If you're just starting your collection, you can browse our hand and general tools to find the right accessories for your kit.
Silicon Carbide and Garnet for Specialist Finishes
Silicon carbide is a sharp, synthetic mineral that's harder than aluminium oxide but more brittle. This makes it the ideal choice for "wet and dry" applications where you use water as a lubricant to achieve a mirror-like finish on metal or plastic. It's also excellent for sanding between coats of lacquer or paint because it cuts quickly without generating excessive heat. Ceramic alumina is the fastest-growing segment in the market today, offering even higher durability for industrial tasks that require extreme material removal.
Garnet is a natural mineral that many traditional woodworkers still prefer for final hand-sanding. It doesn't fracture as easily as synthetic minerals, which means it dulls more quickly but leaves a much softer scratch pattern. This makes it perfect for bare wood projects where you want the natural grain to stand out without any visible sanding marks. While it may not last as long as ceramic options, the quality of the finish is often superior for high-end furniture and decorative items. Choosing the right mineral ensures your hard work leads to a professional result you can be proud of.
The Best Sandpaper Choice Depends on Your Specific DIY Project Goals
The starting grit and progression sequence you need depend entirely on the material you are working with and your desired final finish. For a standard furniture upcycle, the most effective sequence is starting with 80 grit to remove old finish, moving to 120 grit for smoothing, and finishing with 180 or 220 grit before painting. Choosing the right sandpaper for the job ensures you don't waste time on overly fine paper or ruin wood with paper that is too coarse. Always work through the grits sequentially to eliminate scratches from previous steps. Once your surface is perfectly smooth, our paint choosing guide offers expert advice on selecting the perfect topcoat for your project.
Every "job" dictates its own unique grit sequence rather than just a single starting point. If you skip a grade, such as jumping from 60 grit directly to 180, the finer paper will not be aggressive enough to remove the deep gouges left by the coarse grains. This results in a finish that looks smooth to the touch but shows every scratch once you apply a stain. A successful project moves through the levels with patience, ensuring each stage prepares the surface for the next finer abrasive.
Project Comparison: Stripping, Prepping, and Finishing
Different tasks require specific starting points to be efficient. Stripping a door with multiple layers of old paint requires an aggressive start, while refreshing a piece of bare wood furniture is a much gentler process. "Keying" a surface is another common task where you use a medium grit to create a rough texture that helps new paint bond to an existing finish. Use the table below to identify the correct path for your next project.
| Project Task | Starting Grit | Finishing Grit |
|---|---|---|
| Stripping a Painted Door | 40 - 60 | 120 - 150 |
| Restoring Bare Wood Furniture | 80 | 180 - 220 |
| Smoothing New Plaster | 120 (Mesh) | 180 (Mesh) |
| Removing Rust from Metal Gates | 40 - 60 | 120 |
When you are applying varnish or high-gloss lacquer, the work doesn't stop at the first coat. You should use a very fine grit, typically 220 or higher, to lightly sand between coats of finish. This removes "nibs" or small dust particles that settled while the finish was drying. This light touch ensures the final result is professional and perfectly smooth to the touch.
Sanding Metal and Masonry
Metalwork and masonry require a different approach than timber. Removing heavy rust from garden gates requires 40 to 60 grit aluminium oxide to reach the clean metal underneath. For intricate scrollwork or tight corners, you can explore our range of hand tools to find sanding blocks and files that give you better control. This prevents you from over-sanding flat areas while trying to reach small details.
Masonry tasks like smoothing plaster walls create a significant amount of fine dust. We recommend using mesh abrasives for these jobs because they don't clog as quickly as traditional paper. Mesh allows the dust to pass through the abrasive surface, which is especially helpful if you are using a dust extraction system. This keeps your workspace cleaner and extends the life of your abrasive by up to four times compared to standard sheets.
Correct Sanding Techniques Ensure a Flawless Finish and Prolong Tool Life
Correct sanding technique requires following the direction of the wood grain and maintaining light, consistent pressure. Choosing the right sandpaper for the job involves matching the abrasive to the surface and cleaning the workpiece between every grit change. Applying excessive force is counterproductive because it crushes the abrasive minerals and creates heat that clogs the paper. When using a random orbital sander, you must keep the tool moving to prevent circular swirl marks from ruining the surface. Following these steps ensures a professional finish and extends the life of your tools by up to 50%.
Use this 5-step checklist for a perfect sanding workflow:
- Inspect: Check the surface for protruding nails, staples, or dried glue that could tear your abrasive.
- Start: Select the coarsest grit required for your specific material and task.
- Sand: Move the abrasive in long, steady strokes that follow the natural grain of the wood.
- Clean: Use a vacuum or tack cloth to remove all dust before you switch to a finer paper.
- Progress: Move to the next finer grade and repeat the process until the surface is perfectly smooth.
Manual Sanding vs. Power Sanding
Manual sanding with a block is the best way to keep flat surfaces perfectly level. If you sand with just your fingers, you'll create an uneven finish because of the varying pressure from your hand. For curved furniture legs or intricate mouldings, tearing small strips of paper allows you to wrap the abrasive around the shape for better contact. Random orbital sanders are the preferred choice for large areas like tabletops because their dual-motion action reduces visible scratches. If your project involves heavy timber, using circular saws for precise initial cuts can significantly reduce the amount of sanding required later.
Dust Management and Safety
Effective dust management is a critical part of modern DIY. Fine dust particles from MDF or old paint are hazardous to your health and can cause long-term respiratory issues. Always wear a P2 or P3 rated mask and use a sander with a vacuum attachment to capture 90% of the debris at the source. Cleaning the surface between grits is equally important for the quality of your finish. A single stray grain from a 60-grit sheet trapped under a 180-grit sheet will leave a deep scratch that ruins your progress. To get started with the right gear, explore our full range of DIY tools and equipment for a cleaner, safer workspace.
Shop Quality Abrasives and Tools at Klevaro for a Professional Result
Choosing the right sandpaper for the job is the primary factor that determines the quality of your final finish. You turn a tedious chore into a rewarding creative project by using the correct grit sequence and high-quality abrasive materials. Professional results depend on having a diverse range of papers ready to handle stripping, smoothing, and polishing. Klevaro offers durable, trusted DIY brands that help you achieve a flawless surface every time. Building a comprehensive "grit library" ensures you are always prepared for any home improvement challenge that comes your way.
A well-stocked grit library should include at least three grades of aluminium oxide for wood and silicon carbide for wet-sanding tasks. Having these essentials on hand prevents the frustration of using a grit that is too fine for heavy removal or too coarse for a final finish. This proactive approach saves you significant time and ensures your project moves smoothly from the initial prep work to the final coat of paint. When you have the right tools, you can focus on the joy of creating a beautiful, stylish home.
Klevaro is committed to providing UK homeowners with reliable gear that delivers professional results. We select our products based on their durability and practicality, ensuring they stand up to the demands of real-world DIY projects. Our team believes that everyone should have the confidence to transform their living spaces with ease. By choosing quality abrasives, you protect your investment in furniture and decor, ensuring every piece looks its best.
Everything You Need for Your Next Project
Your journey to a perfect finish starts with the right equipment and a clear plan. You can explore our full Tools & Equipment collection to find the exact abrasives and sanding accessories required for your specific task. We stock a variety of formats, including sheets, discs, and rolls, to fit both hand-sanding blocks and power tools. Our fast UK delivery service means you can get started on your project sooner, while our easy returns policy provides total peace of mind for every purchase.
We encourage you to join the Klevaro community to stay updated on the latest expert tips and project ideas. Our community is a place for DIY enthusiasts to share their successes and find inspiration for their next home or garden transformation. We aim to be more than just a retailer; we want to be your trusted partner in making your home a more comfortable and stylish place to live. Fix, build, and create with confidence using supplies designed to help you succeed every time.
Start Your Next Sanding Project with Confidence
Mastering the art of surface preparation transforms your home improvement projects from average to professional. You now understand that choosing the right sandpaper for the job is a logical process involving grit progression and material selection. By starting with a coarse grit for material removal and finishing with a fine 220 grit for polishing, you ensure a flawless surface every time. Remember to always sand with the grain and maintain consistent pressure to protect your workpiece and extend the life of your abrasives.
Having a full grit library in your workshop means you're always ready to fix, build, and create. Klevaro is a Trusted UK Store dedicated to helping you achieve your DIY goals with ease. We provide a wide selection of durable gear to ensure your projects are successful. Benefit from our Fast UK Delivery and our Quality Guaranteed promise on all essential DIY tools. This commitment to excellence helps you focus on the creative side of your home transformation.
Browse our full range of professional-grade tools and abrasives to find everything you need for a smooth finish. Your next project is just a few sheets of the right paper away from being a masterpiece. Get started today and see the difference that the right gear makes in your home.
Frequently Asked Questions
What grit sandpaper should I use to remove paint from wood?
You should use a coarse 40 to 60 grit sandpaper to strip multiple layers of old paint from wood surfaces. These aggressive abrasives cut through the pigment and primer quickly, saving you up to 30% more time compared to using medium grits. Once the bare wood is visible, switch to an 80 or 100 grit to smooth out the deep scratches left by the stripping process.
Can I use the same sandpaper for wood and metal?
Aluminium oxide sandpaper is compatible with both wood and metal surfaces, making it the most versatile choice for UK home workshops. While it works efficiently on both, you must never use a sheet on wood after it has been used on metal. Metal filings trapped in the grit can contaminate the wood grain and cause unsightly rust spots or staining under your final finish.
What is the difference between wet and dry sandpaper?
Wet sandpaper features a waterproof backing that allows you to use water or oil as a lubricant during the sanding process. This lubrication carries away fine dust particles, preventing them from clogging the abrasive and scratching the surface. Dry sandpaper is designed for initial shaping and smoothing of raw materials where moisture might damage the wood fibers or cause metal to oxidise prematurely.
How do I know when it is time to change the sandpaper sheet?
You should change your sandpaper sheet as soon as you notice a decrease in material removal or if the surface feels smooth to the touch. A fresh sheet of 80 grit should feel sharp and aggressive. If the paper looks "loaded" with dust or if it takes twice as long to achieve the same result, the abrasive grains have likely dulled or fractured beyond their useful life.
Is a higher grit number coarser or finer?
A higher grit number indicates a finer abrasive surface with more particles per square inch. For example, 220 grit is significantly smoother than 60 grit and is used for final polishing rather than material removal. Choosing the right sandpaper for the job requires remembering this inverse relationship so you don't accidentally gouge your project with an aggressive low-grit paper when you intended to polish it.
Do I really need to sand between coats of paint or varnish?
Sanding between coats is essential because it removes "nibs" or dust particles and creates a mechanical bond for the next layer. Use a very fine 220 or 320 grit to lightly scuff the surface without removing the previous coat. This process ensures the final finish is perfectly level and helps the topcoat adhere for a more durable, professional-looking result that lasts for many years.
What happens if I skip a grit in the sanding sequence?
Skipping a grit in the sequence leaves deep scratches from the previous stage that the finer paper cannot reach or remove. If you jump from 60 grit directly to 180 grit, you will likely see "pigtail" marks or gouges under your final stain or varnish. Following a logical progression, such as 80 to 120 then 180, ensures each step effectively erases the marks left by the last.
How do I prevent sandpaper from clogging so quickly?
You can prevent sandpaper from clogging by choosing open-coat abrasives, which leave 30% to 50% more space between the grains for dust to escape. Connecting your sander to a vacuum system also removes debris before it can build up on the sheet. If you are working with resinous woods like pine, using a rubber cleaning stick can often restore the "bite" of a clogged sheet, extending its life by up to 3 times.
Leave a comment