


Circular Saw Guide: How to Choose and Use the Best Saw for DIY
The circular saw is the single most important power tool you can add to your DIY arsenal. Full stop. It’s the key to unlocking bigger, bolder projects, from building custom shelving to crafting your own garden furniture with speed and precision.
We get it, though. That spinning blade can feel intimidating, especially when you’re staring at a pricey sheet of plywood, worried one wrong move will ruin it. You’re not alone; many DIYers feel anxious about kickback or get bogged down comparing corded and cordless specs. This guide is here to change all that. We promise to help you master the circular saw with complete confidence, covering everything you need to know from selection and UK safety standards to the techniques professionals use.
Get ready to transform your projects as we break down how to choose the perfect saw for your needs and finally make those perfectly straight rip and crosscuts, every single time.
Key Takeaways
- Find out how to choose the right circular saw for your workshop by comparing corded power with cordless freedom.
- Get to know the essential safety features, from retractable guards to electric brakes, to operate your saw with complete confidence.
- Master a simple two-step technique for setting your blade depth to achieve flawlessly straight and professional cuts every time.
- Boost your saw's performance and safety by learning how to select the best blade for the material you are cutting.
A Circular Saw is the Most Efficient Tool for Straight Timber Cuts
Ready to fix, build, and create with confidence? If your DIY projects involve cutting timber, a circular saw is an essential piece of gear for your toolkit. It's the undisputed champion of fast, straight, and accurate cuts. At its heart, a Circular Saw is a powerful handheld tool that uses a toothed, high-speed rotating blade to cut through wood, and with the correct blade, even plastic or metal. Its real magic lies in its ability to power through long cuts, like slicing down large sheets of plywood, with a speed and precision that a traditional hand saw simply can't match.
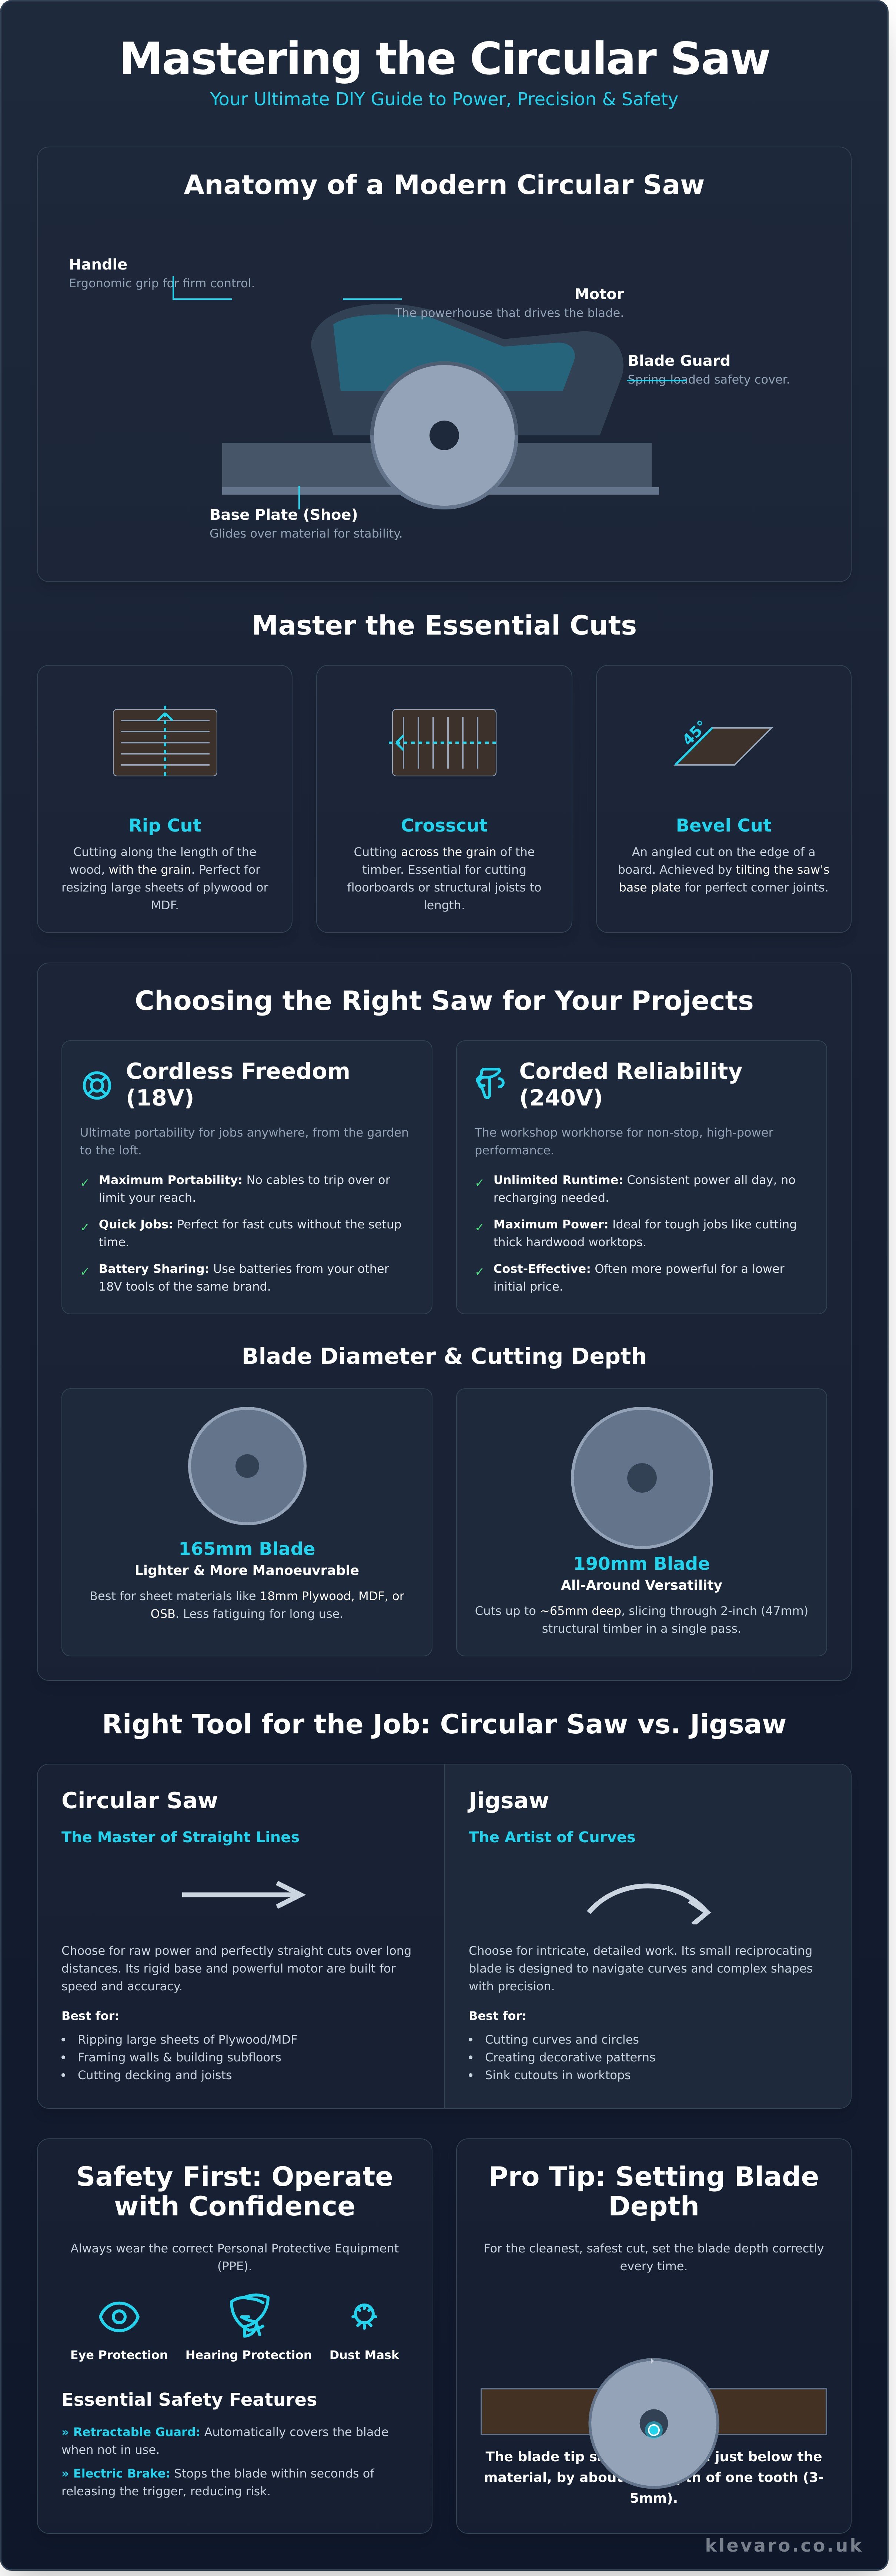
Every model is built around a few core components that work together to give you control and safety. The motor is the powerhouse, driving the blade. The flat metal base plate, also called a shoe, glides over the material and can be tilted to make angled cuts. A spring-loaded blade guard covers the blade when not in use and retracts as you cut, and the ergonomic handle gives you a firm grip for guiding the tool. For anyone in the UK planning a home renovation, from laying new laminate flooring in the living room to building a garden deck for the summer, this tool is a true game-changer.
The Most Common Uses for a Circular Saw in Home DIY
This tool is far more than a one-trick pony. Its versatility makes it the go-to for some of the most common tasks you'll face in any home improvement project. Get to know its primary cuts, and you'll be ready for anything.
- Rip Cuts: This is a cut made along the length of a piece of wood, following the grain. It's perfect for resizing large 2440 x 1220 mm sheets of plywood or MDF for shelving or custom furniture.
- Crosscuts: The opposite of a rip cut, this means cutting across the grain of the timber. You'll do this constantly when trimming structural timber like 4x2s for a stud wall or cutting floorboards and joists to the correct length.
- Bevel and Mitre Cuts: Need an angled finish? A circular saw can handle it. By tilting the base plate, typically up to 45 degrees, you can create a bevel cut along a board's edge. This is ideal for creating clean, professional-looking joins in corners for skirting boards or decorative framing.
Circular Saws vs. Jigsaws: Which Should You Use?
It's a common question for new DIYers. While both are cutting tools, they have very different strengths. Think of the circular saw as the master of straight lines and raw power. It’s designed to plough through thick materials quickly and efficiently, making it the perfect choice for heavy-duty construction tasks like framing a wall or building a subfloor. Its rigid base and powerful motor ensure your cuts remain straight and true over long distances.
A jigsaw, on the other hand, is the artist of the tool world. Its small, reciprocating blade is perfect for cutting intricate curves, circles, and detailed shapes. If you need to cut a hole in a kitchen worktop for a new sink or create a decorative pattern in a piece of wood, the jigsaw is your best friend. For big structural jobs, stick with the power and reliability of the circular saw; for detailed finishing work, grab the jigsaw.
Choosing the Best Circular Saw for Your Workshop and Projects
Picking the right circular saw is the first step towards achieving those perfectly straight, clean cuts you're aiming for. It’s not about finding a single "best" saw, but about finding the best one for you and the projects you have planned. The most significant decision you'll make is how your saw is powered, which directly impacts where and how you can work. Let's break down the key features to help you choose with confidence.
Cordless Freedom vs. Corded Reliability
Your first choice comes down to power source. An 18V cordless saw offers incredible freedom. Imagine building a garden planter, fixing a fence, or trimming decking without being tethered to a wall socket. They're perfect for quick jobs and outdoor projects. If you already own other 18V power tools, choosing a saw from the same brand means you can share batteries and chargers, saving you money and hassle. On the other hand, a 240V corded circular saw is the undisputed workhorse of the workshop. It delivers consistent, powerful performance all day long, never needing a recharge. For tough jobs like ripping through thick oak worktops or making repetitive cuts in structural timber, a corded model's unlimited runtime is essential.
Understanding Blade Diameter and Maximum Cutting Depth
In the UK, you'll mainly find two standard blade sizes: 165mm and 190mm. A 190mm blade is the go-to for all-around versatility. Its larger diameter gives it a cutting depth of around 65mm, allowing it to slice through standard 2-inch (47mm) structural timber in a single, clean pass. This makes it ideal for framing, decking, and general construction. A smaller 165mm saw is lighter and more manoeuvrable, making it a fantastic choice for working with sheet materials like 18mm plywood, MDF, or OSB. It's less fatiguing to use for long periods, especially when cutting overhead or in awkward positions.
Regardless of blade size, look for a tool with an adjustable "depth of cut." This allows you to set the blade to protrude just a few millimetres below the material you're cutting. This simple adjustment is crucial for safety as it minimises the risk of kickback and reduces blade exposure. Modern saws are packed with Essential Safety Features, like retractable blade guards and trigger locks, which are non-negotiable for protecting yourself while you work.
Sidewinder vs. Worm Drive Configurations
You'll also see two main motor layouts: sidewinder and worm drive. For almost every DIYer in the UK, a sidewinder is the right choice. In these saws, the motor sits alongside the blade, making the tool compact, lightweight, and well-balanced. Their high blade speed (RPM) produces a fine, clean finish. Worm drive saws, with their motor positioned behind the blade, are a different beast. They use gears to trade speed for immense torque, making them powerhouses for heavy-duty professional framing. They are heavier and bulkier, so we recommend a classic sidewinder for its user-friendly design and excellent all-around performance.
With these key factors in mind, you're ready to find a saw that feels like an extension of your own hands. Getting a feel for the different weights, grips, and features is the best next step. Take a look at the latest models and find the perfect partner for your next project in our tools and equipment collection.
Essential Safety Features and PPE for Circular Saw Operation
A perfect cut starts with a safe setup. Before you even think about plugging it in, remember that respecting the power of your circular saw is the foundation of every successful DIY project. Modern saws are packed with brilliant safety technology, but it’s your knowledge and preparation that truly make the difference. Let’s get you geared up to fix, build, and create with complete confidence.
Your saw has built-in guardians. The most obvious is the retractable lower blade guard, a spring-loaded shield that covers the blade’s teeth. As you push the saw forward into the material, it retracts, exposing the blade for the cut. Once the cut is complete and you lift the saw, it snaps back into place. Always check that this guard moves freely before each use. Many newer models also feature an electric brake, which reverses the motor’s polarity to stop the blade from spinning in under two seconds after you release the trigger. This drastically reduces the risk of accidental contact while the blade would otherwise be coasting to a stop.
Always be mindful of the "no-go zone." This is the area directly in front of, and especially behind, the saw blade. Your hands should never be in this path. Secure your workpiece with clamps so you can keep both hands on the saw’s handles, giving you maximum control and keeping your fingers far from the spinning blade.
Required Personal Protective Equipment (PPE)
Think of your PPE as your personal toolkit for safety. It’s not optional; it’s essential gear for every single cut. You can find all the essential safety gear you need, from durable gloves to high-impact goggles, in our collection of hand and general tools.
- Eye Protection: Sawdust, wood chips, and debris can become high-speed projectiles. A pair of wrap-around safety goggles are non-negotiable to protect your vision.
- Hearing Protection: A circular saw can easily exceed 100 decibels during operation, a level that can cause hearing damage over time. Earmuffs or earplugs are a must.
- Dust Masks: Fine wood dust, especially from materials like MDF, can be harmful if inhaled. A simple dust mask will protect your lungs and keep you breathing easy.
How to Prevent Kickback and Blade Binding
Kickback is one of the most common dangers when using a circular saw. It happens when the blade gets pinched or bound in the wood, causing the saw to violently jerk up and back towards you. It’s startling and dangerous, but thankfully, it’s also preventable with the right technique.
The primary cause is improper material support. Never try to cut a board that’s only supported on its two ends, like between two sawhorses. As you cut through the middle, the board’s weight will cause it to sag and pinch the blade, triggering a kickback. Instead, ensure the main body of the workpiece is fully supported and clamped down, allowing the smaller off-cut piece to fall away freely once the cut is complete.
Many modern saws also include a riving knife. This is a thin metal fin positioned just behind the blade that is slightly thinner than the blade’s cut, or kerf. As the saw moves forward, the riving knife slides into the cut, holding it open and preventing the wood from closing in and binding on the blade. The importance of features like these is even recognised by professional bodies; official OSHA safety standards detail requirements for anti-kickback devices on woodworking machinery, proving how vital they are for safe operation.
How to Make Professional Straight Cuts Every Time
A wobbly cut can ruin a project. But achieving that crisp, factory-finish edge isn't magic; it’s a simple, repeatable process. Nailing this technique is what separates amateur DIY from work you can be proud of. With the right preparation, your circular saw will become your most trusted tool for precision. Forget guesswork. Follow these four steps to guarantee accuracy on every single cut.
- Step 1: Measure and Mark Your Line. Precision starts here. Use a quality tape measure and a sharp, high-visibility carpenter's pencil. Instead of just a line, mark a small 'V' with the point indicating the exact cut line. This removes any ambiguity about which side of the pencil mark to follow.
- Step 2: Set the Correct Blade Depth. This is a critical safety and performance step. Adjust your saw's baseplate so the blade extends just 3mm to 5mm below the bottom of the material you're cutting. A shallow depth reduces the risk of kickback and results in a cleaner cut by minimising tear-out on the underside.
- Step 3: Secure Your Workpiece. A piece of wood that moves during a cut is both dangerous and a recipe for a crooked line. Firmly clamp your material to a stable workbench or a pair of sawhorses. For large sheets like plywood, use supports to prevent the wood from pinching the blade or sagging after the cut.
- Step 4: Align, Start, and Cut. Rest the front of the saw's baseplate on the wood, well clear of your marked line. Align the 0-degree notch (for a 90-degree cut) on the front of the baseplate with your mark. Squeeze the trigger and let the blade reach its maximum RPM before it makes contact with the wood. Push the saw forward smoothly and steadily, keeping your eye on the notch, not the spinning blade.
Using Guides and Fences for Perfect Accuracy
Freehand cutting has its place, but for true precision, a guide is essential. Your saw likely came with a factory rip fence, a small metal guide perfect for making consistent, narrow cuts parallel to the edge of a board. For quick and perfect 90-degree crosscuts on timber, a speed square is your best friend. Simply hold its flange firmly against the wood's edge and run your saw's baseplate along the square's straight edge. For long, straight cuts on sheet materials, clamp a spirit level or the factory edge of another board to your workpiece to act as a track for the saw to follow.
Technique: Controlling the Saw and Managing the Cord
Your body position makes a huge difference. Stand with your feet shoulder-width apart to create a stable base, ensuring you can complete the entire cut without overreaching. Always let the motor get to full speed before entering the wood; starting the cut with a slow-moving blade can cause it to grab and kick back. Finally, a simple but effective pro tip: drape the power cord over your shoulder. This small action keeps it out of the cutting path and prevents it from snagging on the edge of your workpiece, which can pull your cut offline at the last second.
Getting these details right requires the right gear. Find everything you need to guarantee straight cuts in our collection of quality clamps and measuring tools.
Maintaining Your Saw and Selecting the Right Blades
You've got the perfect saw, and you're ready to build. But even the best tool is only as good as its maintenance schedule and the blade you fit to it. A sharp, clean blade isn't just about getting a better finish; it's a critical safety rule. A dull blade forces the motor to work harder, can burn the wood, and significantly increases the risk of dangerous kickback. Taking a few minutes to care for your circular saw will pay off with cleaner cuts, a longer tool life, and a safer workshop.
Most blades you'll encounter are either High-Speed Steel (HSS) or Tungsten Carbide Tipped (TCT). While HSS blades are cheaper, they dull quickly and are best reserved for softwoods. For any serious DIYer, TCT blades are the standard. The hardened carbide tips stay sharp for far longer, delivering consistent, quality cuts through everything from tough construction timber to MDF and kitchen worktops. It's a small investment for a huge upgrade in performance.
While you're checking the blade, don't forget the blade guard. This essential safety feature must retract smoothly as you push the saw through a cut. Sawdust and wood resin can build up inside, causing it to stick. A guard that doesn't spring back instantly is a serious hazard. Always unplug your saw before cleaning the guard with a stiff brush to keep it in perfect working order. Once your gear is ready, you'll be itching for a new challenge. You can explore our home and garden range for fantastic project inspiration.
Matching Tooth Count to Your Material
The number of teeth on a blade, often marked with a 'T' (e.g., 24T), dictates its cutting style. Choosing the right one is the secret to getting professional results.
- Low Tooth Count (18T-24T): These are your workhorse blades for fast cutting. The large gaps between the teeth, called gullets, clear sawdust efficiently. This makes them perfect for rip cuts (cutting with the wood grain) in framing timber and general construction work where speed matters more than a perfect finish.
- High Tooth Count (40T-60T): Need a finish that's clean enough to join? Reach for a high-tooth-count blade. The teeth take smaller bites, resulting in a silky-smooth cut with almost no splintering or tear-out. They are the top choice for cross-cutting hardwoods, plywood, and melamine.
- Specialty Blades (60T+): For materials like laminate flooring, plastics, or non-ferrous metals like aluminium, you'll need a specialty blade. These often feature a unique tooth geometry, like a Triple Chip Grind (TCG), designed to prevent chipping and deliver a flawless edge on these tougher materials.
Routine Maintenance for Tool Longevity
A few simple checks will keep your circular saw running reliably for years. Think of it as an MOT for your most trusted tool. Before performing any maintenance, always disconnect the saw from its power source.
On corded models, check the carbon brushes every 50-60 hours of use. These small carbon blocks transfer power to the motor and are designed to wear down. If you notice excessive sparking or a drop in power, worn brushes are the likely cause. They are typically housed under two plastic caps on the motor body and are a simple, inexpensive part to replace.
Accuracy is everything, so regularly check that your base plate, or shoe, is perfectly square to the blade. Set the bevel adjustment to 0° and use an engineer's square to check the 90° angle between the plate and the blade body. A knock or a drop can throw this out of alignment, leading to every cut being slightly off. With the right gear from Klevaro and a little bit of care, any DIY project is achievable. Fix, build, and create with confidence!
Build with Confidence and Precision
You're now equipped with the essential knowledge to transform your DIY game. Mastering this powerful tool isn't about guesswork; it’s about making smart choices. From selecting the right blade size for the job to understanding critical safety features like the blade guard, you have the blueprint for success. Remember that a simple straight-edge guide is your secret weapon for achieving those perfectly straight, professional-grade cuts every single time. Your projects deserve that level of precision.
Now that you know what to look for in a quality circular saw, it’s time to find the perfect partner for your workshop. Upgrade your workshop with Klevaro’s range of quality power saws and discover the difference a reliable tool makes. As a Trusted UK Store, we provide Fast UK Delivery right to your door and a Quality Guaranteed promise on all our DIY tools. Stop dreaming about your next project and start building it.
Circular Saw: Your Questions Answered
Can I cut metal with a standard wood circular saw?
Yes, you can cut certain metals with a standard saw, but you must use a specialised metal-cutting blade. Using a wood blade on metal is extremely dangerous and will ruin the blade instantly. You'll need an abrasive metal-cutting disc or a carbide-tipped blade specifically designed for either non-ferrous metals like aluminium or ferrous metals like steel. Always wear a full-face shield and gloves, as this process creates hot sparks and sharp fragments.
What is the difference between a rip cut and a crosscut?
A rip cut is a cut made along the length of a piece of wood, following the direction of the grain. In contrast, a crosscut is a cut made across the shorter width of the wood, going against the grain. Think of it this way: ripping a long plank makes it narrower, while crosscutting a plank makes it shorter. Blades are often optimised for one type of cut; rip blades have fewer teeth (around 24) for fast cutting, while crosscut blades have more (60+) for a clean finish.
How deep should the circular saw blade be set?
The blade on your circular saw should be set to extend just 6mm, or about the height of one full tooth, below the material you are cutting. This shallow depth is the safest way to operate the saw, as it minimises the risk of dangerous kickback if the blade binds. It also puts less strain on the saw’s motor and results in a cleaner, smoother cut. Always unplug the saw before you make any depth adjustments.
Why does my circular saw keep smoking or burning the wood?
Your saw is most likely smoking because the blade is dull, dirty with resin, or you're moving through the cut too slowly. A dull blade creates excess friction instead of cutting, which generates enough heat to scorch the wood. Pine and other resinous woods can also leave a sticky buildup on the blade's teeth, causing the same issue. Try cleaning the blade first; if burning persists, it's time to get a new blade for safer, cleaner results.
Is a cordless circular saw powerful enough for home DIY?
Absolutely. Modern cordless circular saws, especially those with 18V or higher lithium-ion battery systems, offer more than enough power for nearly all home DIY tasks. They are perfect for cutting sheet materials like plywood, trimming decking boards, or building garden projects. While a corded saw might be better for all-day, heavy-duty work, the convenience and performance of today's cordless models make them the top choice for over 90% of DIYers.
How do I change the blade on my circular saw safely?
To change the blade safely, you must first completely disconnect the power source. Unplug a corded saw or remove the battery from a cordless model. Next, locate and press the spindle or arbor lock button, which prevents the blade from spinning. Use the wrench included with your saw to loosen the arbor nut—remember, you usually turn it in the same direction the blade spins to loosen it. Swap the blades, ensuring the teeth point forward, and then securely retighten the nut.
What should I do if the saw blade gets stuck mid-cut?
If your blade gets stuck, release the power trigger immediately and wait for the blade to stop spinning completely. Never try to force the saw forward or yank it backward, as this can cause a violent kickback. Once the tool is off and the blade is still, unplug it or remove the battery. The wood has likely pinched the blade. You can then use a small wedge or screwdriver to gently pry open the cut (the kerf) to free the blade.
Do I need a special blade for cutting MDF or Plywood?
Yes, for the best finish on MDF or plywood, you should use a fine-finish blade with a high tooth count. These engineered woods are prone to chipping and tear-out with a standard blade. A blade with 60 to 80 carbide teeth will give you a crisp, clean edge that looks professional. While a general-purpose blade can do the job, investing in a high-tooth-count blade makes a huge difference to the quality of your finished project.
Leave a comment