


How to Get a Professional Paint Finish Yourself: The Complete 2026 DIY Guide
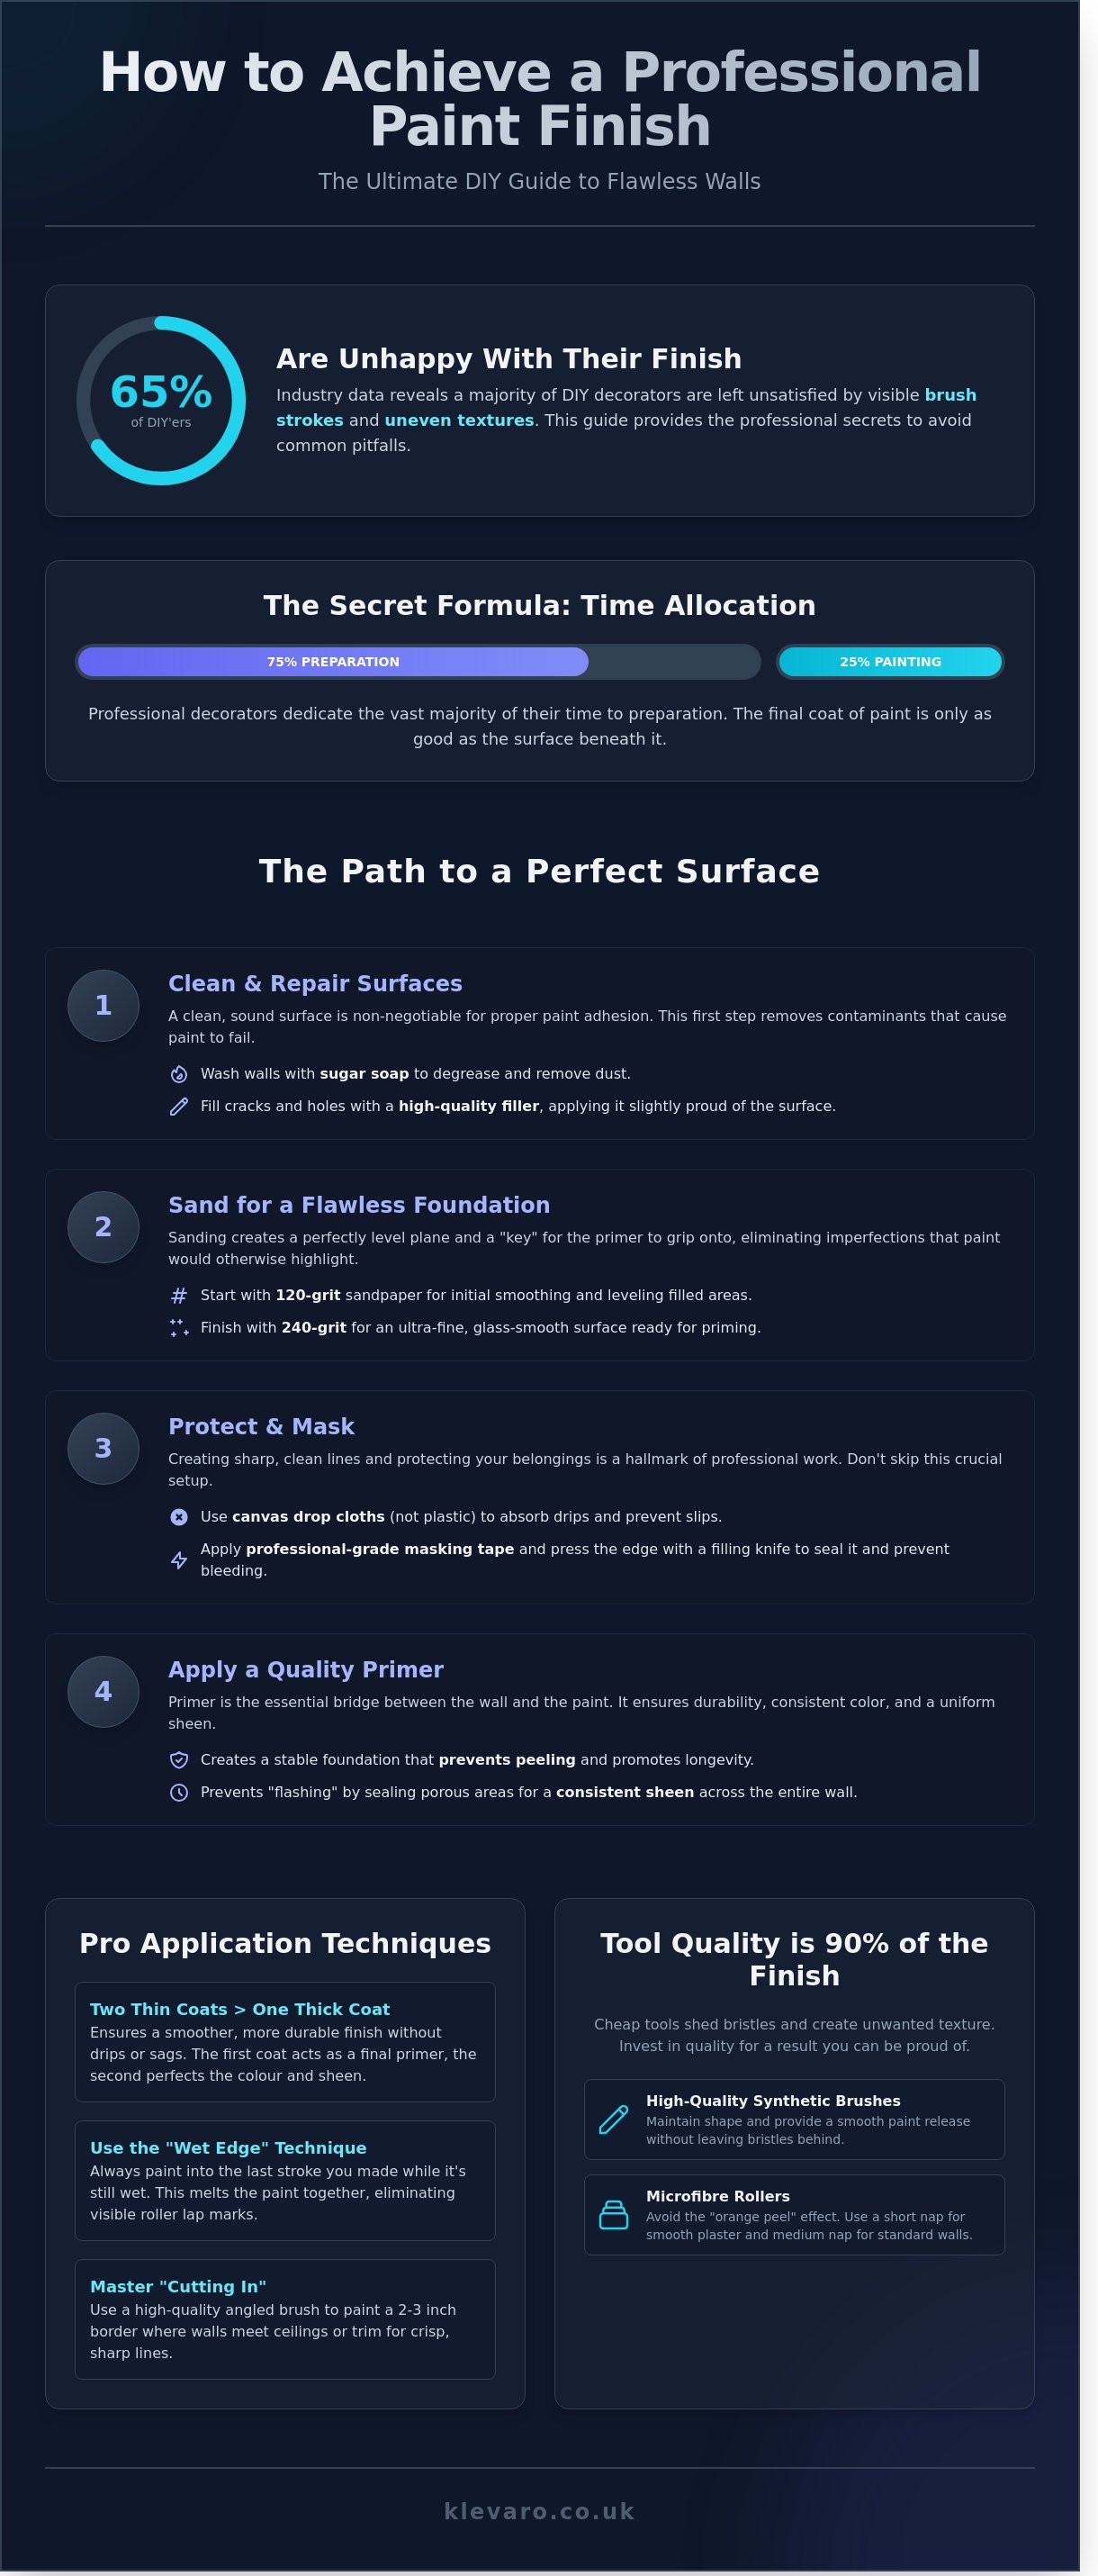
Industry data from 2024 suggests that over 65% of UK DIY decorators are unhappy with their final results due to visible brush strokes and uneven textures. To get a professional paint finish yourself, you must prioritise meticulous surface preparation and use high-quality synthetic tools. Start by cleaning walls with sugar soap and sanding imperfections until the surface is perfectly level. Apply a dedicated primer to prevent peeling and use the "wet edge" technique to eliminate visible lap marks. Two thin coats of premium paint will always provide a more durable and smoother result than one thick layer. This disciplined approach ensures crisp lines and a flawless finish that mimics the work of a trade expert.
Most homeowners recognise the frustration of seeing roller marks or messy edges after a long weekend of decorating. It's disheartening to waste money on equipment that doesn't deliver the smooth look you see in magazines. We promise that by following this guide, you'll master the exact techniques needed to transform any room with confidence. You're about to learn the professional secrets of tool selection, preparation, and expert application for 2026.
Key Takeaways
- Understand why meticulous preparation is the foundation of every project, covering essential cleaning and sanding techniques for a smooth surface.
- Discover how to get a professional paint finish yourself by selecting high-quality synthetic brushes and the correct roller nap for your specific wall texture.
- Master the professional "top-down" application sequence and learn how to cut in edges with precision for a sharp, clean look.
- Learn how to troubleshoot and fix common painting mistakes like drips, sags, and bubbling before they become permanent eyesores.
- Transform your DIY experience from stressful to satisfying by equipping your project with the right professional-grade decorating tools and essentials.
Preparation is the Secret to a Professional Paint Finish
Mastering how to get a professional paint finish yourself starts with the understanding that the best results are won before the tin is even opened. A professional finish requires thorough cleaning, meticulous sanding, high-quality primer, and a disciplined application sequence. Professional decorators often dedicate 75% of their project time to preparation because the topcoat only looks as good as the surface beneath it. If you skip these steps, you risk paint peeling, visible imperfections, and an uneven sheen. Following a strict preparation routine ensures your DIY project looks like a trade-standard job.
Preparation dictates the longevity and aesthetic of the entire job. When the surface isn't smooth and clean, paint won't bond properly, leading to premature failure. You'll also find that tiny bits of dust or old paint flakes become trapped in your new coat, creating a gritty texture that's impossible to hide later. Investing time in the early stages saves you from costly repairs and repainting in the future.
Before you begin, gather your essential kit from a trusted range of hand tools. Having the right gear on hand keeps the workflow steady and prevents mistakes. You'll need:
- Sugar soap and a heavy-duty sponge for degreasing.
- Sandpaper in 120-grit for initial smoothing and 240-grit for a fine finish.
- A flexible filling knife and high-quality filler.
- Professional-grade masking tape to ensure sharp lines.
- Canvas drop cloths to protect your flooring from spills.
Protecting your work area is just as vital as the painting itself. Remove all furniture from the room or move it to the centre and cover it with dust sheets. Use canvas drop cloths instead of thin plastic, as canvas absorbs drips and doesn't create a slip hazard. Apply masking tape to skirting boards and ceilings, running a clean filling knife along the edge to seal it firmly. This prevents paint from bleeding under the tape and ruining your crisp edges.
Cleaning and Repairing Interior Surfaces
Start by washing your walls with sugar soap to strip away grease and dust. This step is essential in kitchens where cooking oils settle on surfaces and prevent paint adhesion. If you identify any cracks or holes, use a suitable wood filler for timber or a flexible filler for plaster. Apply the filler slightly proud of the surface and, once dry, sand it back until it's perfectly flush with the wall.
The Role of Priming and Undercoats
Priming is a non-negotiable step for bare plaster, new wood, or when you're making a dramatic colour change. It creates a stable foundation that stops the topcoat from soaking into the wall. While understanding paint types and sheens helps you select the right products, the primer ensures that finish stays consistent. A quality undercoat prevents "flashing," which occurs when porous areas absorb more paint and leave dull patches. This step is a cornerstone of how to get a professional paint finish yourself that lasts for years.
Selecting High-Quality Tools and the Correct Paint Sheen
To master how to get a professional paint finish yourself, you must use high-quality synthetic brushes and microfibre rollers that suit your specific surface. Professional decorators attribute 90% of a flawless finish to the quality of the tools and the choice of paint sheen. You should select a short-nap roller for smooth plaster and a medium-nap for standard walls to prevent uneven textures. Choosing the correct sheen, such as moisture-resistant eggshell for bathrooms or durable satin for woodwork, ensures the finish lasts for years. Using an extension pole allows for long, continuous strokes that eliminate visible lap marks. These professional-grade choices transform a DIY project into a high-end renovation.
Essential Painting Equipment for Flawless Results
Cheap brushes often shed bristles and leave deep grooves in your paintwork. You should invest in synthetic filament brushes because they maintain their shape and provide a smoother release than natural hair. Cutting-in brushes require a specific angled head to create crisp, sharp edges where the wall meets the ceiling or skirting boards. This design gives you better control and prevents the need for messy masking tape in every corner.
The texture of your walls is largely determined by your roller choice. Microfibre rollers are the industry standard for avoiding the "orange peel" effect caused by budget polyester alternatives. You should match the "nap" or pile thickness to your wall; use an 8mm nap for smooth surfaces and a 12mm nap for slightly textured walls. To ensure you have the right gear, explore our curated tools and equipment collection for professional-grade supplies. A sturdy rolling tray and an aluminium extension pole are also vital for maintaining consistent pressure across the entire wall surface.
Matching Paint Finishes to Room Function
The sheen level of your paint affects both the look of the room and how well the surface stands up to daily life. Matt finishes are a favourite for lounges and bedrooms because they reflect very little light. This lack of reflection helps hide minor lumps or imperfections in the plasterwork. While matt looks sophisticated, it is less scrubbable than higher-gloss options, making it better suited for low-traffic areas.
- Matt: Best for ceilings and adult bedrooms to hide surface flaws.
- Eggshell or Silk: Ideal for hallways and kids' rooms where you need to wipe away scuffs.
- Satin or Gloss: Use these for radiators, skirting boards, and door frames to provide a hard-wearing, impact-resistant shield.
- Moisture-Resistant: Specifically formulated for kitchens and bathrooms to prevent steam from peeling the finish.
For woodwork and metal, satin provides a modern, mid-sheen look that is easier to apply than high-gloss. Modern water-based formulas now offer the same durability as old oil-based paints without the yellowing or strong fumes. Always check the manufacturer's drying times, as professional results require the paint to cure fully between coats. If you are updating your space, you can find everything you need to refresh your home decor and complete your project with style.
Master the Professional Application Sequence
Mastering the application sequence requires a top-down approach that begins with the ceiling and finishes with the skirting boards. You must maintain a wet edge by working in small sections and blending new paint into damp areas to prevent visible lap marks. Using the "W" or "M" rolling technique ensures the paint is distributed evenly across the surface without leaving thin patches. These professional methods are the most effective way to learn how to get a professional paint finish yourself while avoiding common DIY mistakes. Following this order prevents drips from landing on finished walls and keeps the finish consistent.
The "Top-Down" rule is a non-negotiable standard for decorators. You should always start with the ceiling and any coving before moving to the walls. This strategy ensures that any inevitable splatters or fine mist from the roller land on unpainted surfaces rather than ruining a finished wall. Once the highest points are complete, you can work downwards with confidence.
Managing "wet edges" is the secret to a seamless look on large expanses. If a section of paint dries before you roll the adjacent area, you'll see a dark, double-layered line known as a lap mark. To prevent this, work in 1-metre wide vertical strips and never stop for a break in the middle of a wall. Always finish the entire surface to a natural break, such as a corner or door frame.
How to Cut In Like a Decorator
Professional decorators often skip masking tape and rely on a steady hand and a high-quality 2-inch angled sash brush. Load your brush by using the "dip and tap" method. Submerge the bristles about 3cm into the paint and tap the brush lightly against the inside of your paint kettle. Don't wipe the brush against the rim, as this removes too much paint and leads to a streaky, uneven application.
Hold the brush like a pencil for maximum control and use long, fluid strokes. Start your line about 1cm away from the edge to unload the bulk of the paint, then make a second pass to push the paint exactly into the corner. It's best to cut in one wall at a time. This ensures the border is still wet when you begin rolling, allowing the two areas to blend perfectly.
Rolling Techniques for a Smooth Surface
To achieve a flawless texture, you must load the roller evenly without over-saturating the core. Roll the tool back and forth on the tray's ramp until the nap is fully coated but not dripping. Applying paint in a large "W" or "M" pattern across a 1-metre square area is the best way to distribute the product. This technique moves the paint from the centre outwards, ensuring the entire section receives an equal coat.
Avoid applying heavy pressure to the roller frame. Pushing too hard creates "track marks," which are ridges of paint squeezed out from the edges of the roller. Instead, let the tool do the work with a light, consistent touch. To ensure your toolkit is ready for the task, you can explore our selection of hand and general tools designed for DIY success.
The final step for every section is the "lay off" stroke. Once a 1-metre area is covered, lightly roll from the very top of the wall to the bottom in one continuous, vertical motion. Do this without adding more paint to the roller. This simple action aligns the stipple pattern of the paint, creating a uniform, professional texture that looks like it was done by a specialist.
Troubleshooting Common Painting Errors for a Flawless Result
Fixing painting mistakes requires a combination of immediate action for wet errors and careful sanding for dry ones. You can resolve wet drips by lightly brushing over them before they set, while dried sags must be sanded flat with 220-grit sandpaper and re-coated. Bubbling and blistering are typically caused by moisture or heat, requiring you to scrape the damaged section back to the wood or plaster before applying a fresh primer. Small missed spots, often called holidays, should only be touched up once the initial coat is completely dry to prevent texture differences. Mastering these corrections is essential when learning how to get a professional paint finish yourself. Proper tool maintenance ensures your equipment stays in favourite DIY condition for your next project.
Fixing Mistakes During the Project
Keep a clean, damp cloth in your pocket to wipe away "oops" moments on skirting boards or flooring immediately. If you find a dried drip later, don't try to scrape it off with a fingernail. Use a fine-grit sanding block to level the bump until it's flush with the wall, then apply a thin layer of paint using a small brush or mini-roller. This technique blends the repair into the surrounding area without leaving a visible patch.
Colour variations can occur even between tins of the same shade. To prevent this, professional decorators use a method called "boxing." Mix all your paint tins together in a large 5-litre or 10-litre bucket before you start. This ensures a consistent hue across every wall in the room. If you run out of paint mid-wall, stop at a natural break like a corner to make any slight shade shift less noticeable.
Post-Painting Care and Maintenance
Removing masking tape at the wrong time often pulls fresh paint away from the wall. Pull the tape away at a 45-degree angle while the paint is still slightly tacky to the touch. If the paint has already dried completely, use a sharp utility knife to score the edge where the tape meets the wall. This break in the paint film prevents the tape from tearing the finish.
- Synthetic Brushes: Clean these with warm, soapy water immediately after use to remove water-based emulsions.
- Natural Bristle Brushes: Use white spirit or a dedicated brush cleaner to dissolve oil-based gloss or satin finishes.
- Storage: Store cleaned brushes hanging vertically or lying flat to maintain their shape.
When storing leftover paint, wipe the rim of the tin clean so the lid creates an airtight seal. Store the tins in a cool, dry place away from direct sunlight or frost. A tightly sealed tin can last for several years, making future touch-ups quick and easy. For the best results in your next project, ensure you have the right quality hand tools ready to go.
Equip Your Next Project with Klevaro Decorating Essentials
Mastering how to get a professional paint finish yourself requires a combination of patient technique and high-quality application tools. The difference between a streaky DIY job and a flawless showroom finish often comes down to the grade of your brushes, rollers, and preparation equipment. Klevaro provides trade-standard tools designed for UK homeowners who want to achieve professional results without the professional price tag. Using the right gear reduces physical fatigue and ensures even paint distribution across every surface in your home.
The right kit transforms the DIY experience from a stressful chore into a satisfying creative process. We believe every room refresh should be a source of pride. Our commitment to quality means we only stock durable, reliable tools that stand up to the demands of a full home renovation. By choosing professional-grade equipment, you eliminate common frustrations like loose bristles in your paintwork or uneven roller textures.
High-quality tools also save you money over time because they are built to last through multiple projects. A well-maintained brush or a sturdy tray can be used for years, making your initial investment highly cost-effective. We focus on providing the UK market with essentials that bridge the gap between amateur hobbyist and professional decorator.
Shop Our Professional Tool Ranges
Preparation is the most vital stage of any decorating project to ensure the paint adheres correctly. Discover our hand and general tools for every prep task, including scraping, filling, and sanding. Once your walls are dry, upgrade your finish with our premium home decor accessories to pull the entire room together. You can also find the perfect gift for a new homeowner in our home and garden section, featuring items that turn a house into a home.
Join the Klevaro DIY Community
Stay updated with the latest decorating trends and technical advice by joining our community. Sign up for expert tips and exclusive deals on professional-grade equipment to help you save on your next project. Follow our social channels for more "how-to" inspiration and real-life project ideas from other UK decorators. We provide fast UK delivery on all orders, ensuring you have the supplies you need to start your room transformation this weekend.
Learning how to get a professional paint finish yourself is a rewarding skill that increases your confidence as a homeowner. There is a unique sense of pride in standing back to admire a perfectly painted room that you completed to a professional standard. With Klevaro essentials in your toolbox, you have the support and the gear to make every project a success.
Master Your Next Home Transformation With Confidence
Achieving a high-end look depends on thorough preparation and a strict application sequence. You now understand that how to get a professional paint finish yourself requires more than just a standard brush; it's about selecting the correct paint sheen and addressing common errors before the first coat dries. By following these 2026 professional standards, you'll save hours of rework and avoid frustrating streaks or lap marks on your walls.
Equipping your project with reliable gear ensures your hard work leads to a durable, stylish result. Klevaro is a trusted UK store providing quality guaranteed DIY tools designed to help you work efficiently. We offer fast UK delivery on all decorating essentials, so your next project can stay on schedule. You'll find everything from precision rollers to professional-grade tape in our curated range.
Ready to start your project? Shop our professional Tools & Equipment collection for a flawless finish and see the difference quality makes. You've got the skills and the plan. Now it's time to pick up your tools and create a beautiful space you'll enjoy all year round.
Frequently Asked Questions
How many coats of paint are needed for a professional finish?
You need two full coats of paint to achieve a professional-standard finish on most internal walls. While a single coat might look acceptable while wet, a second layer ensures even colour depth and hides any thin patches. If you're painting over a dark shade with a lighter one, or working on fresh plaster, you'll likely need a third coat or a dedicated primer.
Is it better to use a brush or a roller for interior walls?
Use a roller for large, flat wall surfaces and a brush for "cutting in" around edges, corners, and sockets. A medium-pile roller provides the smoothest finish on standard emulsion walls. Brushes are essential for precision, but relying on them for the whole wall often results in visible brush marks and an uneven texture.
How long should I wait between coats of emulsion paint?
Wait between 2 and 4 hours before applying a second coat of standard emulsion paint. While the surface might feel dry to the touch after 30 minutes, the paint needs more time to cure properly before it can take another layer. Check the manufacturer's instructions on the tin, as high humidity or cold rooms can extend this drying time significantly.
Can I get a professional finish using cheap paint?
Achieving a professional finish is significantly harder with budget paints because they contain fewer pigments and more fillers. High-quality trade paints offer better opacity, meaning you often need fewer coats to get a solid, rich colour. Investing in premium paint saves you time and effort while providing a more durable surface that resists scuffs. This is a vital step when learning how to get a professional paint finish yourself.
Why does my paint look patchy after it dries?
Patchy results usually happen because the paint was applied unevenly or the previous coat wasn't fully dry. This effect, often called "flashing," occurs when certain areas absorb more moisture than others, especially if you haven't used a primer on porous surfaces. Always stir your paint thoroughly for at least 2 minutes before starting to ensure the pigments are evenly distributed.
Do I really need to sand walls before painting them?
Yes, lightly sanding your walls is a crucial step for a professional result. It removes small imperfections like dust nibs and creates a "key" for the new paint to grip onto. Use a fine 120-grit sandpaper to smooth the surface, then wipe away all dust with a damp cloth before you start painting.
What is the best way to paint behind a radiator?
Use a long-handled mini roller, often called a radiator roller, to reach the wall behind the unit without removing it. These rollers have a thin profile and an extended reach of up to 50cm, allowing you to cover the area evenly. For a truly flawless look, it's often better to loosen the radiator brackets and tilt it forward, provided you have the right tools and help.
Should I paint the skirting boards or the walls first?
Paint your skirting boards and woodwork first, then move on to the walls. It's much easier to tape off the skirting boards once they're dry than it is to tape off a freshly painted wall. This sequence helps you understand how to get a professional paint finish yourself by ensuring crisp, clean lines where the two surfaces meet.
Leave a comment