


How to Choose the Right Drill for Walls: A Practical DIY Guide
That powerful new drill in your toolbox is almost useless without the right bit for the job. We know the feeling: you're ready to hang a new shelf, but you're worried about crumbling plaster or a bit that just won't bite. Knowing how to choose the right drill for walls is simpler than you think. For plasterboard, a standard cordless drill driver is all you need. For brick or blockwork, grab a combi drill with its hammer action and a masonry bit. If you're facing tough concrete, an SDS drill is your most reliable partner.
This practical guide will give you the confidence to match your drill, bits, and fixings to any wall material. You'll learn how to get secure, damage-free results every time you pick up your tools, turning DIY doubt into a job well done. We'll cover everything from identifying your wall type to selecting the perfect settings on your drill for a clean, professional finish.
Key Takeaways
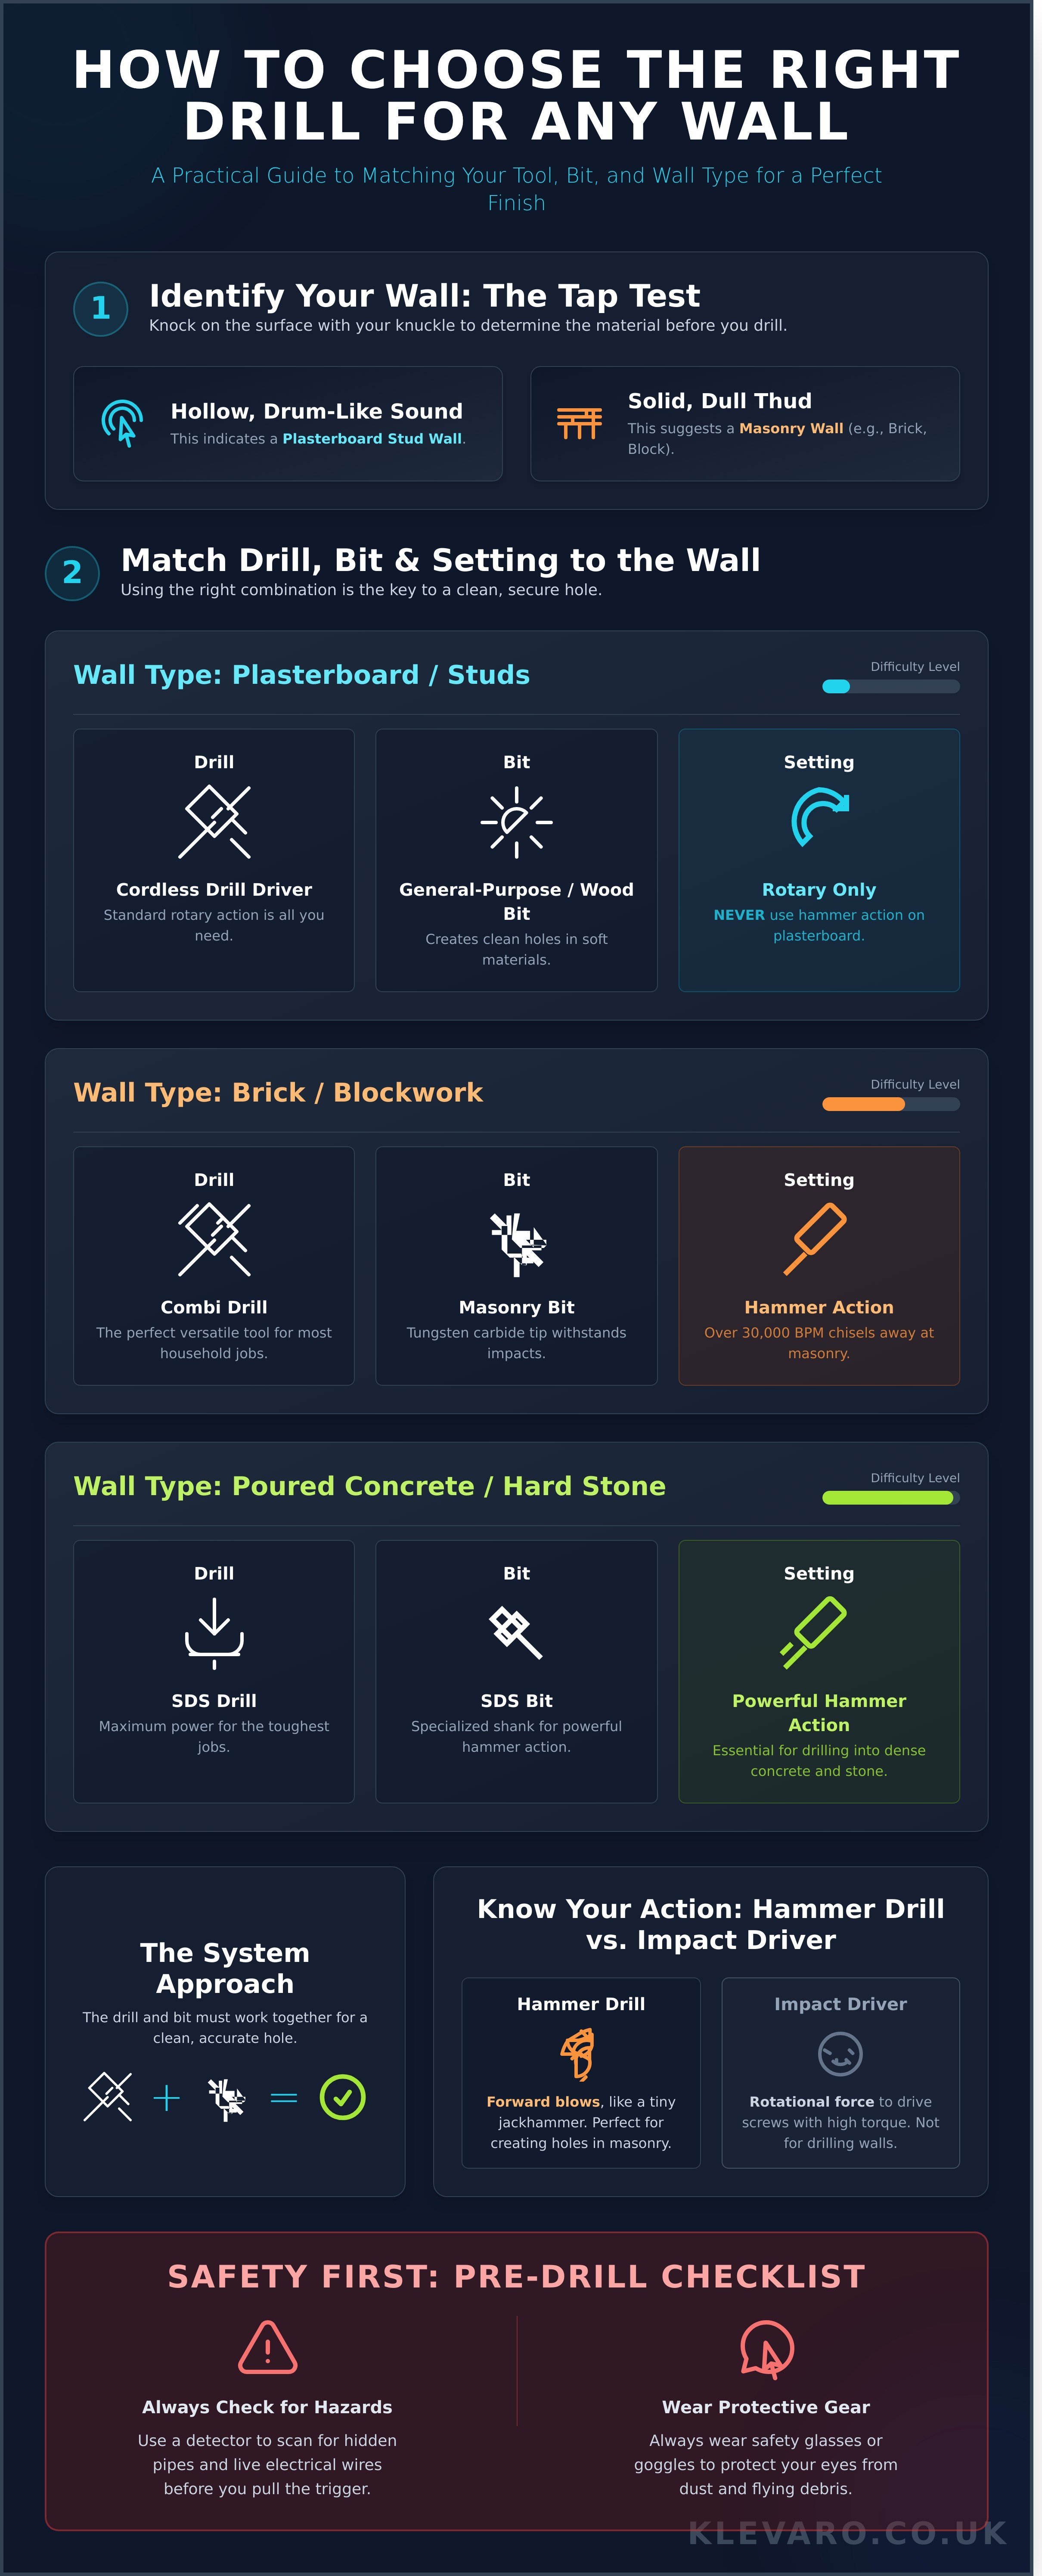
- Identify your wall type before starting; solid brick requires a different approach and tool setting than hollow plasterboard.
- Learning how to choose the right drill for walls involves matching the tool to the task-use a combi drill with a hammer function for masonry.
- Select the correct drill bit for the job, using a masonry bit with a winged tip for brick and a multi-material bit for varied household surfaces.
- Always check for hidden pipes and live wires with a detector before you drill and wear protective eyewear to prevent injury.
The Right Drill for Walls Depends on Your Wall Material and Drill Bit Choice
To drill into walls correctly, you must match your tool to the material. For hard surfaces like brick, stone, or concrete, use a drill with a hammer-action setting paired with a masonry bit. This combination is essential for success. For softer internal walls, such as plasterboard or timber studs, a standard cordless drill driver with a general-purpose bit is all you need. The hammer function provides the rapid, percussive blows required to pulverise hard masonry, allowing the bit to advance and create a clean hole.
Using the wrong setup, like a standard drill on brick, will burn out your drill bit and create an oversized, messy hole that won't securely hold a wall plug. Getting this right is the first step in learning how to choose the right drill for walls and achieving a professional finish for any DIY project, from hanging a picture to fitting a shelf.
Why Hammer Action is Essential for Masonry
The "hammer" setting on a modern combi drill engages a special percussion mechanism. Inside the drill, two ribbed discs spin against each other, creating thousands of tiny, high-speed forward impacts, often over 30,000 blows per minute (BPM). This action effectively chisels away at the masonry while the drill's rotation clears the debris. A standard rotary drill simply spins; against hard stone or brick, this only generates friction and intense heat, which quickly destroys the bit's cutting edge without making progress.
It’s also vital to distinguish between a Hammer Drill and an Impact Driver for wall tasks. A hammer drill delivers its blows straight forward, like a tiny jackhammer, which is perfect for creating holes. An Impact Driver, however, delivers its force rotationally to drive screws with high torque. It’s a fantastic tool for construction but is not designed for drilling into masonry.
The System Approach: Machine plus Bit
Your drill provides the power, but the drill bit does the real work. The machine is only half of the equation. Think of it as a system; the drill and the bit must work together perfectly to get a clean, accurate hole. A top-of-the-line SDS drill is useless against a concrete wall if you've fitted it with a bit designed for wood. For a deeper dive into the different models available, this overview of drill types provides excellent background information.
Matching the bit material to the wall's density is the key. Masonry bits feature a tough tungsten carbide tip designed to withstand the impacts of hammer drilling. Using a standard High-Speed Steel (HSS) bit on brick would blunt it in seconds. Understanding this simple pairing is fundamental to knowing how to choose the right drill for walls.
Quick-Start Guide: Which Tool for Which Task?
Here’s a simple breakdown to get you started on any project:
- Plasterboard & Timber Studs: A standard cordless drill driver is perfect. Pair it with a general-purpose or wood drill bit for clean, easy holes.
- Brick & Mortar Joints: You need a combi drill set to its hammer function. Use it with one of our quality masonry drill bits to ensure a sharp, precise hole for your wall plug.
- Poured Concrete & Hard Stone: For the toughest jobs, an SDS (Slotted Drive System) drill is the best choice. Its specialised chuck and bits are built for powerful, repetitive hammer action without slipping.
Identify Your Wall Type to Choose Between a Combi or SDS Drill
The first step in learning how to choose the right drill for walls is to identify what your wall is made of. Most UK homes feature one of three types: solid brick, breeze block, or internal stud walls covered with plasterboard. For over 90% of household jobs, from hanging a picture to putting up shelves, a versatile Combi drill is the perfect tool. An SDS drill is a heavy-duty specialist tool you'll only need for tough materials like dense concrete or old engineering bricks.
You can identify your wall with a simple tap test. Knock on the surface with your knuckle. A hollow, drum-like sound indicates a plasterboard stud wall. A solid, dull thud suggests you're dealing with a masonry wall, such as brick or block. This quick check gives you the crucial information needed to select the right drill and setting.
Common UK Wall Materials and Their Needs
Different walls demand different approaches. Using the wrong drill or setting can damage the wall, the drill bit, or the drill itself. Here’s a quick guide to the most common materials you'll encounter in UK homes.
- Solid Red Brick or Breeze Block: This is the most common material for external and load-bearing walls. You'll need a Combi drill switched to its hammer setting. This action adds a rapid, percussive punch behind the rotation, which helps the masonry bit chip away at the brick as it turns.
- Plasterboard over Studs: For internal walls, never use the hammer setting. Plasterboard is soft and brittle, and the hammer action will create a messy, oversized hole. Use a standard rotary drill setting and a general-purpose drill bit. A stud finder is a great investment to locate the wooden studs for a more secure fixing.
- Lath and Plaster: Found in many pre-1940s homes, these walls are extremely fragile. To drill without causing cracks, place masking tape over the spot you intend to drill. Use a sharp bit on a slow speed setting with the hammer function turned off. This helps prevent the plaster from vibrating and breaking away.
Combi Drill vs. SDS: Which Should You Buy?
Understanding the difference between these two drills will save you time, money, and frustration. One is a versatile all-rounder, while the other is a powerful specialist.
A Combi Drill is the best choice for almost every DIYer. It combines three functions in one tool: a standard drill for wood and metal, a screwdriver with adjustable torque, and a hammer drill for masonry. As the ultimate DIY workhorse, a good combi drill is a brilliant first investment. You can explore our reliable range of combi drills to find the perfect partner for your projects.
An SDS (Slotted Drive System) Drill is a significant step up in power. You should only consider buying one if you regularly drill large-diameter holes (over 12mm) into very hard materials like reinforced concrete, stone, or dense brickwork. Its specialised chuck and piston mechanism deliver a much harder hammer blow, making tough jobs feel effortless.
This level of performance is often required in commercial installations, for example when outfitting schools or daycare centers where fixtures must be exceptionally secure. For such projects, even the equipment being installed is specialized; European facilities, for example, often turn to suppliers like kigata.de for furniture and gear that meets stringent safety standards.
Finally, consider if you need a corded or cordless model. Modern cordless drills offer fantastic convenience and enough power for 95% of home tasks. However, for prolonged, heavy-duty work like using an SDS drill to chase channels in a brick wall, a corded model provides consistent, high-level power. This level of force requires careful handling, so always review official power drill safety tips before starting a big project.
Pair Your Drill with the Correct Masonry or Multi-Material Bit
Having the perfect drill is only half the battle. To successfully drill into any wall, you must pair it with the correct drill bit. For brick, concrete, or stone, a dedicated masonry bit is essential. These are easily identified by their arrow-shaped tungsten carbide tip, designed to pulverise hard materials. For general DIY, a versatile multi-material bit can handle everything from plasterboard to light brickwork. Most importantly, your drill bit's diameter must exactly match your wall plug's diameter for a secure fit. Never attempt to use a standard HSS (High-Speed Steel) or wood bit on a wall; the intense heat will destroy its cutting edge in seconds.
The secret to a masonry bit's power lies in its tip. Made from tungsten carbide, a compound with a hardness of around 9 on the Mohs scale (just below diamond at 10), the tip doesn't cut material away. Instead, it chips and grinds it into dust, which is then cleared away by the spiral flutes on the bit. This grinding action is why a hammer function is so effective, as it adds a powerful percussive force to the process.
For DIY enthusiasts tackling multiple jobs, multi-material bits are a fantastic time-saver. Their precisely ground tips and robust construction allow you to drill through a plasterboard wall, into a wooden stud, and even into light brick behind it without stopping to change bits. This makes them a practical choice when figuring out how to choose the right drill for walls with unknown internal structures.
Understanding Drill Bit Shanks and Tips
The shank is the end of the bit that fits into the drill's chuck. Most bits designed for Combi drills use a simple straight shank, which is held securely by the chuck's three jaws. Heavy-duty SDS drills, however, use an SDS-plus shank. These have special grooves that lock into the drill, allowing the bit to move back and forth with the hammer action. An SDS bit will not fit in a standard Combi drill chuck.
You can spot a masonry or multi-material bit by looking for the tungsten carbide tip. It appears as a small, often darker grey, spade-shaped piece of metal brazed onto the very point of the bit, distinct from the lighter steel of the main body.
Sizing Your Bit for the Perfect Wall Plug
Getting a secure fixing depends entirely on a snug fit. The golden rule is 1:1: the drill bit diameter must match the wall plug diameter. In the UK, this is made easy by standard colour-coding:
- Use a 5.5mm or 6mm bit for a red wall plug.
- Use a 7mm bit for a brown wall plug.
- Use an 8mm bit for a blue wall plug.
The size is usually stamped or etched onto the bit's shank (e.g., '6' or '7'). For larger fixings in hard materials, it helps to drill a smaller 'pilot hole' first. This prevents the larger bit from slipping and ensures your final hole is perfectly positioned. For a complete walkthrough on technique, Bob Vila offers a fantastic guide on how to use a drill that covers everything from holding the tool to applying correct pressure.
Choosing the right bit protects your drill from strain, prevents damage to your walls, and guarantees your shelves, pictures, and cabinets will be fixed securely. It’s a small detail that makes a huge difference to the quality and safety of your DIY projects.
Follow These Safety Steps Before You Pull the Trigger
You've picked the perfect drill and the right bit for the job. Now, it’s time to make that hole. But before you start, a few simple safety checks will guarantee your project is a success, not a disaster. Taking just five minutes to prepare protects you and your home from unexpected damage, turning a potentially tricky task into a straightforward win.
The most critical first step is to scan the area with a multi-purpose detector. These essential tools find wooden studs, metal pipes, and live AC wiring hidden behind your walls. To use one effectively, turn it on and calibrate it against a section of wall you know is clear. Then, slowly slide it across your drilling area. It will beep or flash to alert you to any hidden obstacles, helping you avoid a costly or dangerous mistake.
Avoiding Hidden Hazards in the Wall
Be extra cautious in 'danger zones'. As a rule of thumb in the UK, assume that electrical cables run vertically and horizontally from sockets and light switches, often within a 150mm corridor. Radiators are another hotspot, with copper pipes likely running directly below them to the floorboards. If you hit unexpected resistance while drilling, stop immediately. Don't try to force it. It could be a steel lintel, a wall tie, or a protective plate over a wire. Back the drill out and investigate before proceeding.
Dust Management and Precision
Drilling into masonry creates a surprising amount of fine dust. For a quick and mess-free solution, try the sticky note trick. Simply fold a Post-it note in half to create a small 'V' shaped ledge and stick it to the wall just beneath your mark. It will catch the majority of the dust, saving you a big cleanup job later.
Precision is just as important as power. Always hold your drill at a perfect 90-degree angle to the wall. A crooked hole means the wall plug won't sit flush, leading to a weak fixing for your shelf or picture frame. To get it right, start drilling at a slow speed. This creates a small pilot divot that stops the drill bit from wandering across the surface. Once the hole is started, you can increase the speed and apply firm, steady pressure.
This technique is a fundamental part of learning not just how to choose the right drill for walls, but how to use it like a professional for a flawless finish every time. Always wear safety glasses. It's a simple rule that can save your sight, as a tiny chip of brick or a metal shard travelling at high speed can cause serious injury.
Finally, let the tool do the work. Avoid leaning on the drill with all your body weight. Apply just enough firm, steady pressure to keep the bit engaged with the material. If you're using a combi drill on its hammer setting, the rapid tapping action is what breaks up the masonry, not brute force. Forcing it will only burn out the motor or snap the bit. Get kitted out with our reliable safety gear and detectors to tackle any project with confidence.
Build Your DIY Toolkit with Reliable Equipment from Klevaro
You now have the knowledge to select the perfect drill for any job, from putting up a simple picture frame to mounting a heavy television. But knowing what you need is only half the battle. The quality of your tools makes the difference between a successful, satisfying project and a frustrating afternoon of setbacks. Investing in reliable equipment isn't just about getting the job done; it's about getting it done right, safely, and with a professional finish you can be proud of.
At Klevaro, we offer a curated range of drills, drill bits, and accessories specifically selected for the UK homeowner. We've done the hard work of sourcing powerful, durable, and easy-to-use tools that you can depend on. Now that you understand how to choose the right drill for walls in your home, getting one delivered is the next step. Our fast UK delivery ensures you have the right gear in your hands exactly when inspiration strikes, so your project never has to wait.
We believe that every DIY task is an opportunity to improve your home and learn a new skill. That's why our support doesn't end when your package arrives. The Klevaro community is here to support you with expert tips, practical guides, and inspiration for every home improvement task you can imagine. We're your partner in every project.
Essential Additions for Your Tool Bag
A great drill is the star of the show, but its supporting cast is just as important for a flawless performance. Before you start drilling, ensure your toolkit is complete with a few key essentials that guarantee precision and make assembly a breeze.
- Your Drill's Best Friend: Perfectly straight holes are useless if the shelf you're hanging is crooked. That's why a high-quality spirit level is an absolute must-have. It ensures every picture, shelf, and cabinet is perfectly aligned for a clean, professional look.
- Final Assembly Gear: Drilling the hole is just the beginning. You'll need the right tools for the final fixings and assembly. Be sure you're ready by stocking up on essential hand tools like screwdrivers, pliers, and a reliable tape measure.
- Protect Your Investment: A quality power tool deserves proper storage. A sturdy tool bag or box keeps your new drill, batteries, and accessories organised, protected from dust and moisture, and ready to go for your next job.
Start Your Next Project Today
Armed with the knowledge of how to choose the right drill for walls and a clear idea of the tools you need, you're ready for anything. Whether you're finally hanging those family photos or tackling a full room renovation, the first step is getting the right equipment. Don't let a lack of tools hold back your creativity.
Your next project is waiting. Explore our full range of DIY tools and equipment to find everything you need to get started. From powerful combi drills to complete hand tool kits, we have the gear to help you fix, build, and create with confidence.
Ready for more practical advice and project inspiration? Join the Klevaro community today and get expert DIY tips delivered straight to your inbox. Let's build something great together.
Fix, Build, and Create with Confidence
You're now equipped with the practical knowledge of how to choose the right drill for walls. The process is straightforward: start by identifying your wall material. A combi drill is your versatile go-to for plasterboard and wood, while a powerful SDS drill is the undisputed champion for tough masonry like brick and concrete. Pairing your drill with the correct bit isn't just a recommendation; it’s the key to achieving a clean, professional finish every time.
Feeling ready to take on that next task? Build your toolkit with reliable gear that gets the job done right. Shop our range of high-quality DIY tools and equipment and find everything you need in one place. As a trusted UK store, we offer fast UK delivery on all our expertly curated DIY gear, so you can start your project sooner.
Go ahead, hang that heavy mirror or put up those new shelves. You’ve got this.
Frequently Asked Questions
Can I use a regular cordless drill for brick walls?
It's not recommended to use a regular cordless drill for brick. While it might manage a single hole in soft brick, you risk burning out the drill's motor from the strain. A combi drill with a hammer function or a more powerful SDS drill is the correct tool. These drills use a hammering action to power through tough masonry, making the job faster and safer for you and your tools.
What size drill bit do I need for a 6mm wall plug?
You need a 6mm drill bit for a 6mm wall plug. The rule is to always match the diameter of the drill bit to the diameter of the wall plug. This creates a snug hole that allows the plug to grip the sides securely once a screw is inserted. Using a bit that's too large will result in a loose fixing that can easily pull out under load.
How do I know if my wall is plasterboard or brick?
Give the wall a gentle tap with your knuckles. A plasterboard wall will sound hollow and resonant, while a solid brick or block wall will have a dull, low-pitched thud with no echo. For a definite test, drill a small pilot hole in an inconspicuous area. White, chalky dust means plasterboard; red or grey, gritty dust indicates you've hit masonry.
Why is my drill bit getting red hot and not going into the wall?
A red-hot drill bit is a clear sign you're using the wrong type of bit or the wrong drill setting for the wall material. This typically happens when a standard wood or metal bit is used on masonry. The friction creates immense heat without actually cutting the material. Switch to a dedicated masonry bit and ensure your drill's hammer function is activated if drilling into brick or concrete.
Do I need a hammer drill for plasterboard?
No, you absolutely do not need a hammer drill for plasterboard. In fact, you should always have the hammer function turned off. Plasterboard is a soft material that requires only a standard rotary drilling action. Using the hammer setting will be too aggressive, tearing a large, messy hole in the wall and making it impossible to get a secure fixing.
Is it better to have a corded or cordless drill for heavy masonry?
For demanding jobs on heavy masonry, a corded drill is almost always better. Corded models, especially SDS drills, provide consistent and higher levels of power that won't fade as a battery drains. This is essential for drilling into dense concrete or engineering brick. Understanding how to choose the right drill for walls often means matching the power source to the task's intensity.
What is the difference between a masonry bit and a metal bit?
The key difference is the tip. A masonry drill bit has a tough, spear-shaped tip made of tungsten carbide, designed to chisel and pulverise hard materials like concrete. A high-speed steel (HSS) metal bit has sharp, angled cutting edges designed to slice cleanly through metal. Using the wrong one will destroy the bit; a metal bit will dull instantly on brick, and a masonry bit will just skate across a metal surface.
Leave a comment