


How to Build a Simple Garden Shed: A Step-by-Step DIY Guide for 2026
A professional-grade garden shed doesn't require a professional builder; it just needs a modular plan. To learn how to build a simple garden shed, you must assemble four timber wall frames, secure them to a level treated-timber base, and finish with OSB cladding and waterproof mineral felt. This modular method uses 4x2 C16 treated timber for the structure and 12mm shiplap for the exterior. In 2026, most UK outbuildings under 2.5 metres tall don't require planning permission, making this a straightforward project for any back garden. Using a spirit level and 75mm wood screws ensures the structure remains square and durable against the elements.
It's natural to feel overwhelmed by timber grades or the fear of a leaky roof. We understand that getting the foundation right is the most stressful part of any DIY build. You'll learn the most efficient way to build a sturdy, simple garden shed from scratch using basic DIY tools and modular construction techniques. This guide walks you through the foundation, framing, and waterproofing steps to ensure your project is built to last. We'll also help you pick the right tool kit so you can tackle future home improvements with total confidence.
Key Takeaways
- Master the five core phases of construction to transform raw timber into a sturdy, functional outdoor storage space.
- Learn how to build a simple garden shed efficiently using modular techniques that a confident DIYer can complete in just two weekends.
- Identify the essential power tools and framing materials required to ensure your structure is perfectly level and built to last.
- Navigate UK-specific planning rules and height restrictions to ensure your new shed is positioned safely and legally.
- Discover professional weatherproofing and maintenance secrets to protect your timber from the elements and extend its lifespan.
The Quick Guide to Building a Simple Garden Shed
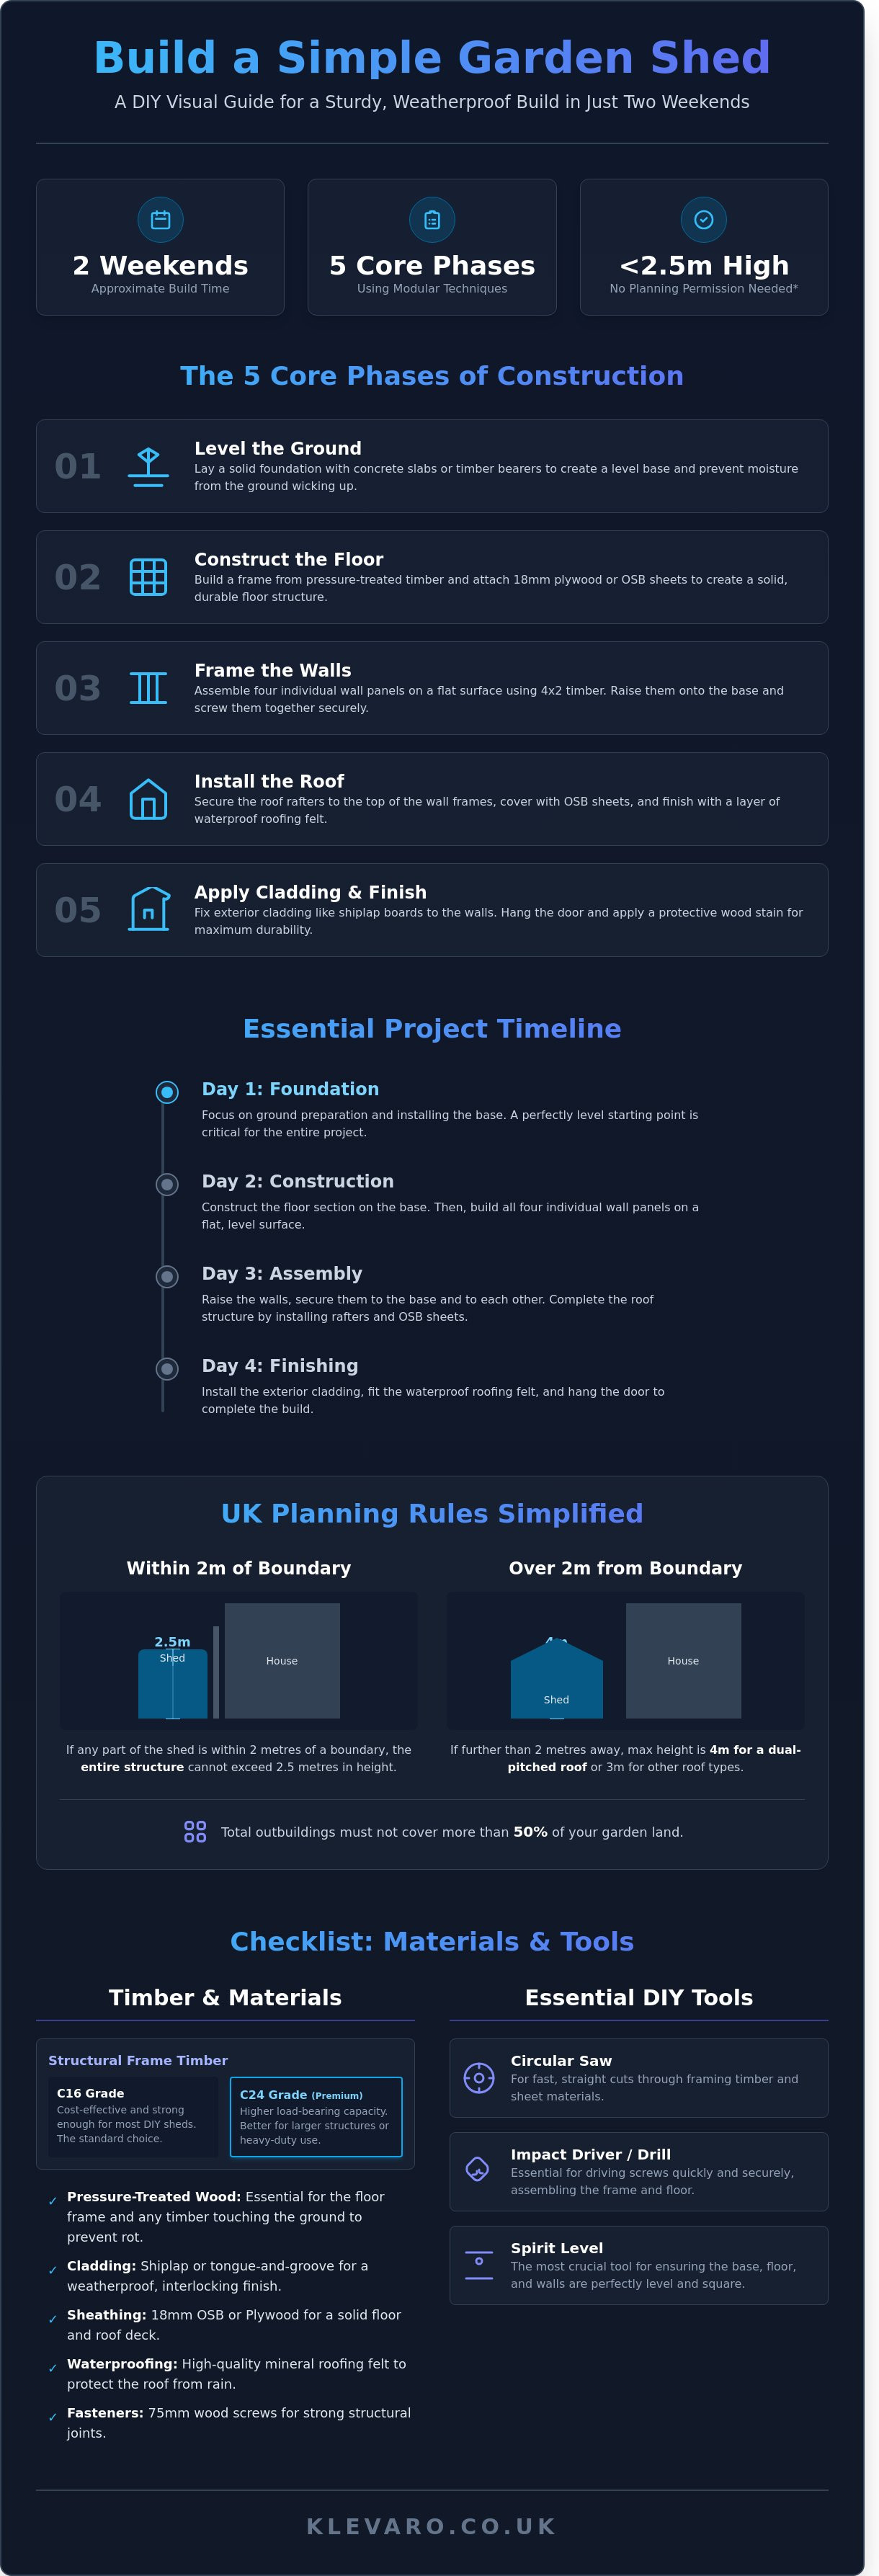
Learning how to build a simple garden shed involves five core construction phases: base preparation, floor construction, wall framing, roof installation, and cladding. A standard 6x4 or 8x6 foot structure takes a confident DIYer approximately four days or two dry weekends to complete. You will need pressure-treated C16 or C24 timber for the frame, OSB or plywood sheets for the flooring and roof, and standard DIY tools and equipment like a circular saw and impact driver. This modular building method ensures the structure remains square and sturdy. Building your own shed results in a more durable product than most budget shop-bought alternatives found in 2026.
The modular approach simplifies the process by breaking the build into manageable sections. You construct each component on a flat surface before assembling the final structure on your prepared base. This technique allows you to verify measurements and ensure everything is level before the walls are permanently fixed. Researching different types of shed construction helps you decide which style best fits your garden's aesthetic and storage needs. Using treated timber is essential for longevity; it prevents rot and ensures your shed survives harsh winter weather.
The 5-Step Build Summary
- Level the ground: Lay a solid foundation using concrete slabs or timber bearers to prevent moisture wicking.
- Construct the floor: Build a pressure-treated frame and attach 18mm plywood or decking boards for a solid base.
- Frame the walls: Build four individual wall panels on a flat surface and screw them together once positioned on the base.
- Install the roof: Secure roof rafters and OSB sheets, then finish with high-quality waterproof roofing felt.
- Apply cladding: Fix exterior tongue-and-groove or overlap boards and apply a protective wood stain for maximum durability.
Essential Project Timeline
- Day 1: Ground preparation and base installation to ensure a level starting point.
- Day 2: Floor construction and framing all four individual wall panels.
- Day 3: Raising the walls, securing them to the base, and completing the roof structure.
- Day 4: Installing cladding, fitting the roofing felt, and hanging the door.
A structured plan makes the process of learning how to build a simple garden shed much less intimidating. You can customise the dimensions to fit your specific garden layout while ensuring the materials used are of a much higher grade than pre-fabricated kits. Grab your hand and general tools and prepare to create a durable, stylish storage solution that will serve your home for years to come.
Planning and Legal Requirements for UK Sheds
Most UK garden sheds qualify as permitted development and don't require a formal planning application. You can build your shed freely if it's single-storey and has a maximum eaves height of 2.5 metres. If you place the structure within 2 metres of your property boundary, the entire building height must stay under 2.5 metres. Total outbuildings must not take up more than 50% of your garden land. Following these specific height and placement rules is the first step in learning how to build a simple garden shed that complies with the law.
Check Your Planning Permission Status
Building within 2 metres of a fence or wall limits your roof height to 2.5 metres to prevent overshadowing. For sheds placed further away, you can reach 3 metres for a dual-pitched roof or 4 metres for a gable roof. Always check with your local council if your home is in a Conservation Area or an Area of Outstanding Natural Beauty (AONB). You can find the full list of criteria on the official UK Planning Permission for Sheds website.
Selecting the Right Timber for Your Build
Structural framing usually requires C16 or C24 grade timber. C16 is the standard choice for most DIY sheds because it's cost-effective and strong enough for small spans. C24 timber is premium grade, offering higher load-bearing capabilities and fewer knots for larger structures. You must use pressure-treated, or tanalised, wood for the floor joists and base. This treatment forces preservatives deep into the grain to stop rot when the wood touches damp ground.
For the exterior, shiplap cladding offers a smooth, interlocking finish that sheds water effectively. Overlap cladding is a more traditional, budget-friendly option where boards simply sit on top of each other. Once you've chosen your materials, make sure you have the right high-quality hand tools to ensure precise cuts and a professional finish.
Positioning and Garden Flow
Pick a spot that's level and well-drained to protect the timber from standing water. A concrete or paved base is ideal, but a timber frame on gravel also works well. Leave at least 50cm of space around the entire perimeter of the shed. This gap allows you to paint the wood or clear debris without struggling against a fence or hedge.
Consider how the shed impacts the "flow" of your garden. Avoid blocking natural pathways or placing the shed in a spot that creates permanent shadows over your favourite plants. A well-placed shed should feel like a natural extension of your home rather than an obstacle. Taking time to map out the footprint with string and pegs helps you visualise the final result before you start digging.
Essential DIY Tools and Materials for Shed Building
Building a simple garden shed requires a reliable circular saw, an impact driver, and a high-quality spirit level. These three tools ensure your cuts are straight, your screws are secure, and your structure remains upright. You will need C16 grade framing timber, 12mm exterior plywood, and 70mm wood screws for the primary assembly. Safety equipment including EN388 rated gloves and impact-resistant eyewear is mandatory to prevent injury. Following this specific tool and material list is the fastest way to learn how to build a simple garden shed that lasts for decades.
A circular saw is the workhorse of any shed project. It allows you to make repeatable, square cuts in 2x4 framing timber much faster than a hand saw. For most DIY builds, a 165mm or 184mm blade provides enough depth to cut through thick joists in a single pass.
Impact drivers are superior to standard drills when you are assembling the main frame. They provide high-torque bursts that drive long wood screws into dense timber without stripping the screw heads. This tool saves your wrists from strain and ensures the joints are pulled tight for maximum structural integrity.
Accuracy is the difference between a professional finish and a leaning structure. You must use a spirit level to check the base before you even think about the walls. Even a 5mm discrepancy at the foundation can lead to a roof that won't fit or a door that won't close.
Primary Tool Kit Checklist
Precision is your best friend when learning how to build a simple garden shed from scratch. You should invest in a high-quality spirit level to keep the structure perfectly upright during every phase of the build. A sturdy 1200mm level is ideal for checking wall studs and floor joists.
Speed up your workflow by using a circular saw to handle the bulk of your timber processing. This tool makes light work of the dozens of cross-cuts required for the wall frames. You also need an 8m tape measure, a speed square for 90-degree angles, and a chalk line to mark long, straight cuts on your flooring sheets.
Materials and Hardware List
Your material list starts with pressure-treated framing timber, typically 2x3 or 2x4 inch, depending on your local weather conditions. Use C16 or C24 graded wood for the floor joists to ensure they can support the weight of your equipment. High-quality timber prevents warping as the shed seasons over the next few years.
- Exterior grade wood screws: Stock up on 50mm, 70mm, and 100mm lengths to handle different timber thicknesses.
- Roofing essentials: You need heavy-duty mineral felt, 13mm clout nails, and bitumen adhesive for a leak-proof finish.
- Door hardware: Choose three heavy-duty T-hinges and a padbolt to keep your belongings secure.
Preparation is the key to a stress-free build weekend. You can browse our full tools and equipment collection to prepare for your build and ensure you have every bit of gear ready before you start sawing. Having the right hardware on hand prevents mid-project trips to the shop.
Step-by-Step Construction Guide
Building a garden shed requires a systematic approach that prioritises a level foundation and a rigid frame. You start by laying pressure-treated timber bearers across levelled paving slabs to create a ventilated base. The floor is then constructed as a ladder frame with joists spaced every 400mm to support heavy loads. You assemble each wall panel flat on the floor, incorporating noggins for extra rigidity, before raising and clamping them into position. This method is the most reliable way to understand how to build a simple garden shed that withstands British weather.
The foundation is the most critical part of the build. Use a timber bearer system made from 4x2 pressure-treated timber, positioned on top of paving slabs that have been levelled using a spirit level and sharp sand. This setup keeps the floor frame off the damp ground and allows air to circulate, which prevents rot. Once the bearers are set, build your floor frame. Standard 400mm joist spacing ensures the floor won't bounce or sag when you move heavy garden equipment inside.
Framing the Walls and Roof
Construct your wall frames using the 'top plate' and 'sole plate' method. This involves two horizontal timbers with vertical studs spaced every 400mm to 600mm. For a simple pent roof, make the front wall 200mm taller than the back wall to create a natural slope for rain. Use a high-quality impact driver to secure the frames together and then fix them firmly into the floor joists. If you're building an apex roof, you'll need to notch the rafters so they sit flush on the wall plates.
Cladding and Finishing
Apply your cladding from the bottom up. Overlap each board by at least 25mm to ensure water runs off the structure without entering the frame. When you reach window or door openings, cut the boards flush with the internal timber using a fine-toothed saw. Install the door last, checking that the frame is perfectly square by measuring the diagonals. If the diagonal measurements are identical, your door will hang correctly and won't stick in damp weather.
Once the main structure is standing, check all corners for plumb using a spirit level before the final screws are driven home. Clamping the walls together at the corners before screwing allows you to make minor adjustments easily. This attention to detail ensures the roof fits perfectly and the entire shed remains stable during high winds. It's a satisfying process that transforms a pile of timber into a functional garden feature.
Explore our range of high-quality DIY tools and equipment to get started on your build.
Weatherproofing and Maintaining Your New Shed
Completing the final stages of how to build a simple garden shed requires immediate protection against moisture to prevent timber rot. Apply a high-quality wood preservative or exterior paint within 48 hours of assembly to seal the wood grain. You should install a guttering system with a 1:200 fall to direct rainwater away from the base. This prevents water from splashing back onto the lower cladding, which is the primary cause of damp in garden buildings. Keep a 30cm perimeter around the shed base clear of grass and weeds to allow for constant airflow. Perform a full inspection of the roofing felt every 12 months to catch small tears before they cause structural leaks. Following these maintenance steps extends the lifespan of your DIY project by 15 to 20 years.
- Apply protection early: Use a solvent-based preservative for deep penetration or a wax-based treatment for superior water shedding.
- Manage water runoff: Fix 75mm gutters to the eaves to stop ground saturation around the foundations.
- Monitor the roof: Look for bubbling or lifting in the felt after storms or high winds.
- Ensure ventilation: Air circulation prevents the buildup of condensation and mould inside the shed.
Roofing and Sealing
Creating a watertight roof is the most critical part of understanding how to build a simple garden shed that lasts. When laying the felt, overlap the pieces by at least 100mm and use 13mm galvanised clout nails spaced every 100mm along the edges. At the corners, fold the felt neatly like a gift wrap and secure it with extra nails to prevent the wind from getting underneath. Don't leave gaps around the entry points; apply a bead of external-grade silicone sealant around window frames and door trims to block driving rain. For the final touches, explore our garden accessories to find the best hardware and finishing details for your build.
Long-term Maintenance Tips
Your shed requires a fresh coat of treatment every 2 to 3 years to maintain its resistance to UV rays and rain. Sunlight breaks down the protective resins in wood, so if the colour starts to fade, it's time to re-coat. Check the door alignment twice a year; timber expands in winter and shrinks in summer, which can cause latches to stick. Apply a multi-purpose oil to the hinges every 6 months to prevent rust and ensure smooth operation. To keep the interior as functional as the exterior, browse our home and garden storage solutions to organise your tools and keep them off the floor. A tidy shed is easier to inspect for signs of damp or pests.
Start Building Your Custom Garden Storage Today
You now have a reliable blueprint for how to build a simple garden shed that lasts well beyond 2026. Most UK projects don't require planning permission if the total height stays under 2.5 metres. Using high-quality treated timber and a level base will protect your structure from damp for over 10 years.
Successful DIY projects require dependable equipment that won't let you down mid-build. We provide Fast UK Delivery on all essential tools so you can start your project this weekend. Every product comes with a Quality Guaranteed stamp, ensuring you work with the same trusted brands used by professionals.
Join the growing Klevaro community for expert DIY advice and inspiration for your next home upgrade. Build your shed with confidence—explore our professional DIY Tool Collection. You've got the plan and the knowledge; now it's time to get started.
Frequently Asked Questions
Do I need a concrete base for a simple garden shed?
You don't always need a concrete base for a small structure, but you must have a level, stable foundation. For sheds under 8ft x 6ft, a pressure-treated timber subframe or heavy-duty plastic grids filled with gravel are excellent alternatives to solid concrete. These options provide 100% drainage and prevent the wood from rotting. Ensure the ground is cleared of 50mm of topsoil before laying your chosen base.
What is the cheapest wood to build a shed with in the UK?
Pressure-treated C16 softwood, typically pine or spruce, is the most affordable timber for UK builders in 2026. It's roughly 20% cheaper than cedar or larch while offering high durability against the British weather. You can source 47mm x 75mm lengths for framing at competitive prices from local merchants. Always check for the FSC certification to ensure your materials are sustainably sourced.
How do I make sure my garden shed is 100% waterproof?
To make sure your garden shed is 100% waterproof, install a breathable membrane under the cladding and use 40kg mineral-faced roofing felt. Overlap the felt by at least 75mm at the seams and secure it with 13mm clout nails to prevent leaks. Adding a 50mm drip edge around the roof perimeter ensures rainwater runs away from the timber walls. Treat the exterior with a water-repellent preservative every 24 months to maintain its seal.
Can one person build a garden shed alone?
You can build a shed alone by using quick-release clamps and temporary timber props to hold panels in place during assembly. While a 6ft x 4ft shed takes roughly 12 to 14 hours for a solo builder, it's a manageable project if you prepare your components in advance. Use a spirit level frequently to ensure the structure remains plumb as you work. For safety, always assemble the roof sections on the ground before lifting them into position.
How long will a DIY wooden shed last?
A DIY wooden shed typically lasts 20 years if you use pressure-treated timber and maintain the roof felt. Structures built with 12mm tongue and groove cladding often outlast cheaper overlap versions by 5 to 7 years. To reach this lifespan, apply a fresh coat of wood preserver every 3 years and clear debris from the roof. Ensuring a 100mm airflow gap beneath the base prevents rising damp from rotting the floor joists.
What size timber should I use for a shed frame?
For a standard shed frame, 38mm x 63mm CLS timber is the most practical and lightweight choice. If you're learning how to build a simple garden shed with a heavy roof, upgrade to 47mm x 75mm joists for extra stability. Space your vertical studs at 400mm or 600mm intervals to provide a solid nailing surface for your exterior cladding. This sizing ensures the structure can withstand wind speeds of up to 50mph without warping.
Is it cheaper to build a shed or buy a kit?
Building a shed from scratch is usually 25% to 35% cheaper than buying a high-quality kit. You'll save approximately £200 on a standard 8ft x 6ft structure by sourcing raw materials yourself and avoiding retail markups. While a kit offers convenience, a DIY build allows you to use thicker 12mm cladding and better quality 47mm framing for the same price as a basic store-bought model. This approach also gives you total control over the final design and durability.
Leave a comment