


DIY Shelving Ideas for Small Spaces: Maximising Every Square Inch in 2026
Your floor space isn't the problem; it's your walls that are underperforming. Effective diy shelving ideas for small spaces involve utilizing vertical height, corner gaps, and recessed alcoves to increase storage capacity by up to 40% in restricted rooms. Successful projects in 2026 rely on floating timber shelves, ladder units, and modular pegboard systems installed with a high-quality combi drill and a spirit level. These solutions clear clutter from the floor and turn unused wall area into functional storage. Using the correct wall anchors for your specific wall type ensures these structures remain stable and secure.
We all know the frustration of a cluttered room where floor space is a luxury you simply don't have. You'll discover practical, space-saving DIY shelving projects and the exact tools you need to execute them perfectly in any small home. We'll explore the best materials for durability and the step by step methods to build confidence with your power tools.
Key Takeaways
- Master the art of vertical storage by reclaiming unused "air space" and door frames with these creative diy shelving ideas for small spaces.
- Learn how to choose between sleek floating shelves for a minimalist look and heavy-duty bracket systems for maximum weight capacity.
- Follow a professional five-step installation process to ensure every shelf is perfectly level, secure, and safe for your home.
- Discover expert styling tips, including the "rule of three," to transform functional storage into a beautiful and clutter-free display.
- Understand why high-quality hardware and the "measure twice, cut once" rule are essential for professional-grade DIY results in tight quarters.
Effective DIY shelving for small spaces relies on verticality, shallow depth, and utilising overlooked areas like door frames or wall studs.
Small-space storage requires reclaiming "dead" air space and wall voids that standard furniture cannot reach. Successful diy shelving ideas for small spaces prioritise vertical height over floor footprint to keep walkways clear. You must use three core design pillars: verticality to reach the ceiling, transparency via open shelving to maintain light flow, and multi-functionality to serve multiple needs. Shallow shelves measuring 15cm to 20cm are often more effective than deep units because they prevent items from being hidden at the back. These slim profiles allow light to reach the corners of the room, preventing the "boxed-in" feeling common with bulky wardrobes. Micro-shelving in corners or above door frames turns 100% of available wall area into usable storage for books, plants, or jars. Precise alignment and custom dimensions ensure these additions look like architectural features rather than cluttered afterthoughts.
The "Answer First" approach to small-space storage
DIY shelving is the most effective way to manage storage in compact UK flats where every millimetre counts. Standard furniture often leaves gaps of 10cm to 30cm that go to waste. By building your own, you can match the shelf type to specific wall constraints, such as mounting brackets directly into wall studs for heavy loads. High-quality Adjustable shelving systems allow you to reconfigure your storage as your needs change throughout 2026. Precision is the key difference between a messy DIY project and a professional finish. Using a spirit level and accurate measurements ensures your shelves look integrated into the room's design. This tailored approach allows you to utilise the full height of a room, creating storage in areas that are traditionally ignored. It's about turning a cramped flat into a functional, organised home without sacrificing style.
Why DIY beats off-the-shelf furniture for compact living
Mass-produced furniture rarely fits the awkward alcoves or slanted ceilings found in older UK properties. Custom DIY projects allow you to build around obstacles like pipes or radiators while maximising height. You can save money by sourcing your own timber and investing in high-quality DIY tools that last for years. Custom-built shelves offer better longevity because they are secured directly to the building's structure. This creates a permanent, sturdy solution that won't wobble like cheap flat-pack alternatives. You gain the freedom to choose materials that match your existing decor, turning a simple storage solution into a stylish home feature. Building your own shelves also means you can choose sustainable materials, which is a growing priority for homeowners in 2026.
Vertical storage solutions turn unused wall height into functional display and storage zones.
Vertical storage maximizes floor space by shifting the storage footprint from the ground to the walls. Floor-to-ceiling units, over-door shelves, and alcove installations utilize the 2.4-meter average ceiling height in UK homes to increase storage capacity by up to 40% without encroaching on living areas. These diy shelving ideas for small spaces work by converting "dead air" into functional zones for books, media, and decor. Renters can use leaning ladder shelves to avoid wall damage, while homeowners can install permanent floating shelves in alcoves to reclaim lost square footage.
A floor-to-ceiling library creates a dramatic focal point and houses hundreds of items in a footprint just 30cm deep. In wet rooms, over-the-toilet shelving provides three extra tiers of storage for towels and toiletries in spaces that are usually wasted. Similarly, over-the-sink racks in kitchens keep drying dishes or spices off the primary countertop, freeing up essential food prep areas. These solutions ensure every centimetre of wall height contributes to an organised home.
For those living in rental properties, leaning ladder shelves are a game-changer. These units provide multiple tiers of storage by resting against the wall at a slight angle, requiring zero drilling or permanent fixtures. They're easy to move between rooms and won't jeopardise a security deposit. If you're ready to start your project, explore our hand and general tools to find the right gear for the job.
Maximising the space above doors and windows
The gap between a standard door frame and a 2.4-meter ceiling often measures between 30cm and 50cm. This is the perfect spot for long-term storage of items you only need twice a year, such as holiday decorations or seasonal gear. Start by measuring the clearance carefully; you'll need at least 25cm of height to make the shelf practical for storage boxes.
Choose lightweight timber or 12mm plywood to keep the load manageable at height. Using heavy materials in high-altitude zones can be dangerous if the fixings aren't industrial grade. Always use a spirit level to ensure your long spans remain perfectly horizontal. This prevents the shelf from sagging or tilting, which could cause items to slide off over time.
Utilising alcoves and chimney breasts
Alcoves on either side of a chimney breast offer a natural pocket for storage that doesn't protrude into the room. You can install floating diy shelving ideas for small spaces by screwing 25mm x 25mm wooden cleats into the side and back walls to support the shelf board. This method provides a "built-in" look that adds value to the property while providing robust support for heavy books.
Most UK houses built before 1950 have walls that aren't perfectly square. You'll need to use a technique called "scribing" to trim your timber for a flush fit against uneven plaster. Keep these specific tools ready for fine-tuning lengths in tight spots:
- Block plane: For shaving millimetres off the edge of the timber.
- Hand saw: For making precise cross-cuts.
- Wood rasp: For smoothing down corners that catch on the wall.
- Combi square: To check the internal angles of the alcove.
Floating shelves provide a streamlined look while bracketed systems offer superior weight capacity for heavy items.
Floating shelves are the most effective diy shelving ideas for small spaces when you want to maintain an open, airy feel, but bracketed systems are the essential choice for any load exceeding 15kg. Floating shelves use internal support rods to create a "invisible" connection to the wall, which eliminates visual clutter in tight rooms. Bracketed systems use external supports to transfer weight directly into wall studs, making them the standard for heavy kitchen appliances or book collections. For narrow 80cm-wide hallways, 5cm deep picture ledges provide a functional storage alternative that doesn't impede foot traffic. Industrial pipe shelving offers a high-strength DIY solution, capable of supporting 40kg or more when constructed with 20mm steel fittings.
Choosing between these two systems depends on the room's purpose. In a small living area, floating shelves keep the walls looking "quiet" and spacious. In a pantry or utility room, the strength of a visible bracket is more valuable than the minimalist look. If you're working with a wall that lacks traditional timber studs, such as a modern apartment partition, bracketed systems with specialized toggle bolts are often safer than floating kits.
Floating shelves: The minimalist choice
True floating shelves require an internal bracket system, usually consisting of a backplate with two or more protruding steel rods. You must slide the hollowed-out shelf over these rods to achieve the seamless look. Most standard floating kits have a weight limit between 5kg and 10kg. They aren't suitable for heavy ceramic stacks or cast iron cookware, as the leverage can cause the shelf to sag or pull away from the plasterboard.
Installation requires high levels of accuracy. You should use precision tools to ensure you drill perfectly perpendicular holes into the wall. Even a 2-degree tilt in your drill bit will result in a shelf that slants downward. If you're building your own floating shelf from timber, a 12mm steel rod is the standard diameter for most internal supports.
Bracketed systems: Strength and style
Visible brackets offer the most reliable support for heavy-duty storage. When you mount brackets directly into wall studs, the shelf can easily handle 30kg or more depending on the timber thickness. You can find decorative metal or timber brackets that function as home decor, allowing the hardware to become a design feature rather than a hidden necessity. Ornate brass or industrial matte black finishes are popular choices for 2026 interiors.
- Spacing: Space your brackets no more than 60cm apart for 18mm thick MDF to prevent the board from bowing under weight.
- Material: Solid oak or pine can handle bracket spacing up to 90cm, provided the brackets are rated for the total load.
- Stud Finding: Always use a stud finder to locate the vertical timber frames behind your plasterboard. Screwing into a stud provides 4 times more holding power than using a standard wall plug.
For a modern industrial look, you can build your own bracket system using 1/2 inch black iron pipes and floor flanges. This method is incredibly popular for DIY projects because it's nearly impossible to break and fits perfectly in small, rustic-themed apartments. These pipe systems allow for deep shelves that can hold heavy electronics or large kitchen mixers without the risk of collapsing.
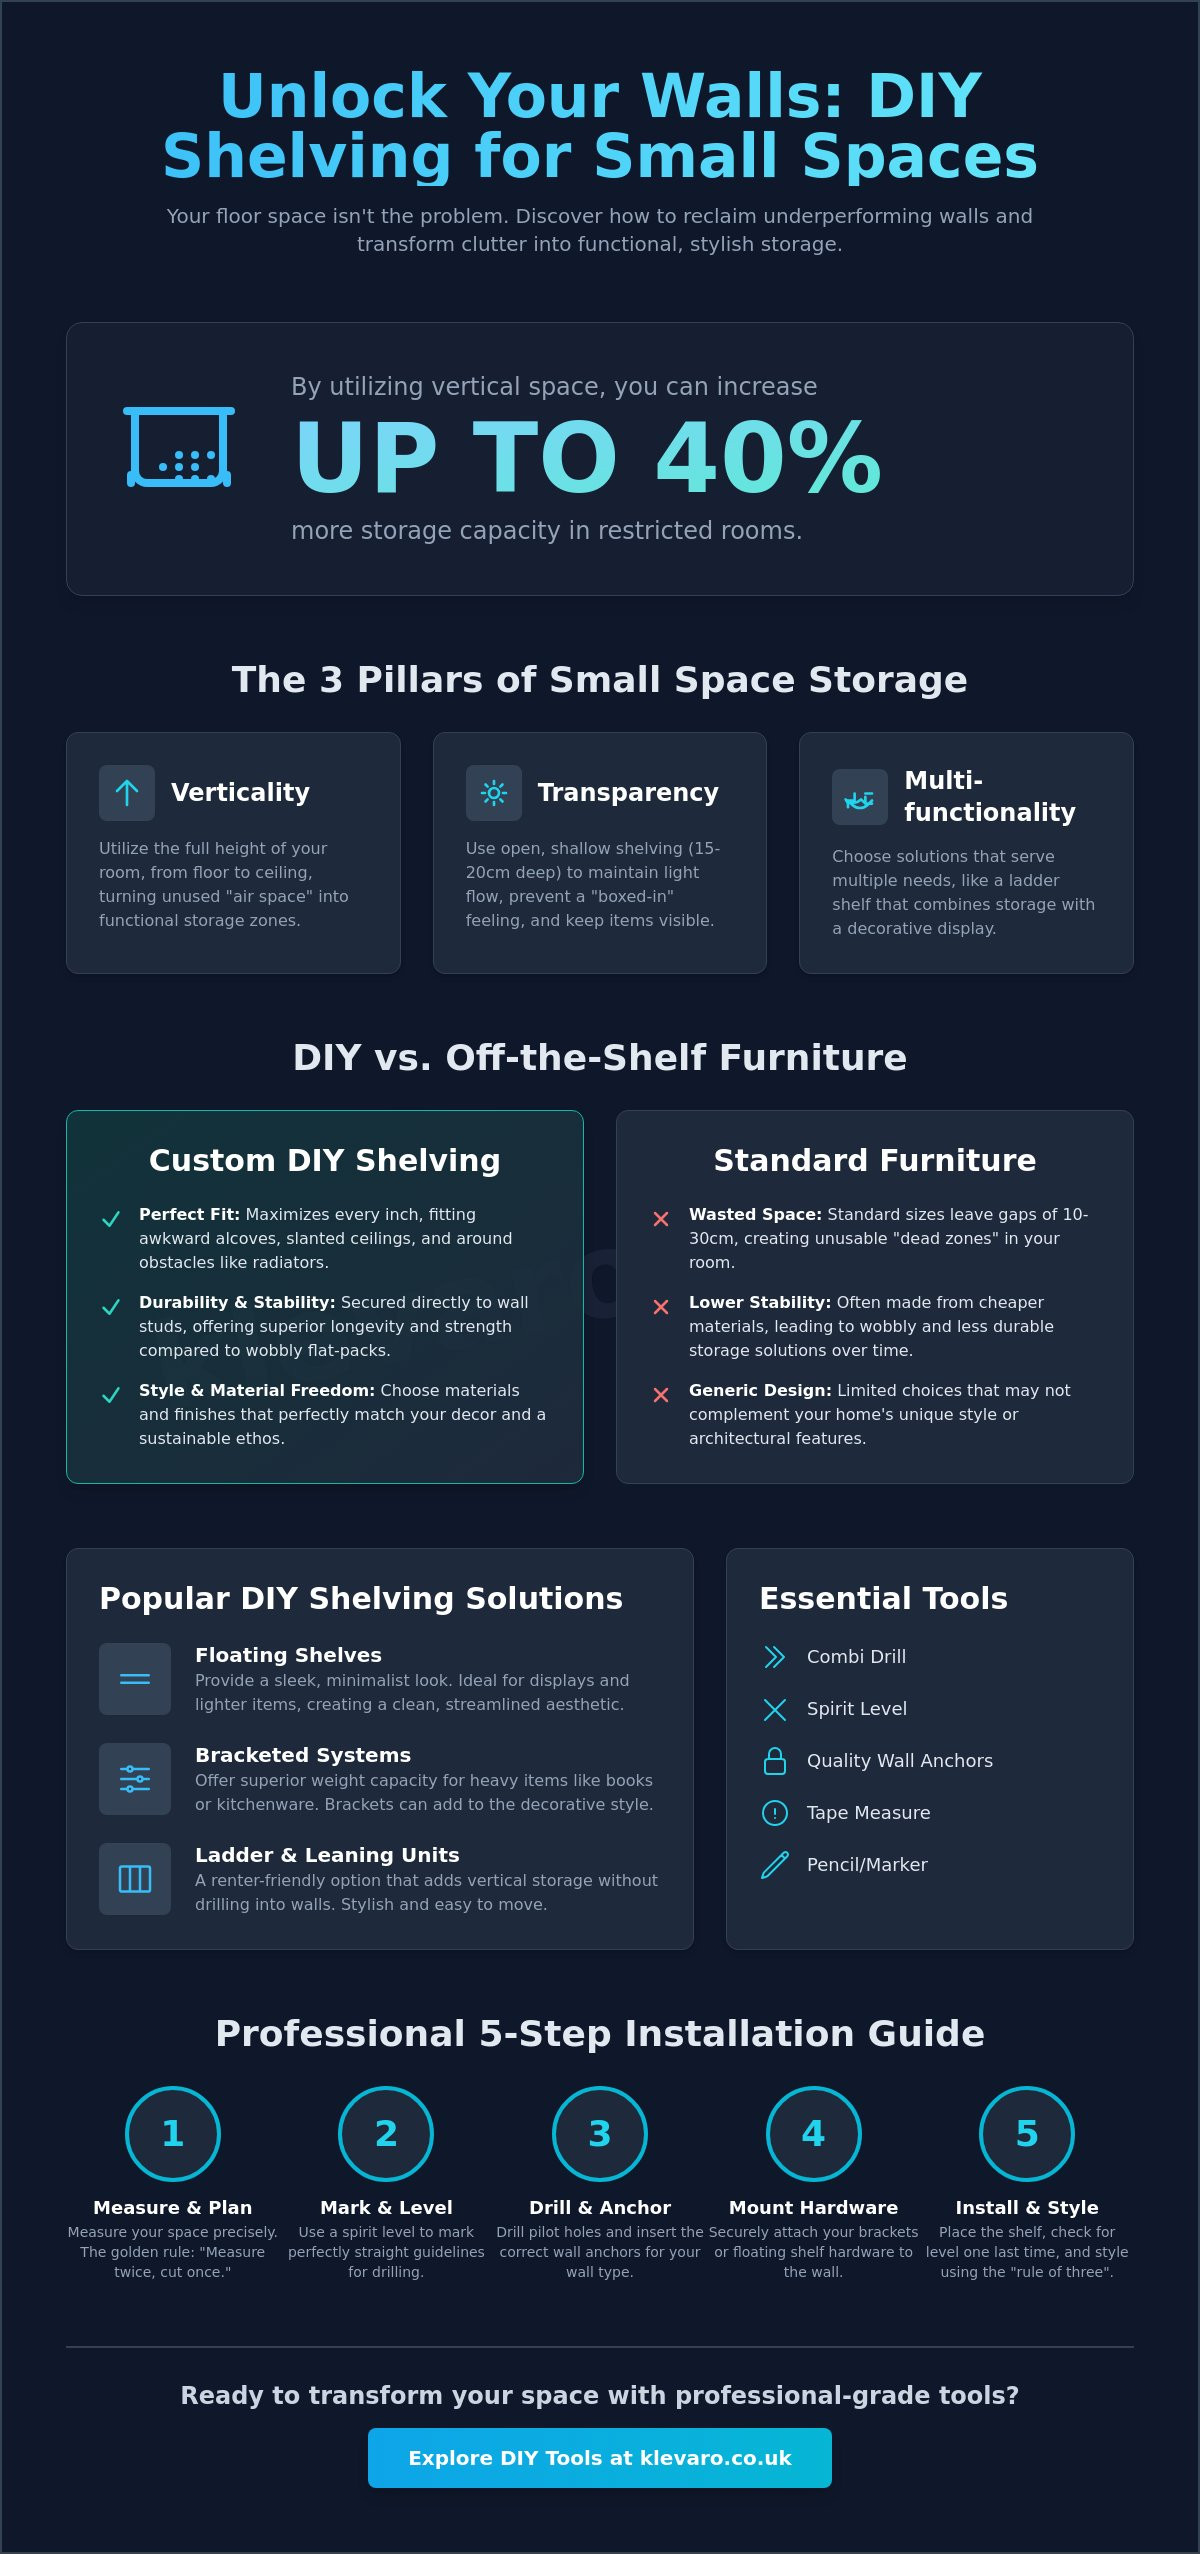
Precise measurement and the right power tools are critical for safe and level shelf installation.
Successful DIY shelving requires a structured five-step process: wall checking, measuring, drilling, fixing, and leveling. You must identify your wall type and use a stud finder to locate safe mounting points before making any holes. Precision is vital for diy shelving ideas for small spaces because even a 2mm error can make a compact shelf look crooked. Always use a spirit level to ensure the bracket is perfectly horizontal. Choosing the correct wall plug for either masonry or plasterboard ensures the shelf can support its intended weight safely.
The "measure twice, cut once" rule is your best friend when working in tight corners. Small gaps leave no room for error. First, check the wall for hidden pipes or wires using a digital detector. Next, mark your drill points with a pencil after using a tape measure to verify the exact height. Once you drill the holes, insert the appropriate wall plugs. Fix the brackets securely and perform a final leveling check before placing the shelf board.
Masonry walls made of brick or stone require a hammer action drill and masonry bits to penetrate the hard surface. Hollow plasterboard walls are different. You must locate the wooden studs for heavy loads or use specialized hollow-wall anchors for lighter items. Using the wrong fixing can lead to the shelf pulling away from the wall, which causes significant damage.
Essential tools for a professional shelving finish
Getting a clean look starts with the right gear. A quality hand and general tools kit should include a 5-metre tape measure, a carpenter's pencil, and a reliable spirit level. While a hand saw works for basic tasks, using a circular saw provides the perfectly straight, splinter-free edges needed for professional results. You also need a versatile combi drill. Ensure you have a set of sharp drill bits. Use masonry bits for brick and high-speed steel (HSS) bits for timber studs.
Safety and wall-fixing selection
Safety is the priority when drilling into any internal surface. Always run a pipe and cable detector over your intended drilling spot to avoid hitting electrical lines or water pipes. The type of wall plug you choose depends entirely on the substrate. Use standard plastic rawl plugs for solid brick. For hollow plasterboard, use toggle bolts or metal speed plugs that expand behind the board to grip the surface. These fixings provide the necessary tension to keep diy shelving ideas for small spaces stable and secure.
Explore our range of power tools and equipment to get started on your next project today.
Choosing high-quality DIY tools and stylish hardware ensures your small-space shelving is both durable and decorative.
Using professional-grade tools and premium hardware creates a secure foundation for any storage project. Successful diy shelving ideas for small spaces rely on a balance between structural integrity and aesthetic appeal. You can achieve this by selecting robust brackets and high-quality timber that withstands daily use. Once the build is complete, styling with intentionality prevents the area from feeling overcrowded. Incorporating natural elements and a cohesive color palette transforms basic shelves into a focal point.
Moving from the construction phase to styling is where your project truly comes to life. The rule of three is a reliable design technique for arranging objects. Grouping items in odd numbers creates visual interest and prevents a cluttered appearance. You can pair a vertical book, a small plant, and a decorative object to achieve a balanced look that feels curated rather than messy.
Integrating greenery softens the hard lines of wooden shelves. A trailing ivy or a small succulent adds texture and organic color to your display. You can also elevate the atmosphere by adding items from our home fragrance collection. Scented candles or reed diffusers make the space feel intentional and lived-in rather than just a functional storage spot.
Start your next project with confidence by using our curated tools and equipment. Having the right gear ensures your measurements are precise and your fixings are secure. High-quality tools make the process enjoyable and produce a professional finish every time.
Styling your shelves for a clutter-free feel
Effective styling requires leaving plenty of negative space. Empty gaps between objects allow the eye to rest and prevent the room from feeling boxed in. This is a vital part of diy shelving ideas for small spaces as it maintains an airy atmosphere.
Use uniform storage boxes to hide smaller, unsightly items like cables or loose paperwork. This creates a clean visual line across the shelf. For a truly relaxed vibe, consider adding spiritual wellbeing items like incense burners or crystals. These small touches turn a functional shelf into a personal sanctuary.
Maintaining your DIY creations
Long-term durability depends on regular maintenance. Check your wall fixings every six months to ensure they remain tight, especially in high-use areas like hallways or kitchens. Tightening a loose screw early prevents damage to your walls and keeps your belongings safe.
Protect your timber from moisture in kitchens or bathrooms by applying high-quality oils or waxes. These finishes prevent the wood from warping and keep the grain looking vibrant. Remember that small spaces aren't a limitation; they are a creative opportunity to showcase your personality through smart design.
Transform Your Home with Smart Vertical Storage
Maximising your living area in 2026 requires a strategic approach to wall space and precision tools. Successful diy shelving ideas for small spaces focus on utilising vertical height and shallow depths to keep walkways clear. By choosing high-quality hardware and bracketed systems from trusted brands like Rolson, you ensure your storage handles heavy items safely while looking stylish.
Accuracy is the most important factor for a professional finish. Using the right spirit levels and power tools prevents slanted shelves and wall damage. You can easily turn unused door frames or wall studs into functional zones with the right preparation and equipment. It's an achievable way to make every square inch of your property work harder for you.
Explore our full range of DIY tools and equipment to start your shelving project today. We offer Fast UK Delivery on all essential gear and provide Quality Guaranteed products to help you build with confidence. Join the Klevaro community for expert project tips and start creating a more organised, beautiful home today. You've got the vision; we've got the gear to help you make it happen.
Frequently Asked Questions
What is the best type of shelf for a very narrow hallway?
Picture ledges or ultra-shallow floating shelves are the most effective choice for narrow hallways. These typically measure between 5cm and 10cm in depth, allowing you to display art or small essentials without obstructing the walkway. Mount them at eye level to keep the floor area clear and the space feeling open. This keeps your home looking stylish while maintaining a safe, clear path.
How much weight can a DIY floating shelf actually hold?
A DIY floating shelf can hold up to 20kg on a solid brick wall if you use high-quality steel rods. On plasterboard, this weight capacity often drops to 5kg or less because the material is less dense. You should always use a stud finder to secure your brackets into the timber frame for maximum stability. These diy shelving ideas for small spaces stay secure only when matched with the correct wall fixings.
Do I need a permit to install shelves in a UK rental property?
You don't usually need a government permit, but you must check your specific UK tenancy agreement for "minor alterations" clauses. Most standard contracts allow for shelving if you ask for written permission from your landlord or letting agent first. Ensure you use the correct wall plugs for the job. Be prepared to fill and paint the holes when you move out to ensure you get your full deposit back.
Which drill is best for installing shelves into brick walls?
A combi drill or an SDS drill with a hammer function is the best tool for drilling into brick or masonry. This setting provides the percussive force needed to break through tough materials that a standard rotary drill cannot handle. Always pair your drill with a high-quality masonry bit for a clean, precise hole. This prevents the surrounding brick from crumbling and ensures your wall plugs fit tightly for a professional finish.
How do I stop my DIY shelves from sagging in the middle?
Place your brackets no more than 60cm apart for a standard 18mm thick wooden shelf to prevent sagging. If you are storing heavy items like books, reduce this distance to 40cm or choose a thicker timber to keep the shelf level. Sagging happens when the material is too thin or the span between supports is too wide. Using more brackets is a simple way to create durable, reliable diy shelving ideas for small spaces.
Can I build shelves into the stud space inside a wall?
Yes, in-wall shelving is a brilliant space-saver that uses the 10cm of hidden depth between vertical timber studs. You can create these by removing a section of plasterboard, making them perfect for bathroom toiletries or spice racks. You must use a detector to ensure no electrical wires or plumbing pipes run through that specific section before you cut. It's a clever way to transform empty wall cavities into practical storage solutions.
Leave a comment