


Best Wood Filler for Exterior Repairs UK: Top Choices for 2026
What if your exterior wood repairs could outlast the next five British winters without a single crack? The best wood filler for exterior repairs uk is a high-performance two-part chemical wood filler. These polyester-based products are the top choice for 2026 because they bond permanently to timber and resist the UK's 80% average winter humidity. Unlike standard ready-mixed fillers, two-part versions cure in under 30 minutes and don't shrink or crack when the temperature drops. For smaller, decorative gaps, a flexible acrylic filler provides the necessary movement to keep your paint finish intact.
It's frustrating when a repair you worked hard on fails after just one wet season. We understand the worry that hidden rot might spread if the seal isn't perfect. You'll discover the most durable, weather-resistant wood fillers for UK exterior repairs and learn exactly how to apply them for a professional finish. We'll walk you through the top-rated products on the market to give you the confidence to fix your home like a pro.
Key Takeaways
- Identify why two-part polyester resin is the best wood filler for exterior repairs uk for a durable, weather-resistant finish that won't shrink.
- Understand the key differences between polyester, epoxy, and water-based fillers to choose the right drying speed and strength for your specific task.
- Discover the professional two-step method—including the "secret" use of wood hardener—to stop rot and guarantee long-lasting results.
- Learn how to match filler types to natural wood movement to prevent future cracks and avoid the most common DIY misconceptions.
- Get a checklist of the essential high-quality filling knives and scrapers needed to achieve a smooth, professional finish on every project.
What is the best wood filler for exterior repairs in the UK?
The best wood filler for exterior repairs in the UK is a two-part polyester resin filler. This high-performance material uses a chemical hardener to create a bond that is significantly stronger than standard air-dry products. It offers the best protection against the UK’s unpredictable weather because it doesn't shrink or pull away from the wood over time. While epoxy-based fillers are better for large structural repairs, high-quality acrylic options are suitable for hairline cracks. An exterior wood filler is a moisture-resistant compound designed to expand and contract with timber. Using the best wood filler for exterior repairs uk ensures your window frames, doors, and garden furniture remain rot-free for years.
Why two-part fillers outperform ready-mixed options
Two-part resins use a chemical reaction to harden within 15 to 30 minutes, regardless of the external temperature or humidity. This speed is a massive advantage for DIY projects in Britain, where rain can arrive without much warning. Unlike ready-mixed water-based fillers, these resins exhibit zero shrinkage as they cure. This prevents water from getting trapped behind the repair, which is the primary cause of rot in window frames and doors. You'll find that these fillers bond almost instantly to the wood fibres, creating a permanent seal. Grab the right scrapers and spreaders from our hand and general tools range to make the application process smooth and professional.
The durability of two-part fillers is unmatched in damp climates. Standard fillers often rely on evaporation to dry, which can take hours or even days in typical UK humidity. If it rains before the filler is dry, the repair will fail. Chemical curing happens from the inside out, meaning the repair is waterproof and sandable in a fraction of the time. This reliability makes them the go-to choice for professional joiners and homeowners who want a fix that lasts a decade rather than a season.
Key features of weather-resistant fillers
UV resistance is a vital feature for any filler used on south-facing timber. Without it, the filler can become brittle and discolour under the sun’s rays, leading to a patchy appearance. Flexibility is actually more important than hardness for outdoor repairs. Timber moves constantly due to moisture changes, so a filler that is too rigid will eventually crack and fall out. High-quality exterior fillers are designed to be "semi-flexible" to accommodate this natural movement without losing their grip.
Understanding Wood finishing helps you choose between stainable fillers, which absorb pigment, and paintable versions that provide a smooth base for exterior gloss or satin. Always check if the product is "high-build," which allows you to fill deep holes in a single application without the need for multiple layers. If you're working on a decorative piece, look for a filler that matches the base wood species to ensure the repair remains invisible once you apply the final topcoat.
Comparing the three main types of exterior wood fillers
Selecting the best wood filler for exterior repairs uk requires matching the product to the size of the gap and the required durability. Polyester resins are the most common choice for general DIY tasks because they harden within 30 minutes and resist shrinking. Epoxy fillers provide the strongest structural bond for severe rot but require a 24-hour cure time. Water-based acrylic fillers are only suitable for superficial nail holes and minor grain cracks. While water-based options are cheaper upfront, the long-term cost of epoxy or polyester is lower because these repairs often last for over 10 years without failing.
Surface "skimmers" who only need to hide tiny imperfections should stick to acrylics. Those dealing with structural damage or deep cavities must use two-part resins to ensure the repair doesn't pop out during winter. High-quality resins typically cost between £15 and £40, but this investment prevents the need for total timber replacement later. You can find the right equipment to apply these fillers in our range of hand and general tools.
Polyester Resins: The DIY standard
Most UK hardware stores stock polyester fillers in a "tin and tube" format. This system uses a large tin of resin paste and a small tube of hardener. You must mix these components carefully to achieve a durable finish. A common rule is to mix a golf-ball-sized amount of resin with a pea-sized amount of hardener. Avoid "hot" mixes with too much hardener; they become brittle and crack under the stress of UK weather cycles. These fillers are perfect for door frames, window sills, and fascia boards where speed is a priority.
Epoxy Fillers: The professional choice for rot
Epoxy is the strongest material available for restoring timber that has suffered from significant wet rot. It creates a chemical bond that is often stronger than the wood itself. Unlike polyester, epoxy has a longer cure time that usually lasts 24 hours. This slow drying period is a benefit for complex shapes because it allows you to mould and sculpt the filler without it hardening mid-task. Professional restorers across the UK rely on epoxy for historic buildings where original timber must be preserved.
Water-based and Acrylic: Best for minor cosmetic fixes
Water-based fillers are easy to use but have limited applications outdoors. They are only suitable for very small holes, such as nail heads or tiny cracks in the wood grain. Don't use these for structural repairs or large gaps because they lack the flexibility to handle the UK's fluctuating humidity. If you use an acrylic filler, ensure it is fully sealed with a high-quality exterior coating. For more advice on finishing your project, check out our guide on Choosing and Using Paint.
Choosing the right filler for your specific UK project
The best wood filler for exterior repairs uk must match the specific expansion and contraction rates of the timber you are fixing. Most homeowners believe any "waterproof" label guarantees a permanent fix, but rigid fillers often crack when applied to softwoods that move significantly during damp British winters. High-performance two-part chemical resins are the industry standard for structural repairs like window sills because they bond permanently and resist rot. For aesthetic fixes on garden furniture, water-based stainable fillers provide the most natural finish. Always assess the depth of the damage and the wood species before you start your project. Choosing a filler based solely on a "waterproof" claim often leads to repair failure within twelve months. Wood is a living material that breathes. In the UK, outdoor humidity levels fluctuate between 50% and 90% throughout the year, causing timber to swell and shrink. Rigid polyester fillers work well for small holes in stable hardwoods, but they can pull away from the edges of larger gaps in pine or cedar. Flexible acrylic-based fillers or epoxy resins are better suited for joints that experience this inevitable movement. Before purchasing your materials, run through this quick assessment of the damage:- Repair Depth: Is the hole deeper than 5mm? You require a high-build resin to prevent sagging.
- Structural Integrity: Does the wood feel soft or spongy? Apply a wood hardener before the filler.
- Mechanical Load: Will the repair hold a screw or hinge? Only two-part resins provide the necessary strength.
- Final Finish: Are you painting or staining? Match the filler colour to the wood if you plan to use a clear coat.
Use high-performance resins for high-stress window and door repairs
Window sills and door frames are high-stress zones where water frequently pools. These areas require maximum adhesion and structural strength to survive the elements. Two-part chemical resins are the best choice because they set within 30 minutes and can be drilled, sanded, or screwed into just like real wood. Don't use decorators caulk for these external repairs. Caulk is designed for internal gaps and lacks the durability to withstand exterior weather cycles, eventually shrinking and letting moisture back into the timber.Select stainable fillers for garden furniture and gates
UK gardens often feature a mix of softwoods like pressure-treated pine and hardwoods like oak or teak. Softwoods expand more than hardwoods, so look for a filler with a slight degree of flexibility to prevent popping. If you want to maintain the natural wood grain on a teak bench, choose a dedicated stainable filler that mimics the porous nature of the wood. You can find everything you need to maintain your outdoor space in our home and garden collection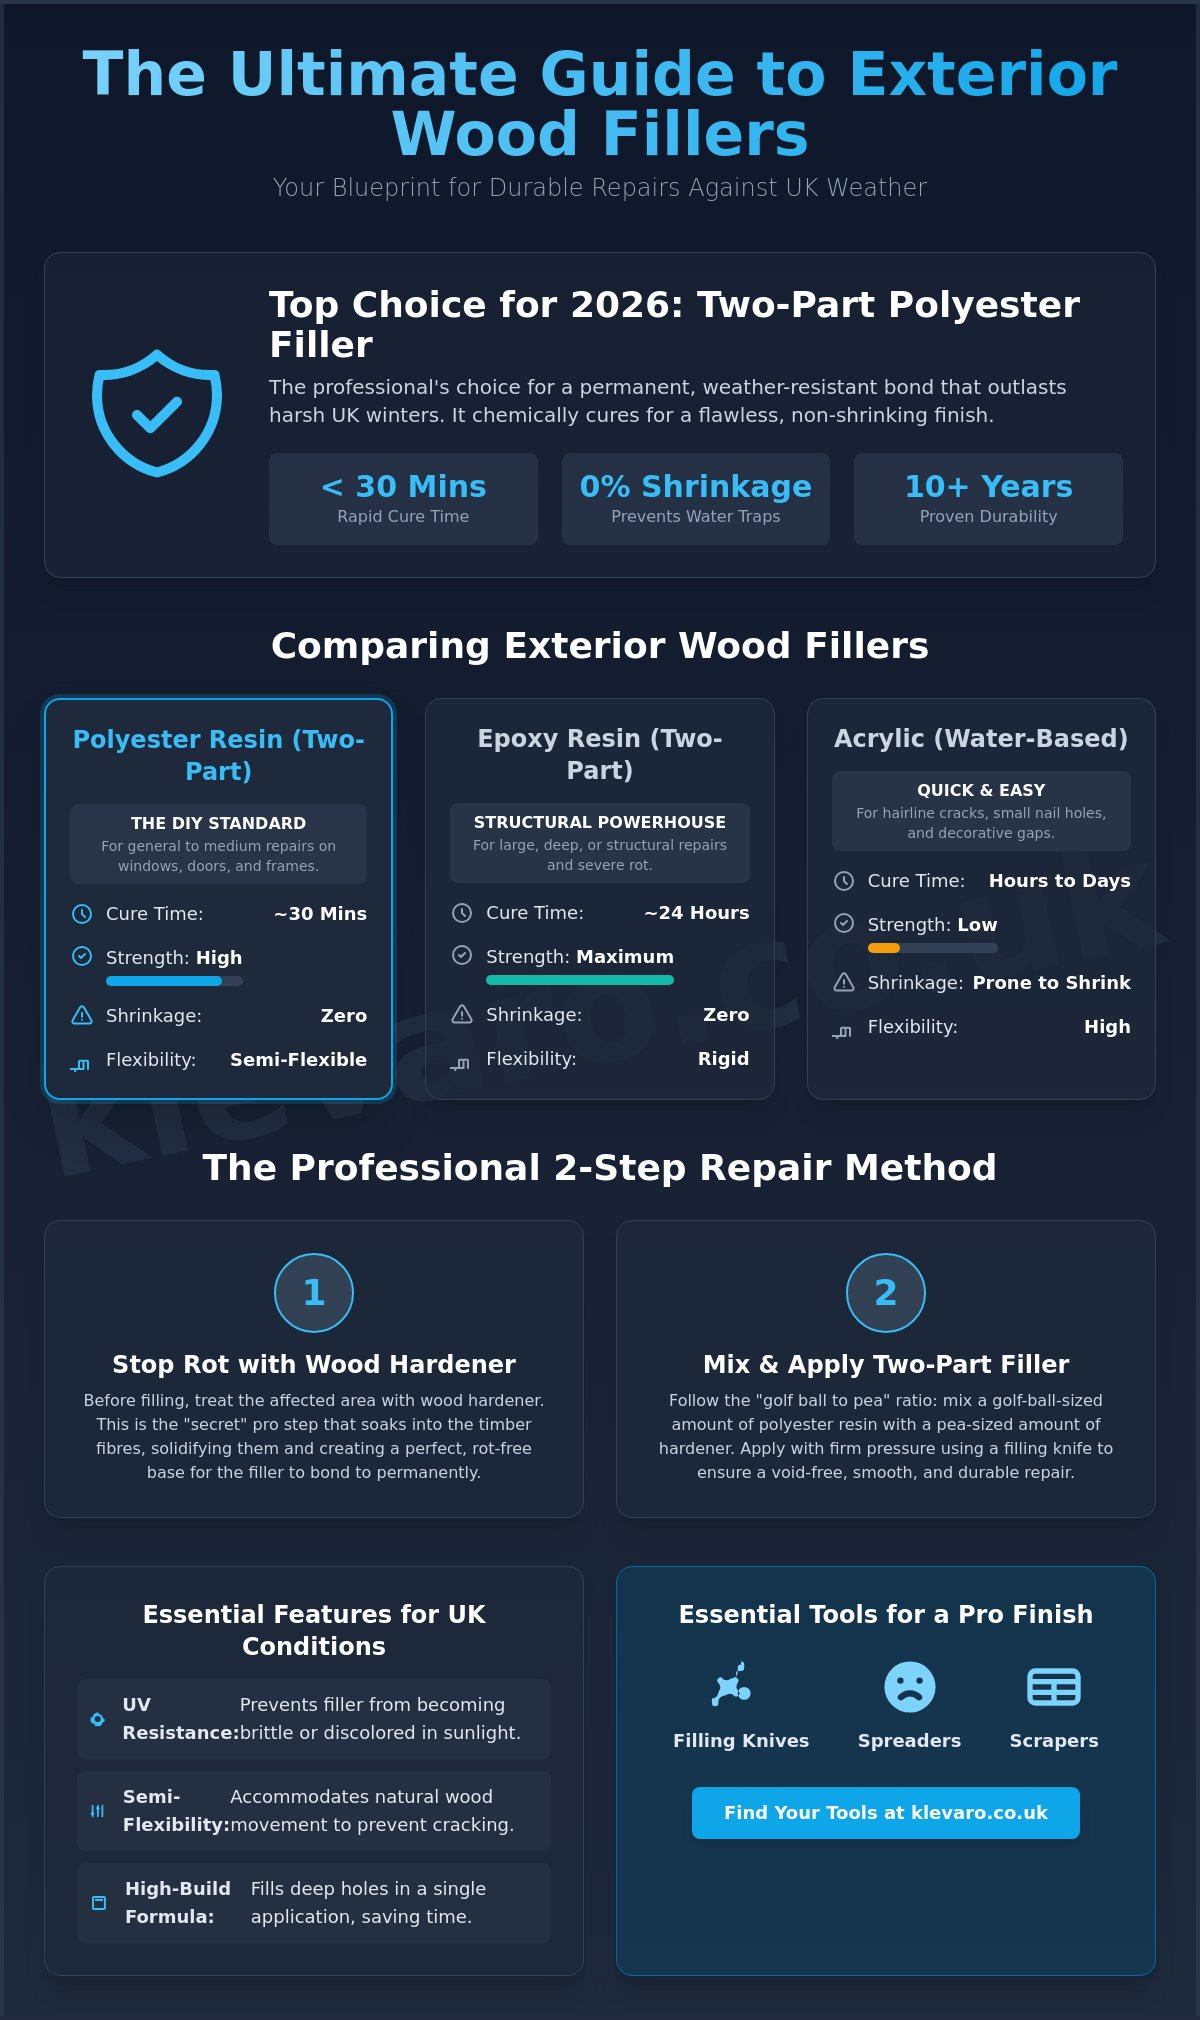
Step-by-step: How to apply exterior wood filler for lasting results
Applying the best wood filler for exterior repairs uk requires a clean, rot-free surface and a chemical wood hardener to ensure a permanent bond. You must first scrape away all soft, decaying timber until you reach solid wood. Applying a liquid resin hardener then stabilises the remaining fibres before you fill the gap with a high-quality wood filler. For deep repairs, mix and apply the filler in layers to prevent shrinking or cracking. Finally, sand the area flush and seal it with paint or varnish to block moisture from re-entering the wood.
Start your repair by removing every trace of soft wood. Use a sharp chisel or a sturdy scraper to dig into the affected area. If you leave even a small amount of rot behind, the fungus will continue to spread beneath your new filler. You know you've reached healthy wood when the timber feels hard to the touch and no longer crumbles under pressure.
Once the wood is dry and clean, apply your wood hardener. This step is vital for professional results because it creates a rock-solid foundation. If you are dealing with deep holes, mix your two-part filler in small batches. Apply it in layers of approximately 5mm to 10mm at a time. This technique ensures the filler cures evenly and avoids the internal stresses that cause cracking in larger repairs.
The importance of wood hardener
Chemical hardeners are the secret to a repair that lasts for years rather than months. These products use thin resins that soak deep into the wood fibres to turn soft, spongy timber into a solid base. A wood hardener is a liquid resin that solidifies decayed timber. It effectively replaces the natural lignin that rot has destroyed.
You must allow the hardener to dry completely before moving on to the filling stage. Most UK brands require a drying time of 2 to 4 hours depending on the external temperature. Applying filler over "tacky" or wet hardener prevents a proper bond and will likely lead to the repair failing during the next winter freeze.
Sanding and finishing techniques
Achieving a professional look depends entirely on your sanding process. You should always practice the "over-filling" technique by applying slightly more filler than you need. This creates a small mound that sits 1mm or 2mm above the wood surface. Because most fillers shrink slightly as they cure, this ensures you have enough material to sand down for a perfectly flush finish.
Begin sanding with a coarse 80-grit paper to remove the bulk of the excess material. Once the surface is nearly level, switch to a finer 120-grit or 180-grit paper to smooth out any scratches. You can find high-quality sanding blocks and scrapers to make this process much faster and more accurate. Always finish by applying a protective primer and topcoat to shield the repair from the British weather.
Ready to start your next home improvement project with confidence? Shop our full range of durable tools and equipment today.
Essential tools for a professional exterior wood repair
To achieve a professional finish with the best wood filler for exterior repairs uk, you must use high-quality application tools like stainless steel filling knives and precision scrapers. Proper preparation requires specific grit sandpapers, typically 80-grit for shaping and 120-grit for finishing, alongside safety equipment such as nitrile gloves and FFP2 dust masks. A successful repair depends on a 24-hour dry weather window and a surface completely free of loose debris. Investing in these essentials now allows you to build a durable repair kit for maintaining window frames, doors, and garden furniture for years to come.
The right filler is only as effective as the tools used to apply it. High-quality filling knives allow you to pack the material tightly into deep cracks, which prevents air pockets that could lead to future failure. Using a sharp scraper to remove every trace of grey, weathered wood before application ensures the resin bonds to healthy timber. This preparation step is the most common point of failure for DIY repairs, so taking the time to clear the area is vital.
Safety should be your top priority when working with chemical resins and sanding dust. Two-part fillers often contain styrine or other chemicals that can irritate the skin, making nitrile gloves a necessity during the mixing phase. When you transition to sanding the cured filler, the fine dust produced can be harmful if inhaled. Always wear a well-fitted mask and work in a ventilated area to keep your lungs protected while you transform your home.
Must-have hand tools from the Klevaro range
Stainless steel filling knives are far superior to plastic versions because they offer the perfect balance of stiffness and flexibility. They won't rust when cleaned with water or solvent, and they provide a much smoother finish that reduces your total sanding time. If you are rebuilding a structural edge like a door frame or a windowsill, using a small spirit level is essential to ensure your repair is perfectly square. You can find these essentials and more when you explore our tools and equipment range.
Final checklist before you start
Before you mix your first batch of filler, check the local weather forecast. Most high-performance resins need a 24-hour dry window to cure properly; moisture trapped behind the filler will eventually cause it to pop out. Ensure you have a variety of sandpaper grits ready and a clean, dry cloth to remove all dust between coats. If you want to expand your collection further, browse our hand and general tools to ensure you have everything needed for a successful project.
Start Your Exterior Wood Restoration Project
Finding the best wood filler for exterior repairs uk requires matching the right material to your specific project. High-performance two-part chemical fillers are ideal for structural fixes, while flexible water-based options work best for minor cosmetic cracks. Always ensure your wood is dry and sanded before application to achieve a professional finish that stands up to the British weather. Using the correct spreaders and sanding blocks will significantly improve the durability of your repair.
Klevaro is proud to be trusted by UK DIY enthusiasts who want reliable results every time. We offer quality guaranteed products and fast UK delivery so you can start your project without delay. It's time to take pride in your home and garden by giving your woodwork the care it deserves. You've got the skills to make it look brand new again, and we are here to help you every step of the way.
Shop our full range of professional DIY tools and equipment
Frequently Asked Questions
Can you put wood filler on rotted wood?
You should never apply wood filler directly onto rotted wood because the filler won't bond and the decay will continue to spread. You must first scrape away all soft, punky material until you reach healthy, firm timber. Treat the remaining area with a liquid wood hardener to seal the fibres before you begin filling. This process ensures your repair stays durable and protects your home for years to come.
How long does exterior wood filler take to dry in UK weather?
Most high-quality products dry enough to sand within 30 to 60 minutes in standard conditions. However, in typical damp UK weather with humidity levels above 70 percent, you should wait at least 4 hours before applying paint. Using a two-part chemical cure product is often the best wood filler for exterior repairs uk when you need a fast, reliable set during colder months.
Is wood putty the same as wood filler for outdoor use?
Wood putty and wood filler are different products and aren't interchangeable for exterior projects. Putty is typically oil-based and remains flexible, which makes it unsuitable for large outdoor repairs that require sanding and painting. Filler hardens completely and creates a stable surface that withstands the elements. For a long-lasting finish on garden furniture or window frames, always choose a dedicated exterior wood filler.
Can I paint over two-part wood filler immediately?
You can't paint over two-part wood filler immediately after you apply it. You must wait for the chemical reaction to finish and the surface to become completely hard, which usually takes about 30 minutes. Once it's cured, sand the area smooth and wipe away any dust before applying your primer. This ensures your paint job looks professional and doesn't peel away from the repair site later.
Will vinegar really stop wood rot before filling?
Vinegar won't effectively stop wood rot for permanent exterior repairs. While the acetic acid can kill surface spores, it doesn't penetrate deep enough to neutralise the fungi that cause structural decay. It's much better to use a professional boron-based preservative or a dedicated wood hardener. These quality treatments provide a reliable foundation, allowing you to fix, build, and create with total confidence in your handiwork.
What is the strongest wood filler for structural repairs?
Two-part polyester or epoxy resins are the strongest choices for structural timber repairs. These products use a hardener to trigger a chemical set that's often tougher than the original wood. They won't shrink or crack even when you're filling deep 50mm gaps in gate posts or door stiles. This makes them the best wood filler for exterior repairs uk when you need a dependable, heavy-duty solution.
How do I stop wood filler from cracking in the winter?
To prevent cracking in winter, you must use a high-performance filler designed for thermal expansion. Wood naturally moves when UK temperatures drop below 5 degrees Celsius, so your repair material needs to be flexible enough to follow. Apply the filler in thin layers rather than one thick block to reduce internal tension. Choosing a weather-resistant, durable formula ensures your stylish outdoor spaces stay looking fresh all year round.
Do I need a primer before applying wood filler?
You don't usually need a primer before applying filler to clean, bare wood. Most modern fillers are formulated to grip directly onto the timber fibres for a secure bond. However, you must apply a primer over the filler once it has dried and been sanded. This step is essential because it prevents the filler from absorbing the paint differently than the surrounding wood, ensuring a smooth and beautiful finish.
Leave a comment