


Why is My Drill Smoking? Common Causes and Immediate Solutions
You are halfway through mounting a new shelf when a thin wisp of grey smoke curls out of your power tool's motor vents. If you are wondering why is my drill smoking, the cause is usually worn carbon brushes, a heavy build-up of sawdust, or an overloaded motor. White smoke with a sharp ozone smell often signals a blown capacitor or burnt internal wiring. Stop using the tool immediately to prevent a permanent motor failure or an electrical fire. Most issues are solvable by cleaning air intakes or replacing carbon brushes which typically cost under £10.
It's incredibly frustrating when a project stalls and you're left worrying if your expensive gear is ruined. We understand that fear of a fire or the uncertainty of repair costs can make any DIY task feel stressful. This guide will help you identify the exact cause of the smoke and provide the clear steps needed to get back to work safely.
You'll learn how to perform essential safety checks, how to clean your motor effectively, and how to spot the signs that it's time to invest in a new tool. We've gathered expert advice to ensure you can fix, build, and create with total confidence.
Key Takeaways
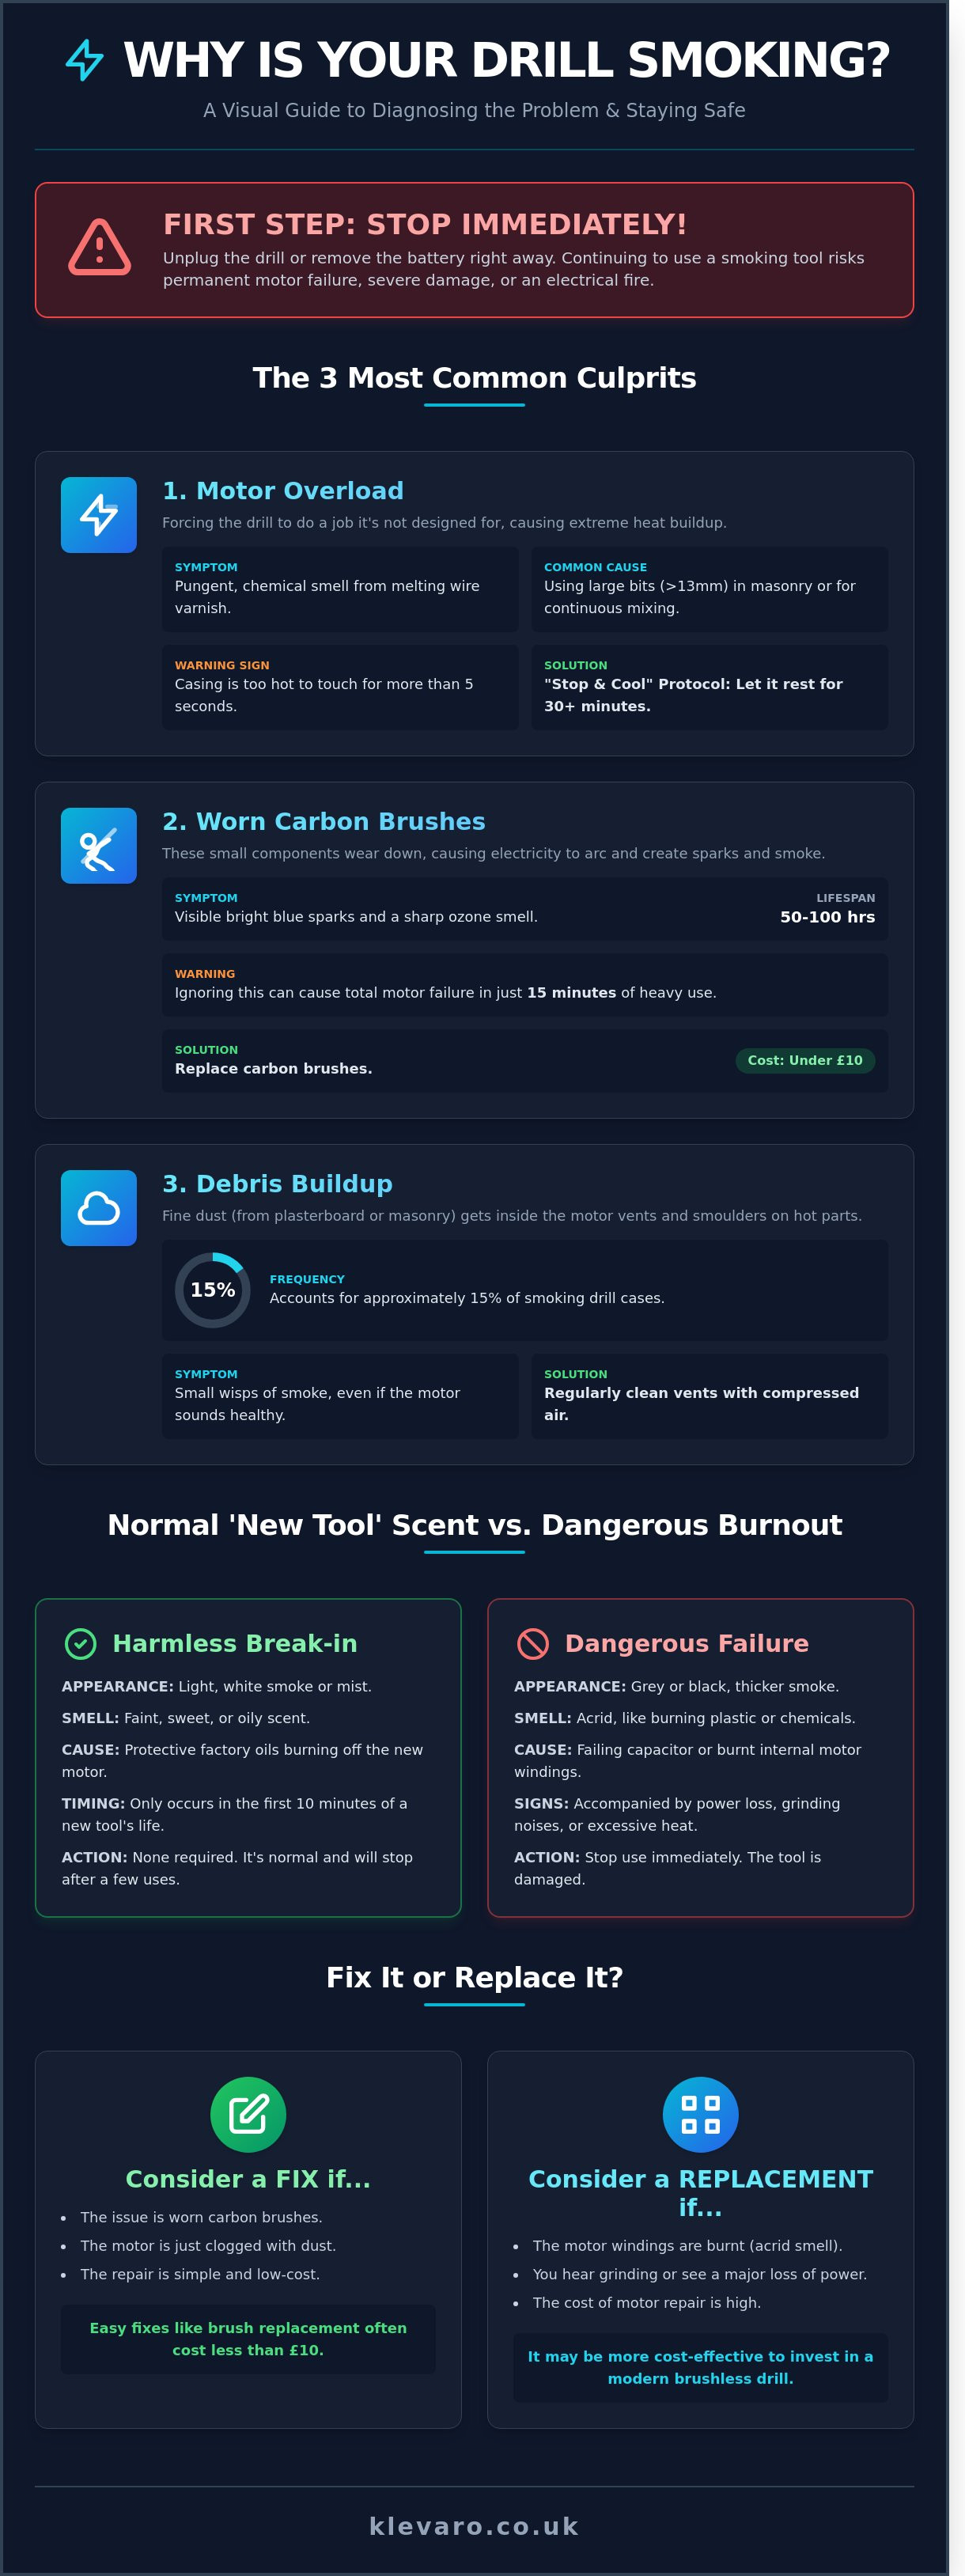
- Identify the three most common causes of drill smoke, including motor overload, worn carbon brushes, and accumulated debris within the housing.
- Differentiate between the harmless "new tool" smell of burning protective oils and the dangerous signs of a terminal electrical motor failure.
- Learn the immediate steps to take when you wonder why is my drill smoking, including safe power disconnection and cleaning ventilation ports.
- Master preventative maintenance techniques, such as matching drill bit sizes to materials, to stop your power tools from overheating during DIY projects.
- Determine when it is more cost-effective to replace a failed motor with a modern brushless drill rather than paying for expensive repairs.
A smoking drill is typically caused by motor overload, worn carbon brushes, or accumulated dust.
Smoke from a power tool usually signals excessive friction or heat within the motor housing. If you're wondering why is my drill smoking, it's typically due to one of three issues: motor overloading, worn carbon brushes, or accumulated internal debris. When the motor works too hard, the protective varnish on the copper windings begins to melt, releasing a pungent, chemical smell. You must follow a "stop and cool" protocol immediately. Turn off the drill and let it sit for at least 30 minutes to prevent permanent armature damage.
Internal debris is another frequent culprit. Fine dust from plasterboard or masonry can enter the motor vents and settle on hot components. In approximately 15% of cases, this dust ignites or smoulders, creating small wisps of smoke even if the motor itself is healthy. Regularly cleaning your vents with compressed air can prevent this buildup and extend the life of your tool.
Using the wrong tool for the job
Standard drills often fail when used for 10-minute continuous mixing sessions or with masonry bits larger than 13mm. These heavy-duty tasks require massive torque, which slows the motor down significantly. Because the internal cooling fans are tied to the motor's speed, they can't move enough air to keep the unit cool under heavy load. If your current gear isn't up to the task, you can explore our hand and general tools collection to find the right equipment for your project.
Using a tool at low speeds for high-resistance work is especially dangerous. The motor draws maximum current but receives minimum airflow, leading to a rapid temperature spike. If the drill casing feels too hot to touch for more than 5 seconds, the internal components are likely reaching critical temperatures.
Worn carbon brushes and electrical arcing
Carbon brushes are vital electric motor components that deliver current to the rotating armature. Most carbon brushes are designed to last for 50 to 100 hours of actual trigger time before they require inspection. As these brushes wear down, they lose contact with the commutator, creating small physical gaps. Electricity then arcs across these gaps, producing bright blue sparks and eventually smoke.
"The easiest way to spot electrical arcing is by the distinct, sharp scent of ozone that fills the air during use." If you see consistent sparking through the side vents, it's time to replace the brushes before they score the motor. Continuing to use a drill with worn brushes can lead to a total motor failure within just 15 minutes of heavy use.
Identify the difference between normal break-in smoke and dangerous motor failure.
Determining why is my drill smoking depends on the age of the tool and the scent of the vapour. Light, white smoke during the first 10 minutes of a new drill's life is typically normal as protective factory oils burn off the motor. This smoke should dissipate quickly and have a faint, sweet smell rather than an acrid one. If your drill is older or the smoke is grey, black, or smells like burning chemicals, it indicates a failing capacitor or burnt windings. You must stop using the tool immediately if you notice a drop in power or excessive heat through the plastic casing.
Safety is the priority when a power tool begins to fail. If smoke is accompanied by a sudden loss of RPMs or a grinding noise, the internal components have likely suffered a mechanical breakdown. In these instances, the tool must be unplugged or the battery removed immediately to prevent an electrical fire. Understanding these early warning signs helps you decide whether to continue your project or invest in a reliable replacement tool from a trusted source.
The 'New Tool' scent vs. electrical burnout
Manufacturers apply thin layers of lubricant to internal parts to prevent corrosion during storage. When you first trigger the drill, these oils reach operating temperatures and produce a thin, white mist. This is a standard break-in process and shouldn't recur after the first three or four uses. You can distinguish this from a burnout by the smell; factory oils have a mild, oily scent, whereas a failing motor smells like scorched plastic or ozone.
Persistent smoke is a clear indicator that the drill is working beyond its capacity. If you feel intense heat through the handle or see the plastic vents beginning to warp, the internal insulation is likely melting. Following Power Hand Tool Safety Guidelines is vital here, as stalling a motor under heavy load is a primary cause of rapid overheating. Don't ignore a chemical odour, as this suggests the varnish on the copper windings has reached its failure point.
When sparks become a problem
Visible sparks don't always signal a disaster. Most brushed motors produce small, blue sparks where the carbon brushes meet the spinning commutator. These are normal electrical arcs and are usually most visible in low-light conditions. If the sparks change to a bright orange colour and appear to "trail" or circle the entire motor, your brushes are likely worn down to the springs or the commutator is badly pitted.
The colour of the smoke provides the final clue for your diagnosis. White smoke is often just fine masonry or wood dust that has been sucked into the vents and is being singed by the motor's natural heat. Grey or black smoke is much more serious. This darker smoke indicates that the wire insulation or plastic housing is actively burning, which creates a permanent risk of a short circuit. If you see dark smoke, the tool's internal health has been compromised and it's no longer safe for DIY use.
How to diagnose and troubleshoot a smoking drill in five steps.
Stop using the tool immediately and disconnect the power source, whether it's a battery or a mains plug. This prevents further electrical damage and allows you to safely investigate why is my drill smoking. Clear the ventilation ports using compressed air to remove sawdust and grit that block airflow. Inspect the motor through the vents for any signs of discolouration or melted plastic. If your tool is an older model, check the carbon brushes for wear as they often cause sparking and smoke when they reach the end of their life. Finally, run the tool at no-load to let the internal fans cool the motor down.
Step-by-step cleaning for dust-clogged drills
Fine sawdust acts as an insulator, trapping heat inside the motor casing and leading to rapid overheating. To clean the unit, use a vacuum with a brush attachment or a canister of compressed air on the cooling vents. Focus the air stream into the intake vents to push debris out through the exhaust. This ensures the internal fan can circulate air effectively and prevents the motor from reaching critical temperatures during heavy use.
Keeping your equipment in a proper tool organiser or bag significantly reduces dust ingress during storage. This simple habit protects the delicate internal components from 80% of common debris-related failures. It also keeps your workspace tidy and ensures your tools stay in peak condition for every project.
Testing the motor after a smoke event
Wait at least 30 minutes for the internal components to reach room temperature before testing. Perform a 'no-load' test by running the drill at full speed in the air without any resistance or drill bits attached. This allows the internal cooling fan to purge any remaining heat from the motor windings. If your tool is an older, brushed model, pay close attention to the carbon brushes. These small blocks conduct electricity and naturally wear down; when they become too short, they create the friction and heat that explains why is my drill smoking.
Use the 'listen and feel' method to check for grinding noises or irregular vibrations that weren't there before. If smoke returns while the tool is running freely, the motor windings are likely shorted. In this scenario, it's time to admit defeat and look for a replacement or a professional repair service. A successful test will show the drill running smoothly with clear, cool air blowing from the exhaust ports within 60 seconds.
Preventative maintenance to stop your power tools from overheating.
Preventative maintenance and correct operation are the primary ways to stop your power tools from overheating. You must always match the drill bit size and material to your tool's specific rated capacity to avoid overloading the motor. Allow the drill to reach its full speed before you engage the workpiece to reduce initial torque stress. Regular cleaning of the air vents after every use prevents debris from 'caking' and insulating the motor. If you notice the tool struggling, stop immediately; stalling the motor causes a massive heat spike that often explains why is my drill smoking.
Matching your accessories to the tool's power output is vital for longevity. Using a 25mm spade bit in a compact drill only rated for 13mm holes forces the motor to work beyond its design limits. This excess strain draws more current, which generates heat faster than the internal fan can dissipate it. Always check your manual for the maximum drilling diameters in wood, metal, and masonry.
Debris management is another essential habit for any DIY enthusiast. Sawdust and masonry grit are drawn into the motor housing through the cooling vents during operation. Over time, this material packs tightly around the copper windings and brushes. This 'caking' effect acts like a thermal blanket, trapping heat inside and eventually leading to a burnt-out motor. A quick blast with a vacuum or compressed air after every project keeps the airflow clear.
Avoid the temptation to push through a stall. When a drill bit jams and the motor stops turning while the trigger is still pressed, it creates a 'locked rotor' state. During a stall, the electrical current can spike to five times its normal operating level. This causes the internal temperature to skyrocket in less than three seconds, which is a frequent reason why is my drill smoking during heavy-duty tasks.
Best practices for heavy-duty drilling
When you tackle hard masonry or thick metal, use the 'pulse' technique. Drill in short bursts of three to five seconds, then pull the bit back slightly while it is still spinning. This clears waste material from the flutes and allows cool air to circulate through the motor. Always ensure your bits are sharp; a dull bit requires significantly more physical force and motor torque to progress. For tasks requiring extreme torque, you should explore our range of high-torque power tools designed for professional-grade applications.
Storage and environmental care
The environment where you store your tools affects their internal health. Damp conditions in a shed or unheated garage lead to internal corrosion on the motor's commutator and switch contacts. This rust creates electrical resistance, which generates heat the moment you pull the trigger. Keep your gear in a dry, temperature-controlled space to prevent shorts. High-quality garden and home tools require this same level of care to ensure they remain reliable for years.
Ready to upgrade your workshop with reliable gear? Shop our full range of durable tools and equipment today.
Choosing a reliable replacement if your drill motor has failed.
Deciding whether to fix or replace a smoking tool depends on the total repair bill. For most consumer drills, a replacement motor costs between £30 and £50. Once you factor in professional labour charges, the cost often exceeds the price of a brand-new tool. Upgrading to a modern model is usually the smartest financial choice for most homeowners.
If you've been wondering why is my drill smoking, the answer often lies in outdated internal components. Older brushed motors generate significant heat through physical contact between the brushes and the commutator. Switching to a tool with electronic overload protection prevents this issue from recurring. These sensors cut the power before the motor sustains permanent damage from heat or resistance.
Always purchase your new equipment from a reputable UK retailer. This ensures your warranty is valid and provides access to local customer support if you ever encounter a fault. A reliable supplier helps you find the right tool for your specific DIY needs while offering peace of mind through guaranteed quality.
Why brushless motors are the future of DIY
Brushless motors are a game-changer for home projects because they remove the carbon brushes entirely. These brushes are the most common source of friction and heat in power tools. By using magnets and electronic circuits instead of physical contact, brushless tools run cooler and last much longer than traditional versions.
This technology solves the mystery of why is my drill smoking by removing the parts that typically burn out. They also provide up to 50% more runtime on a single battery charge compared to older brushed models. You can explore our range of power tools to find the latest high-efficiency brushless models for your next project.
Building a toolkit that lasts
Investing in high-quality gear follows the 'buy once, cry once' logic. Spending a little more on a durable drill now saves you the frustration of a breakdown during a critical job. High-quality tools use better materials that dissipate heat effectively and withstand the demands of regular maintenance.
A high-performance drill also makes an excellent Father's Day gift for any aspiring handyman or seasoned DIY enthusiast. Having the right equipment gives you the confidence to tackle any home improvement task with ease. You'll spend less time worrying about tool failure and more time creating something beautiful in your home or garden.
Get ready to fix, build, and transform your home with gear you can trust. Choosing the right replacement ensures your toolkit remains a reliable partner for years to come. With modern features and robust designs, your next drill will be ready for any challenge you throw at it.
Restore Your Power and Finish the Job
Identifying why is my drill smoking is the first step toward a safer workshop. Most smoke issues are caused by simple carbon brush wear or dust build-up, which you can often resolve in under 10 minutes. If the smoke is accompanied by a sharp, acrid scent or visible flames, the motor insulation has likely failed and the tool should be decommissioned immediately.
It's important to keep your gear in top shape to avoid project delays. Regular maintenance stops 90% of overheating issues before they start. When a repair isn't possible, choosing a high-quality replacement ensures your next DIY task runs smoothly without the risk of burnout or electrical faults.
Klevaro is a trusted UK store that helps you build with confidence. We offer quality guaranteed on all DIY tools, ensuring you get professional results every time. Upgrade your toolkit with our range of reliable power tools and enjoy fast UK delivery along with easy returns. Let's get your home project back on track today.
Frequently Asked Questions
Is it safe to use a drill that has smoked once?
It's safe to use your drill if the smoke was a one-off event caused by trapped dust or a brief overload. If you're wondering why is my drill smoking and the tool now runs clearly without a smell, you're likely fine to continue your project. However, a persistent burning scent or a 15% drop in power indicates damaged internal insulation. Using a drill with compromised windings creates a high risk of electrical shorts or fires.
What does it mean if my new drill smells like it is burning?
A faint burning smell from a brand-new drill usually signifies the break-in period where factory-applied oils and protective varnishes heat up for the first time. This scent should disappear within the first 5 minutes of operation. If you see visible smoke or the smell remains after 3 separate uses, contact your retailer to discuss a replacement or warranty claim under UK consumer rights.
Can I fix a burnt-out drill motor?
You can technically fix a burnt-out motor by replacing the armature or rewinding it, but it's rarely cost-effective for drills priced under £100. Professional labour and parts often cost 80% of the price of a brand-new, more efficient tool. For high-end professional gear, check if the manufacturer offers a fixed-price repair service before you decide to recycle the old unit.
Why does my drill smoke when I am drilling into masonry?
Your drill smokes when drilling into masonry because the high friction and torque requirements generate intense heat that exceeds the motor's cooling capacity. If you're asking why is my drill smoking during heavy tasks, it's usually because you're using a standard drill instead of a dedicated hammer drill. The smoke is a clear sign the motor is drawing too much current, which can melt internal components in under 60 seconds.
What colour of smoke is bad for a power tool?
Grey or black smoke is the most dangerous sign because it indicates that plastic components, wire insulation, or carbon brushes are actually burning. These dark colours suggest internal temperatures have likely exceeded 200 degrees Celsius. White smoke is less concerning as it's often just fine masonry dust or steam from damp timber being expelled through the cooling vents.
How do I know if my carbon brushes need replacing?
You'll know your carbon brushes need replacing if you see excessive orange sparking through the vents or if the drill starts and stops intermittently. Most modern drills allow you to inspect the brushes by removing the small plastic caps on the motor housing. If the carbon block measures less than 4mm in length, it's time to install a fresh set to maintain motor performance and tool life.
Leave a comment