


What to Do When You Hit a Water Pipe in the Wall: An Emergency Guide
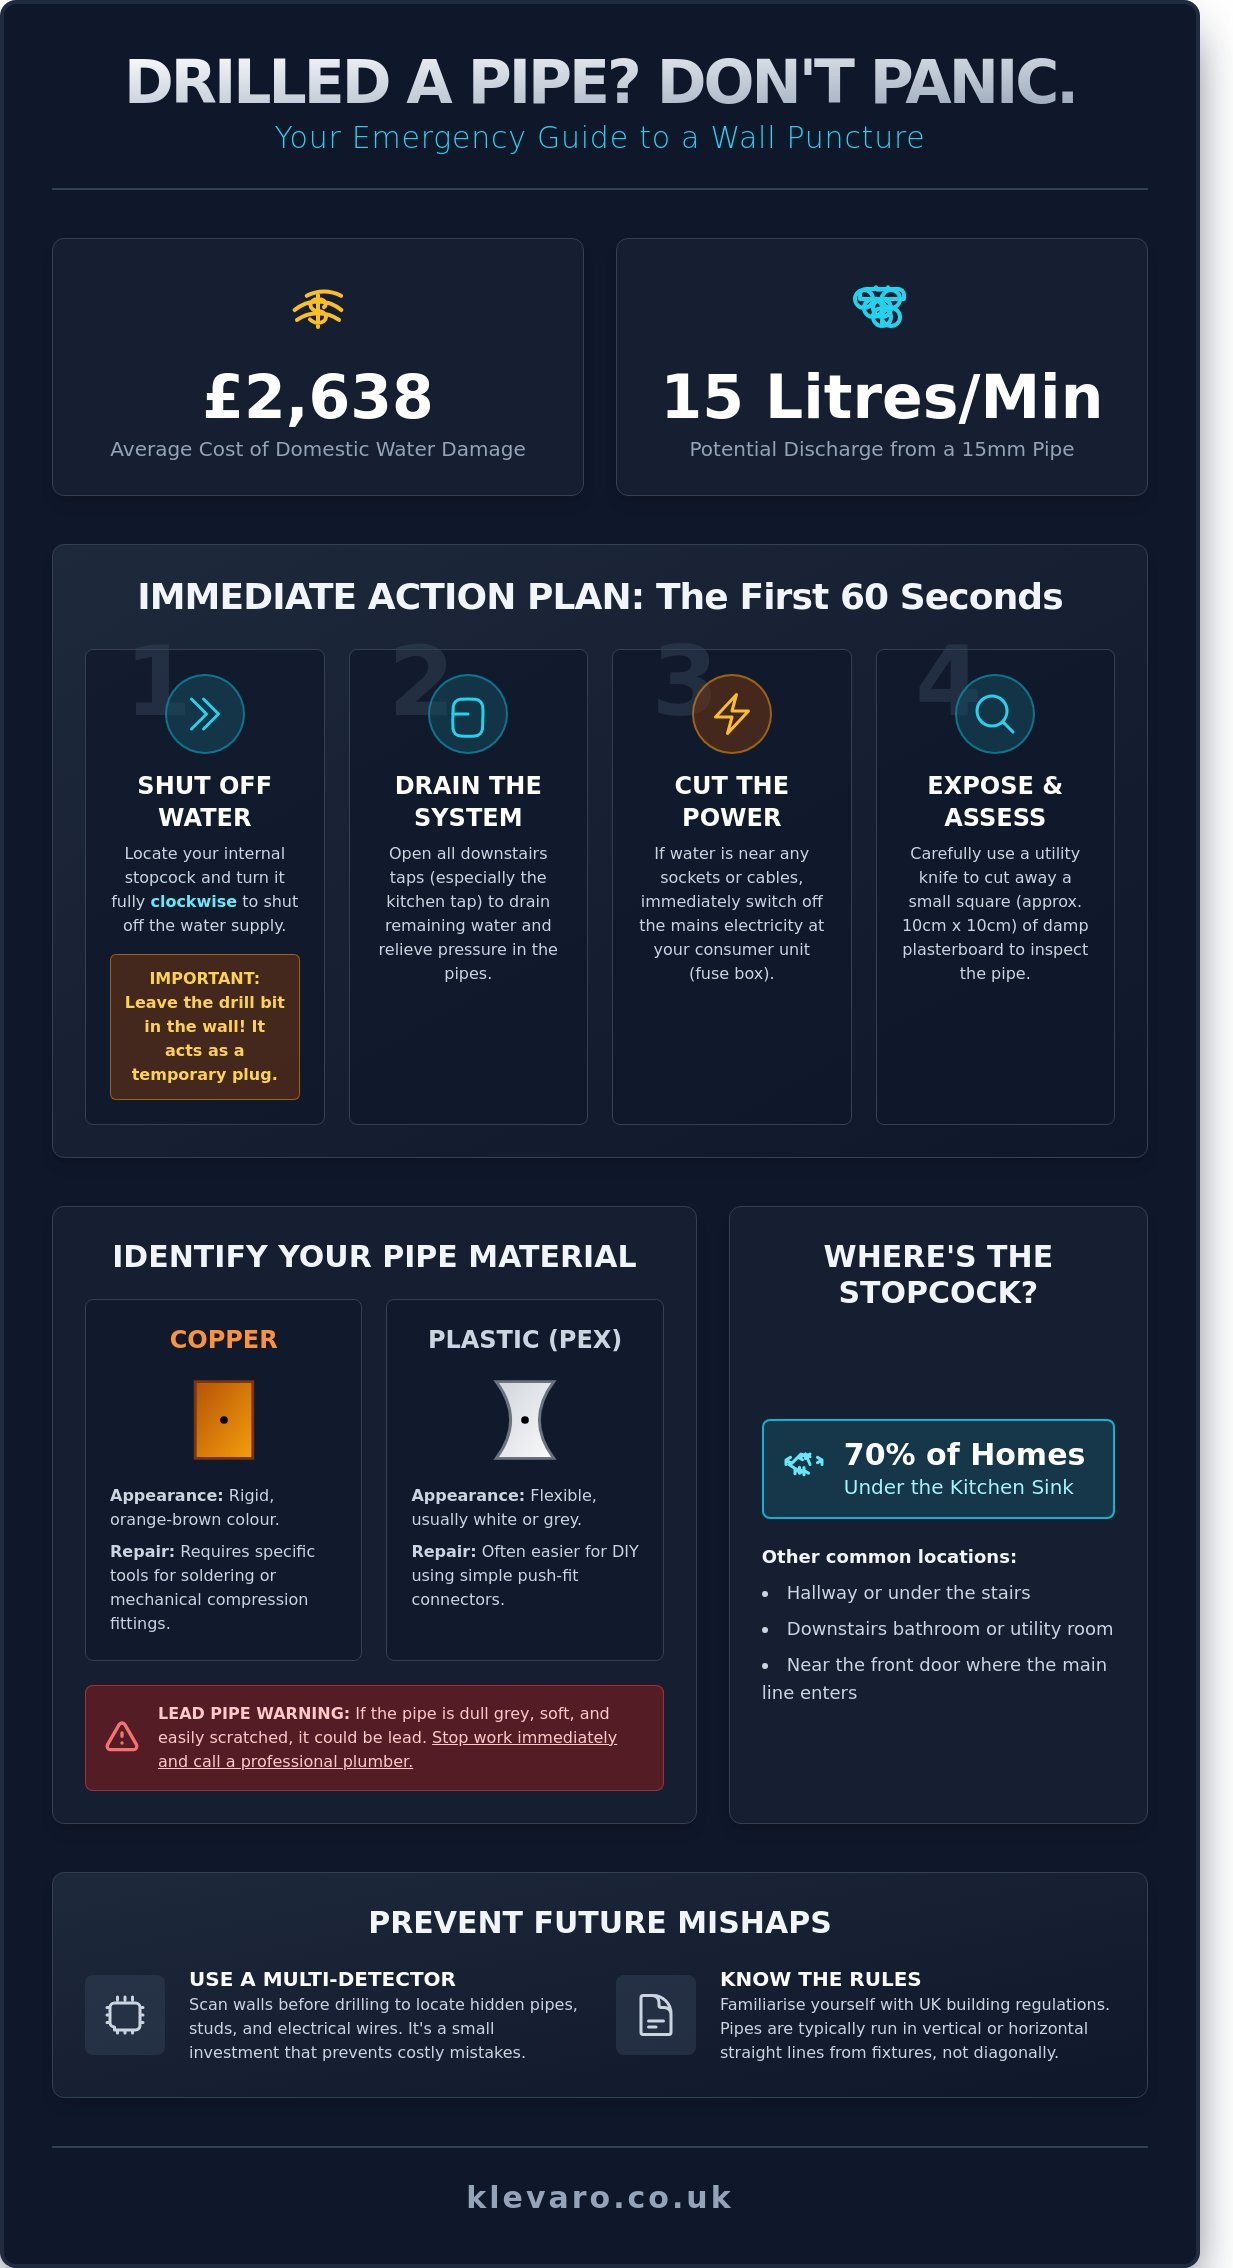
Last Tuesday, a DIY enthusiast in Birmingham watched a simple renovation turn into a fountain when their drill bit struck a hidden mains line. Knowing what to do when you hit a water pipe in wall prevents the average £2,638 cost associated with domestic water damage. First, turn your internal stopcock fully clockwise to shut off the water. Open all downstairs taps to drain the remaining water and reduce pressure. Switch off your electricity at the consumer unit if water is near any sockets or cables. Finally, clear away the damp plasterboard to see if the damaged pipe is 15mm copper or modern plastic.
It's a heart-stopping moment that can happen to anyone, but you don't need to panic or call an expensive emergency plumber immediately. This guide gives you the immediate steps to stop a leak, assess pipe damage, and choose the right tools for a professional-standard repair. We'll show you how to identify your pipe type and which specific fittings will get your project back on track with confidence.
Key Takeaways
- Stop the flow of water immediately by locating your main stopcock and leaving the drill bit or nail in the wall to act as a temporary plug.
- Identify whether you have traditional copper or modern plastic piping to determine if you can perform a DIY fix or require a professional plumber.
- Select the correct hand and general tools and materials, such as repair tape or clamps, for an effective emergency repair.
- Understand what to do when you hit a water pipe in wall to avoid future damage by using multi-detectors and following UK building regulations for pipe runs.
- Learn the professional process for drying the internal wall cavity and applying a seamless plasterboard patch to restore your home’s finish.
Immediate Steps to Take After Hitting a Water Pipe
If you have just punctured a pipe, your priority is to stop the water flow and protect your home from electrical hazards. Knowing what to do when you hit a water pipe in wall starts with turning off the internal stopcock immediately. Do not remove the drill bit or screw from the wall; it currently serves as a vital plug that limits the volume of water escaping. You should also switch off the mains electricity at the consumer unit if the leak is near any wiring or sockets. Finally, open your lowest taps to drain the system and relieve pressure. These rapid actions can save you from a repair bill that often exceeds £2,500 for damp proofing and structural drying.
Water travels with surprising speed. A standard 15mm copper pipe under mains pressure can discharge up to 15 litres of water per minute. This volume is enough to soak through floorboards and ruin plasterwork on the floor below in less than ten minutes. By keeping the drill bit in place, you buy yourself precious time. Even a partial seal reduces the flow rate significantly while you locate the shut-off valve. Don't be tempted to "see how bad it is" by pulling the tool out. You'll likely face a high-pressure jet that makes finding the stopcock much harder in the dark or while soaking wet.
At Klevaro, we believe every DIY enthusiast should feel confident in their home, even when things go wrong. Most domestic leaks are manageable if you act within the first 60 seconds. Modern homes are designed with safety in mind, but the interaction between water and modern plumbing systems requires a calm, methodical approach. Once the immediate flow stops, you can begin assessing the damage and planning your repair with the right tools and gear.
Finding Your Main Stopcock and Draining the System
In roughly 70% of UK homes, the main stopcock is located under the kitchen sink. If it isn't there, check the hallway, under the stairs, or near the front door where the rising main enters the property. Turn the handle clockwise until it's tight to cut the supply. Once the valve is shut, head to the kitchen and turn on the cold tap. This relieves the remaining pressure and prevents further leaks from the puncture point.
Electrical Safety Precautions During a Leak
Safety is paramount when water enters wall cavities. If the puncture occurred near a light switch or socket, go to your consumer unit and flip the main switch to 'Off'. Modern fuse boxes feature an RCD (Residual Current Device) which might trip automatically if it detects a fault. Don't rely solely on this. If you suspect water has touched cables, don't turn the power back on until a qualified electrician has inspected the circuit. Drying out a wall cavity can take 48 to 72 hours with a professional dehumidifier.
Once you've secured the area and stopped the flow, you can start thinking about the fix. Whether you're a seasoned pro or a weekend warrior, having a plan makes all the difference. Remember that a small leak can become a big problem if left unaddressed, so ensure the area is completely dry before you begin any plastering or decorating repairs. You've got this, and taking these quick steps has already prevented the worst-case scenario.
Identifying the Pipe Material and Extent of Damage
The first step in deciding what to do when you hit a water pipe in wall is to expose the damaged area for a full visual inspection. You cannot fix what you cannot see, so use a utility knife or a padsaw to carefully enlarge the hole in the plasterboard. Aim for a square opening of approximately 100mm by 100mm. This provides enough space to fit your hands and tools inside the wall cavity without causing unnecessary structural damage to the room.
Once the pipe is visible, wipe away any standing water with a dry cloth to get a clear look at the puncture. Identifying whether the pipe is part of the mains cold water supply or the central heating system is vital. Cold, clear water usually indicates a mains line, while warm or discoloured water suggests a heating pipe. Central heating pipes in UK homes often run in parallel pairs, typically spaced 50mm apart, whereas mains pipes usually run solo towards a kitchen or bathroom fixture.
Copper vs Plastic: Why the Material Matters
Most British homes use either traditional copper or modern plastic piping like PEX or Hep2O. Copper pipes are rigid, orange-brown in colour, and require specific heat-based soldering or mechanical compression fittings for a permanent fix. Plastic pipes are usually white or grey and offer more flexibility, which can sometimes make the repair easier in tight wall cavities. If your property was built before 1970, look out for lead pipes. These are dull grey, very soft, and require a professional plumber for replacement as they pose significant health risks when disturbed.
The repair method changes significantly based on these materials. Plastic pipes often utilise simple push-fit connectors that click into place, while copper requires more precision. Having a few reliable DIY tools on hand will help you manage these different materials with confidence. Always check the pipe diameter before buying parts; most UK internal plumbing uses 15mm or 22mm sizing.
Assessing the Hole Size for Repair
The scale of the damage dictates whether you can use a simple patch or if you must cut out a section of the pipe. Small punctures under 2mm are usually the result of a single nail or screw. A pinhole leak is defined as a tiny, concentrated puncture often caused by a stray nail or screw strike. While small, a 2mm hole can still leak up to 15 litres of water per minute at a standard UK mains pressure of 3 bar.
Use a high-lumen torch to inspect the entire circumference of the pipe. It is common for a drill bit to pass entirely through a pipe, creating a hidden exit hole on the back side that is difficult to see at first glance. If you find a large gouge over 5mm or a split longer than 10mm, a simple clamp will not suffice. In these cases, you will need to remove the damaged section entirely and bridge the gap with a new piece of pipe and two couplings.
While you are inspecting the pipes, check the condition of the surrounding insulation. Ensuring your pipework is properly lagged can help during the winter months, which is a leading cause of internal flooding in the UK. Taking a moment to assess the overall health of the plumbing now can save you from another emergency call-out in six months' time.
Deciding Between a DIY Repair and Calling a Plumber
The decision to repair a pipe yourself or call a professional depends on the pipe material and your access to the leak. If you have clear access to a straight section of plastic or copper pipe, a DIY repair using push-fit connectors is often achievable for a confident homeowner. You must call a professional plumber if the leak is behind a structural stud, involves a gas line, or requires soldering in a tight, poorly ventilated space. Knowing what to do when you hit a water pipe in wall starts with assessing if you can safely isolate the supply and reach the damage without compromising the building's structure. Simple punctures in accessible areas can be fixed for under £30 in materials, whereas professional call-outs in the UK typically range from £60 to £150 per hour plus the cost of parts.
Evaluate your familiarity with basic hand and general tools before you attempt a permanent fix. If the pipe is tucked behind a floor joist or inside a complex T-junction, the risk of making the leak worse increases significantly. Temporary measures like self-amalgamating silicone tape or a heavy-duty repair clamp can buy you valuable time. These solutions work well for pinhole leaks but are rarely long-term fixes for a pipe that has been fully pierced by a heavy-duty drill bit.
For most modern UK homes, pipes are either 15mm or 22mm in diameter. If you can clearly see the damaged section and have enough room to move a pipe cutter around it, a DIY repair is likely. If the pipe is under tension or bent at an awkward angle, the seals on a DIY fitting might fail under pressure. In these cases, the expertise of a professional is worth the investment to avoid future damp issues or ceiling collapses.
Essential Tools for a Permanent Pipe Repair
A successful repair requires a perfectly square cut to ensure a watertight seal. You must use a dedicated pipe cutter rather than a hacksaw to avoid leaving jagged burrs that damage internal O-rings. Every reliable home maintenance kit should include quality tools and equipment such as adjustable wrenches, a deburring tool, and a tape measure. Modern push-fit technology is the best choice for beginners because it removes the need for blowtorches and messy flux. These connectors simply click into place on both copper and plastic pipes, providing a permanent seal in seconds without the fire risk of soldering.
When to Admit Defeat and Call a Professional
Some situations are too dangerous or complex for a standard DIY project. If you suspect you have hit a gas pipe, you must evacuate the area and contact a Gas Safe registered engineer immediately; it is illegal and life-threatening for an unqualified person to work on gas lines. You should also call a pro if water has been spraying for more than 15 minutes, as this can compromise the structural integrity of timber studs or saturate electrical wiring. While a DIY kit costs roughly £25, a professional ensures the repair meets UK building regulations and often includes a guarantee. If the leak is located at a joint or behind a load-bearing wall member, the labour costs of £100 are a small price to pay for peace of mind. Knowing what to do when you hit a water pipe in wall means knowing your limits before the water damage spreads.
Essential Tools to Prevent Future Plumbing Mishaps
Avoiding a burst pipe starts with using a high-quality multi-detector before you start any project. This tool is your first line of defence against expensive repairs and water damage. Most DIY enthusiasts only learn what to do when you hit a water pipe in wall after the damage is done. You can prevent 90% of these accidents by scanning every centimetre of your workspace before the drill bit touches the plaster. Following standard UK "safe zone" guidelines ensures you stay clear of vertical and horizontal pipe runs. Always calibrate your device to distinguish between metal, wood, and live wires. Marking your wall with a pencil creates a visual "no-drill" map. These simple steps turn a risky project into a successful home improvement task.
A reliable multi-detector is the most important investment for any home toolkit. These devices use electronic sensors to "see" through solid surfaces like plasterboard and brick. By identifying copper or plastic pipes before you drill, you save yourself the stress of an emergency plumbing call-out. It's much cheaper to buy a quality detector than it is to pay a £150 emergency plumber fee on a Sunday evening.
How to Use a Multi-Detector Correctly
Calibration is the most important step for accuracy when using a detector. Hold the device against the wall in a clear area and press the calibrate button to set a baseline. Move the detector in a slow, steady grid pattern to capture both horizontal and vertical runs. When the signal peaks, you've found the centre of the object. Mark this spot clearly to ensure you don't accidentally clip the edge of a copper pipe.
Different materials require different settings on your device. Most modern detectors have specific modes for timber, metal, and live AC wiring. Switching between these modes helps you confirm if you're looking at a structural stud or a water-carrying pipe. Always double-check the "centre" signal by approaching the area from both the left and the right. This technique confirms the exact width of the obstruction.
Standard Pipe Run Patterns in UK Homes
British building standards generally require pipes to run in straight lines. These "safe zones" usually extend vertically or horizontally from taps, boilers, and radiators. You will rarely find a pipe running diagonally across a wall in a home built after 1990. Always assume a pipe exists directly above or below any plumbing fixture. Measuring twice and drilling once is a rule that saves thousands of pounds in repair costs.
Older properties can be more unpredictable than modern builds. If your home was renovated before 1980, pipes might have been installed using less standardised routes. Use your multi-detector more frequently in these environments to map out the entire wall. Never assume a wall is empty just because there's no radiator nearby. Pipes often travel through walls to reach bathrooms or kitchens on the other side of the house.
A stud finder is another essential piece of gear for wall-based projects. These tools identify the timber frame where pipes are frequently secured with metal clips. If you find a stud, proceed with caution as pipes often run alongside or through these wooden supports. Use a sharp pencil to mark "no-go zones" clearly on the wallpaper or paint. This visual map keeps you focused and prevents mistakes when you're balancing on a ladder or working in tight corners.
Preparation is the key to DIY confidence. Taking ten minutes to scan and mark your walls ensures your shelves or mirrors are hung safely. You'll feel much better knowing your drill bit is entering a clear space. If you're ready to upgrade your toolkit, explore our range of reliable DIY tools to find everything you need for your next project.
Repairing the Wall and Restoring Your Home
Restoring your room requires a bone-dry wall cavity and a precise plastering technique to ensure the damage is invisible. You must leave the internal wall open for at least 24 to 48 hours to allow moisture to evaporate from the studs and insulation. Once dry, fit a plasterboard patch and apply a high-quality filler in thin layers to create a flush surface. Use a stain-blocking primer to prevent old water marks from ruining your new paint job. Understanding exactly what to do when you hit a water pipe in wall ensures your home remains structurally sound and mould-free. Finish the job by sanding the area smooth and repainting the entire wall section for a professional look.
Drying Out the Wall to Prevent Mould
Moisture trapped inside a wall is a recipe for structural decay and health hazards. Black mould can begin to colonise damp plasterboard and timber within 72 hours of exposure. Position a dehumidifier or a targeted heater near the opening to pull moisture from the deep recesses of the wall. Check the area thoroughly before you start sealing. If the timber feels soft or you notice a lingering musty odour, the drying process isn't finished. You might need to remove and replace sodden mineral wool insulation if it doesn't spring back to its original shape.
For the physical repair, use a piece of scrap plasterboard to bridge the gap. Secure it with galvanised screws and apply a jointing compound across the seams. Don't rush this stage; two thin coats of filler are always better than one thick application. Sanding between coats with 120-grit sandpaper will help you achieve a seamless transition between the old wall and the new patch. A smooth finish here is the secret to a repair that no one will ever notice.
The Final Flourish: Redecorating After the Fix
Standard emulsion paint won't hide water damage on its own. You need a dedicated stain-blocking primer to seal the repair site and prevent brown rings from bleeding through. This simple step saves you from having to repaint the same spot three or four times. Once the primer is dry, apply your topcoat using a roller to mimic the existing wall texture. Knowing what to do when you hit a water pipe in wall involves more than just the plumbing; it's about returning your home to a state you're proud of.
After the stress of a plumbing emergency, focus on the fun part of home ownership. You can browse our home and garden collections for fresh inspiration to revitalise your space. This is the perfect moment to upgrade your DIY kit with a reliable pipe detector so your next project goes off without a hitch. Having the right tools on hand builds the confidence you need for future home improvements.
If the repair site is in a prominent position, use it as an excuse to refresh your styling. You can find beautiful pieces in our home decor range to distract the eye or even cover the patch entirely. A stylish mirror, a piece of framed art, or a well-placed shelving unit can turn a previous problem area into a beautiful feature. Transforming your home after a mishap is all about combining practical fixes with a bit of creative flair.
Take Control of Your Home Repairs and Prevent Future Leaks
If you need to know what to do when you hit a water pipe in wall, you must shut off the mains water at the stopcock immediately to prevent flooding. Next, drain the remaining water from your taps and identify if the pipe is copper or plastic to determine the necessary repair kit. Most minor punctures can be fixed with a temporary clamp or a permanent push-fit repair coupling; however, significant damage requires a professional plumber. Using a pipe detector during future projects will prevent these high-stakes accidents from occurring again.
Being prepared means having the right gear on hand before you start drilling. We're a trusted UK store committed to helping you build and fix with total peace of mind. You can explore our range of hand tools to prepare for your next DIY project and enjoy fast UK delivery on all orders. Every item in our collection comes with quality guaranteed DIY tools so you can focus on transforming your space. You've got the skills to handle any home improvement challenge that comes your way.
Common Questions About Fixing Drilled Water Pipes
Should I pull the nail out of the water pipe immediately?
Don't pull the nail or screw out immediately if you hit a water pipe in wall. The object is currently acting as a temporary plug and removing it will cause the water to spray out at full pressure. Leave the nail in place to slow the leak while you quickly locate your stopcock to turn off the main water supply. Once the water is safely off and the system is drained, you can then remove the object and assess the damage.
How do I know if I hit a water pipe or a gas pipe?
You can identify the difference by checking for moisture or listening for a distinct hissing sound. A punctured water pipe will usually show signs of dampness or spray liquid within 10 seconds of the impact. A gas pipe won't leak fluid but will emit a clear whistling noise and a "rotten egg" smell caused by added mercaptan. If you suspect you've hit a gas line, evacuate your home immediately and call the National Gas Emergency Service on 0800 111999.
Can I use waterproof tape to fix a leaking pipe permanently?
No, waterproof silicone tape is only a short-term emergency measure and won't provide a permanent solution. While it can hold back a leak for 24 to 48 hours, the constant 3 bar pressure of a UK mains water system will eventually cause the tape to fail. You must replace the damaged section with a mechanical fitting or a soldered joint to ensure a lasting repair. Use tape only to buy yourself enough time to get to a DIY store for proper supplies.
What is the easiest way to fix a copper pipe without soldering?
The easiest way to repair a copper pipe without a blowtorch is by using a push-fit connector or a compression fitting. These components allow you to join pipes by simply pushing them into the fitting or tightening a nut with a spanner. Brands like Speedfit or Hep2O offer reliable, DIY-friendly solutions that create a watertight seal without the need for heat. This is the safest method for what to do when you hit a water pipe in wall if you're working near flammable insulation.
Will my home insurance cover the damage from a drilled pipe?
Most UK home insurance policies cover the resulting damage under "accidental damage" or "escape of water" clauses. While the insurer usually pays to repair your ruined plasterboard, flooring, or furniture, they don't always cover the cost of the actual pipe repair itself. Check your policy for "trace and access" cover, which pays for the cost of exposing the pipe. Approximately 80% of comprehensive buildings insurance policies include this protection as standard.
How much does it typically cost to have a plumber fix a small hole in a pipe?
A professional plumber in the UK typically charges between £80 and £150 for a standard emergency repair during normal business hours. This price usually includes the first hour of labour and basic materials like a copper coupling or a small length of pipe. If you require a call-out after 6pm or on a weekend, prices can rise to £250 or more. Hiring a professional ensures the repair meets current Water Regulations Advisory Scheme standards.
How can I tell where water pipes are behind a wall without a detector?
You can estimate pipe locations by tracing vertical and horizontal lines from your radiators, taps, and boiler. Pipes almost always run in straight lines from these fixtures, so avoid drilling directly above or below a sink or radiator. You can also check the direction of floorboards, as pipes often run across joists through pre-cut notches. While these visual cues work in about 90% of cases, using a dedicated pipe detector is the only way to be completely certain before you drill.
Leave a comment