


What Saw Do I Need to Cut Laminate Flooring? (2026 Expert Guide)
Using the wrong saw on your new laminate flooring is the fastest way to turn a dream DIY project into a costly pile of chipped planks. We get it; the fear of ruining that beautiful, expensive surface can stop you before you even start.
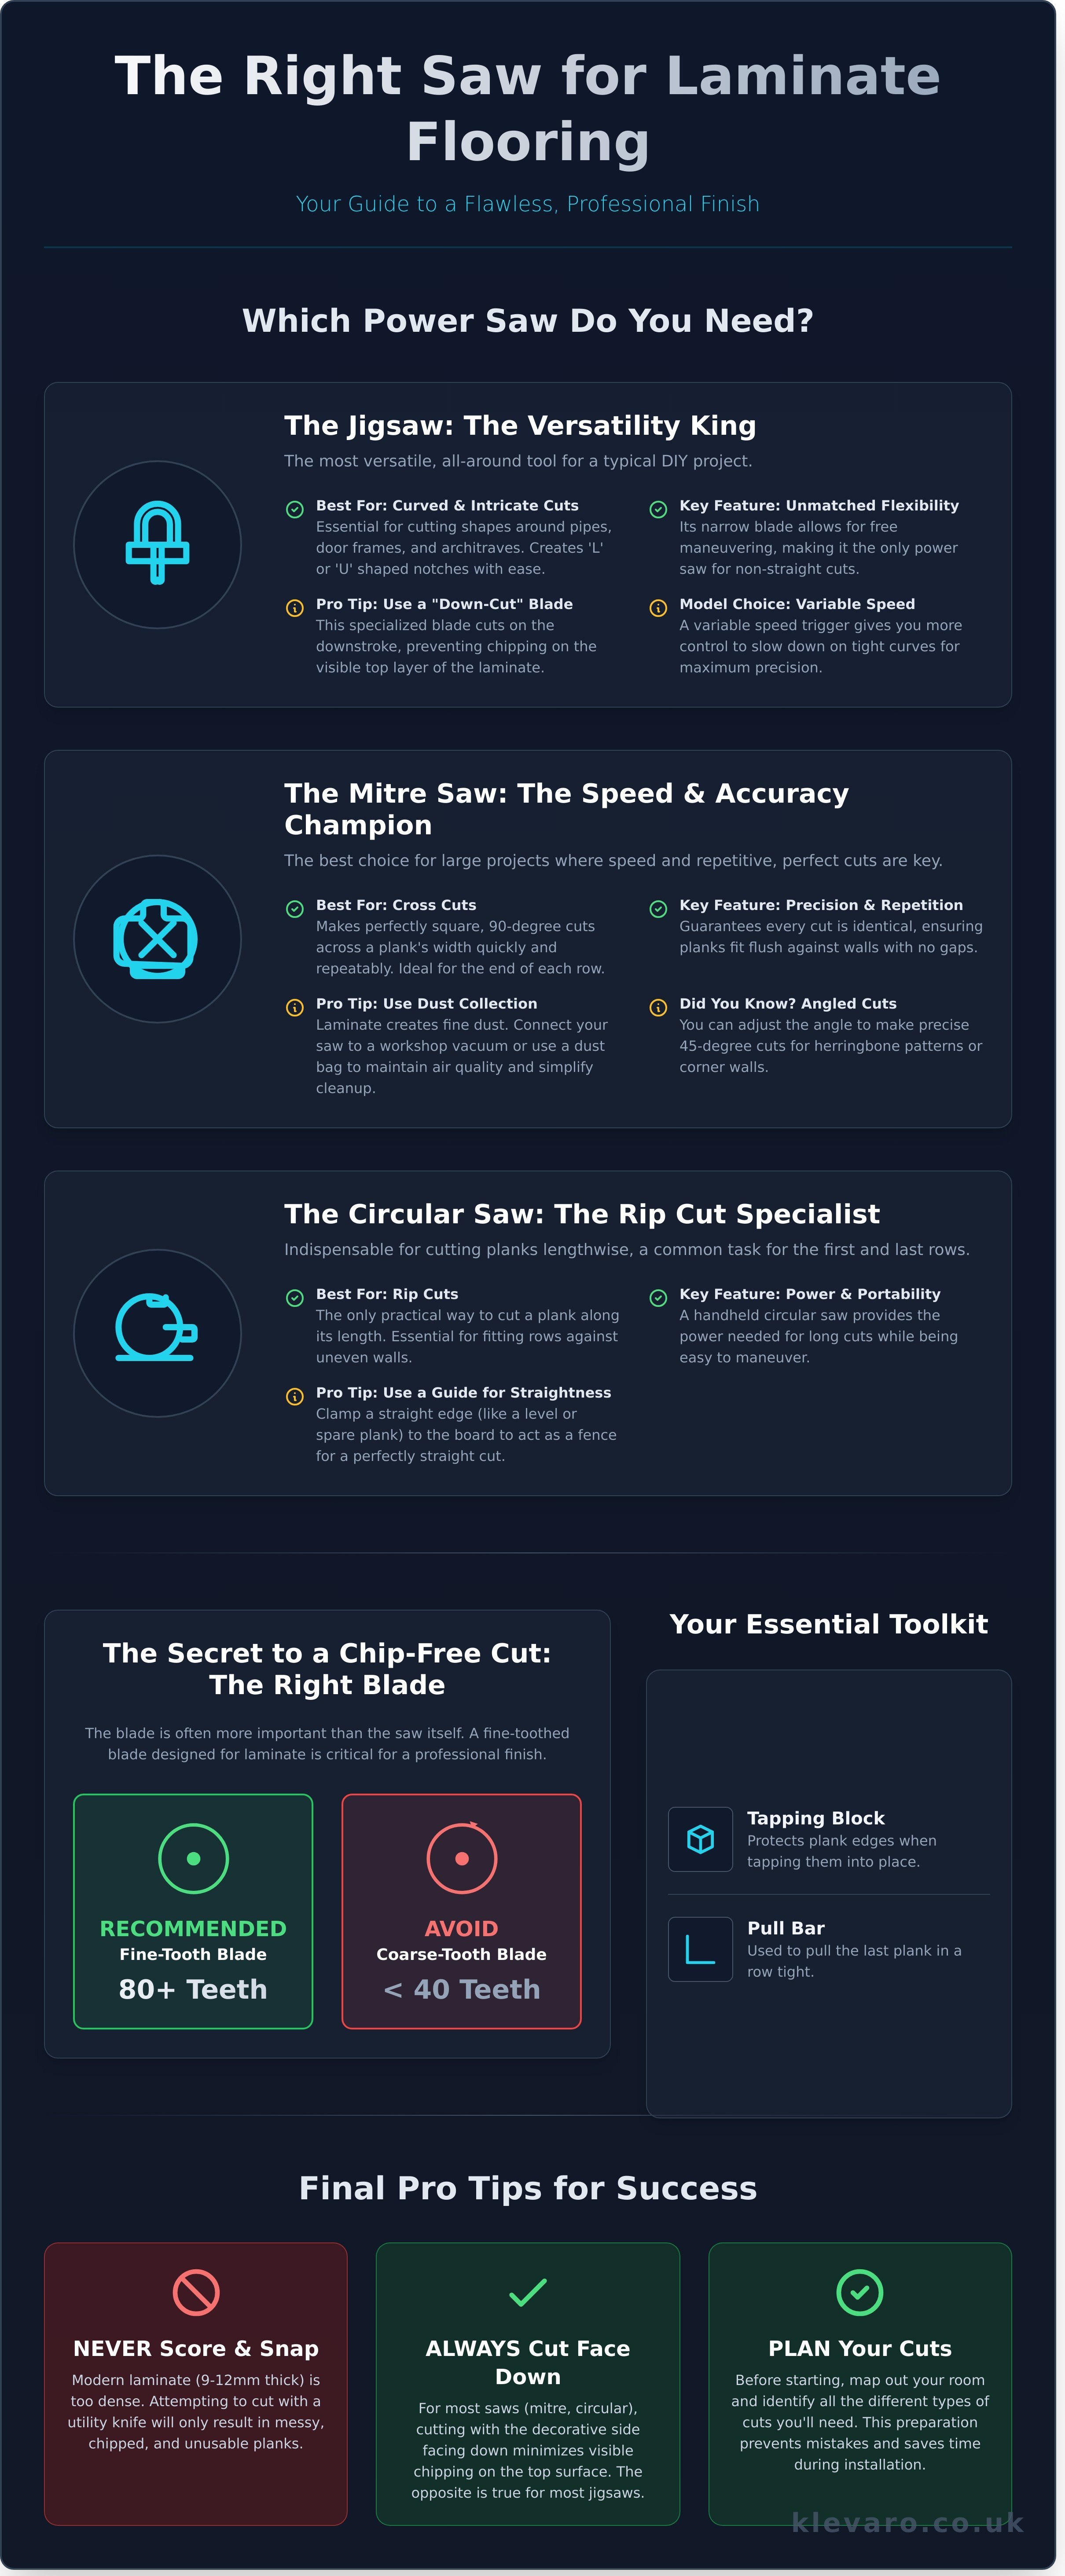
So, what saw do you need to cut laminate flooring for a flawless finish? For most straight, clean cuts, a mitre saw or a circular saw is your best friend, especially when paired with a fine-tooth blade (think 80 teeth or more). For any tricky curves or cutouts, like fitting a board around a radiator pipe, a jigsaw is the essential tool for the job.
This guide promises to eliminate the guesswork. We'll show you exactly which saw to grab for every type of cut you'll face. Get ready to transform your space with the confidence that comes from having the right gear and the right advice for a professional-looking floor you can be proud of.
Key Takeaways
- For most DIYers, a jigsaw is the most versatile saw, tackling both the straight cuts and tricky curves you'll encounter during installation.
- The answer to what saw do I need to cut laminate flooring depends on the job; a mitre saw is best for speed on straight cuts, while a circular saw excels at cutting planks lengthwise.
- Achieve a chip-free, professional finish by selecting the right blade, as a fine-toothed blade designed for laminate is more critical than the saw itself.
- A perfect installation requires more than just a saw, so learn why a tapping block and pull bar are essential tools for seating your planks correctly without damage.
The Best Saws for Cutting Laminate Flooring in 2026
So, what saw do you need to cut laminate flooring? For most DIY projects, a jigsaw is the best all-around tool. Its versatility allows it to handle both the essential straight cuts and the tricky curved cuts needed around pipes or door frames. If your project involves many rooms and you need speed, a mitre saw is the fastest and most precise choice for making repeated straight cuts across planks. For very small jobs, like a single box room, a fine-toothed hand saw is a quiet, budget-friendly option, but it demands significant physical effort.
It’s important to understand that modern laminate flooring, typically between 9mm and 12mm thick, is far too dense and durable to be scored and snapped with a utility knife. Attempting this will only lead to frustration and messy, chipped edges. To get a clean, professional finish for your project, investing in a quality electric saw is highly recommended. It saves time, reduces waste, and gives you the crisp cuts your new floor deserves.
Why the Jigsaw is the Most Versatile Tool
A jigsaw is the DIYer's best friend when fitting laminate flooring because no other saw can match its ability to make intricate cuts. When you reach a doorway or a radiator pipe, you'll need to make "U-shaped" or "L-shaped" notches in a plank. A jigsaw handles these complex shapes with ease, allowing you to create a seamless fit that looks professionally installed. Get a model with a variable speed trigger, as this gives you ultimate control to slow down on tight curves and prevent the laminate's top layer from chipping.
Beyond its cutting flexibility, the jigsaw is a practical choice for home use. It's compact, lightweight, and easy to store in a shed or cupboard once your flooring project is complete. This makes it a far more accessible tool for occasional use compared to larger, more specialised equipment.
When to Choose a Mitre Saw for Speed
If your project is large and efficiency is your top priority, a mitre saw is the champion of speed and accuracy. Its primary function is to make perfectly square, 90-degree cross-cuts time after time. This guarantees that the planks at the end of each row will fit flush against the wall without any gaps. You can set your length, cut a plank in seconds, and repeat the process for dozens of boards with identical results. While a jigsaw offers flexibility, other power tools like the mitre saw or a handheld Circular Saw excel at specific tasks requiring repetitive straight cuts.
Using a mitre saw indoors, however, requires careful planning for dust. Laminate flooring produces a large amount of fine dust when cut, which can quickly cover a room and impact air quality. To manage this, always connect your saw to a workshop vacuum or use the included dust collection bag. This simple step makes cleanup much easier and creates a healthier working environment.
Power Saw Options for Straight and Curved Cuts
The right power saw for your project depends entirely on the type of cut you need to make. For clean, straight cuts across a plank's width, a mitre saw is your best tool. For long cuts down the length of a plank, a circular saw is essential. If you need to cut curves or complex shapes, only a jigsaw will do the job.
For flawless cross-cuts, a mitre saw is king. Also known as a chop saw, it's designed for making fast, perfectly repeatable cuts across the width of a plank. This guarantees a square 90-degree cut every time, which is vital for laying standard rows. By adjusting the saw's angle, you can also make precise 45-degree cuts for herringbone patterns or for fitting boards neatly around corner walls.
For intricate and curved cuts, you'll need a jigsaw. It's your go-to tool for cutting shapes around radiator pipes, door frames, and architraves. The narrow blade allows you to manoeuvre freely, creating custom notches that are impossible with other saws. To avoid chipping the laminate's top layer, always use a fine-toothed, "down-cut" blade which presses the decorative surface down instead of lifting it up.
Answering the question of what saw do I need to cut laminate flooring often comes down to these three power tools, each serving a distinct purpose. Having the right one turns a frustrating job into a satisfying one. Before you begin, map out your room and identify all the different cuts you'll need for a seamless installation.
Circular Saws for Long Lengthways Cuts
A circular saw is indispensable for rip cuts, which means cutting a plank along its length. This is most commonly needed for the first and last rows of flooring in a room, as they almost always need to be trimmed to fit snugly against the wall. A handheld circular saw gives you the power and portability to handle these long cuts efficiently.
The secret to a perfectly straight rip cut is using a guide. You can clamp a straight piece of wood or a spirit level to the plank to act as a fence for your saw to run against. Setting up a guide rail correctly is key to a flawless finish; for a visual walkthrough, this Lowe's step-by-step guide offers excellent practical advice. Getting these cuts right is simple when you have the right gear, and you can find everything you need to build with confidence in Klevaro’s tools and equipment collection.
Laminate Guillotines: The Dust-Free Alternative
If the thought of dust and noise puts you off, a laminate guillotine is a fantastic alternative. This manual tool works without a motor. You simply place the plank on the bed and pull down a long handle, which uses leverage to force a sharp, heavy blade through the board with a clean shearing action.
The biggest benefits are the lack of mess and noise, making it the perfect choice for anyone working inside a finished home or living in a flat. There's no fine dust to clean up and no loud motor to disturb neighbours. However, be aware of their limitations; they can only perform straight cross-cuts and typically have a thickness limit of around 10mm to 12mm.
Choosing the Right Blade to Prevent Chipping
Here's a secret the pros know: the saw blade you use is often more important than the saw itself for achieving a flawless finish. Laminate flooring isn't wood. It's a tough composite of fibreboard (MDF or HDF) and a rock-hard aluminium oxide wear layer that is incredibly abrasive. Using a standard wood blade is a recipe for disaster; it will become blunt after just 5-10 cuts, leading to ugly, chipped edges.
To get clean, professional results, you must use a carbide-tipped blade. Tungsten Carbide is an extremely hard material that resists the abrasive nature of laminate, staying sharp for the entire project. Investing £20-£40 in a purpose-built laminate blade transforms your saw, ensuring every cut is precise and chip-free. This is a critical part of the answer to what saw do i need to cut laminate flooring, as the right blade makes almost any saw the right saw.
Understanding TPI (Teeth Per Inch)
TPI, or Teeth Per Inch, dictates the quality of your cut. For laminate flooring, a high TPI is non-negotiable. Look for circular saw blades with 80-100 teeth or jigsaw blades with a TPI of 14-20. A low-TPI blade, like a 24-tooth blade meant for rough-cutting timber, has huge gaps between its teeth that rip out large chunks of material. This aggressive action will shatter the brittle surface of a laminate plank.
Think of it this way. A high TPI blade acts like a fine-grit sandpaper, slicing through the resin layer without splintering the core. The cut will be slower than with a rough-cut blade, but the perfectly smooth edge is a trade-off worth making every time. Your patience will be rewarded with joints that fit together seamlessly.
Up-cut vs. Down-cut Jigsaw Blades
If you're using a jigsaw for complex shapes or notches, the blade's cutting direction is vital. A standard jigsaw blade has teeth that point upwards, meaning it cuts on the up-stroke. This action pulls wood fibres up and away from the surface, causing chipping right on the decorative face of your flooring plank.
The solution is a specialised "down-cut" or "reverse-tooth" blade. These blades have teeth pointing downwards, so they cut on the down-stroke. This pushes the material down, keeping the visible surface pristine and completely free of chips. If you can't find a down-cut blade, don't worry. You can get the same result with a standard blade by simply marking your cut, flipping the plank over, and cutting it from the back. All the chipping will happen on the hidden underside of the board.
Step-by-Step Guidance for Precision Laminate Cuts
You've chosen your laminate and have the right saw ready to go. Now, it's all about technique. A flawless finish isn't just about the tool; it's about how you use it. Follow these essential steps to ensure every cut is clean, accurate, and professional, transforming your room from a DIY project into a stunning new space.
Mastering the fundamentals is key to avoiding costly mistakes and frustrating chipping. Before you make a single cut, commit these four golden rules to memory:
- Measure Twice, Cut Once: Always measure the gap you need to fill, from the wall to the last full plank. From this measurement, subtract 10mm to allow for the crucial expansion gap. This space lets the flooring expand and contract with temperature changes without buckling.
- Mark Your Line Clearly: Use a pencil and a set square to draw a sharp, precise cut line on the decorative side of the plank. Marking on the top surface helps you follow the line perfectly and ensures any minor chipping from the blade's exit occurs on the less visible underside.
- Secure Your Plank: Never cut a loose plank. Firmly clamp it to a workbench or sawhorse to eliminate any vibration. A stable board is essential for a straight cut and is much safer to work with.
- Start the Saw First: Get your saw's blade up to full speed before it makes contact with the laminate. This prevents the blade from catching and jumping, which can damage the plank and pose a safety risk.
Cutting Around Radiator Pipes and Door Frames
Straight cuts are one thing, but rooms are full of obstacles. For radiator pipes, use a drill with a spade bit or hole saw to create a hole for each pipe. Then, use a jigsaw to cut out the thin piece of material between the holes and the edge of the plank. For uneven walls or detailed door frames, scribing is your best friend. This technique involves using a compass or profile gauge to trace the wall's contour onto the board for a perfect fit. These detailed jobs often require a delicate touch, and a reliable set of hand tools from Klevaro, like a sharp chisel or coping saw, will give you the control you need for a professional finish.
How to Achieve a Clean Rip Cut
A rip cut runs along the length of the plank, typically for the final row against a wall. The right technique here is just as important as the answer to 'what saw do i need to cut laminate flooring'. To prevent the long off-cut piece from snapping off and tearing the laminate before the cut is finished, make sure it’s fully supported by a workbench or blocks of wood at the same height as your main piece.
For an extra-crisp edge, apply a strip of masking tape over your marked line before cutting. The saw blade cuts through the tape first, which helps hold the delicate top layer of the laminate together and drastically reduces chipping. If you're using a circular saw, check your blade depth. It should be set to protrude just 6mm below the bottom of the plank to minimise friction and prevent splintering.
With these techniques, you can tackle any cut with confidence. To ensure every measurement is spot-on, explore our range of reliable measuring tools and get your project started on the right foot.
Building Your Laminate Flooring Toolkit with Klevaro
You've made the big decision. You know which saw is right for your project and are ready to get started. But answering the question of what saw do i need to cut laminate flooring is only the first step towards a flawless finish. A successful installation depends on a team of trusted tools working together. At Klevaro, we believe having the right gear turns a challenging task into a satisfying achievement.
Think of your saw as the star player. It can't win the game alone. You'll need a supporting cast of high-quality accessories to ensure every plank fits perfectly, every line is straight, and your final floor looks professionally installed. From precise measurements to the final tap of the plank, we have the essentials you need for all your home and garden projects.
To guarantee those tight, seamless joints that define a great laminate floor, a few key items are non-negotiable:
- Tapping Block: This simple block protects the delicate tongue and groove of the plank. You use it with a hammer to gently tap planks into place without causing damage.
- Pull Bar: For the final plank in a row, where there's no space for a tapping block, a pull bar is essential. It hooks over the end of the plank, allowing you to tap it tight from the opposite side.
- Quality Measuring Tape & Set Square: Inaccurate cuts are the number one cause of wasted material and frustration. A reliable steel measuring tape and a set square ensure your marks are precise and your 90-degree cuts are truly square, preventing "creeping" errors across the room.
Setting Up a Temporary Cutting Station
Protect your home and work efficiently by setting up a dedicated cutting area. A pair of sturdy sawhorses or a portable workbench provides a stable surface at a comfortable height, saving your back and your existing floors. Ensure the area has bright, direct lighting so you can clearly see your pencil marks for accurate cuts. Keep a small brush and dustpan handy to clear away sawdust frequently; this prevents it from scratching the surface of your new flooring.
Safety Gear: Protecting Your Eyes and Lungs
Your safety is the most important tool of all. Laminate dust isn't just wood; it contains resins and binding agents that you shouldn't inhale. A well-fitting dust mask is absolutely essential. When using any power saw, debris can be ejected at high speed. A pair of durable safety goggles will protect your eyes from chips and fine particles. With the right protective gear, you can fix, build, and create with confidence.
Getting a fantastic result is about more than just raw power. It’s about precision, safety, and having a complete system of tools you can rely on. While knowing what saw do i need to cut laminate flooring sets you on the right path, it's the full toolkit that gets you to the finish line. We're here to help you gather every piece you need to transform your space and enjoy the pride of a job well done.
Build Your Toolkit for Flawless Laminate Floors
You're now equipped with the knowledge to tackle your laminate flooring project with confidence. The key is choosing the right tool for the right cut: a mitre saw delivers unmatched precision for straight cuts, while a jigsaw is your go-to for navigating tricky corners and curves. Ultimately, the answer to what saw do I need to cut laminate flooring depends on your project's specific demands. But remember, pairing your saw with a fine-toothed, carbide-tipped blade is the secret to preventing chips and achieving a professional finish.
Ready to get started? At Klevaro, we've expertly curated everything you need to fix, build, and create. From trusted brands like Rolson and Stanley to all the essential DIY gear, you'll find it in our collection. Shop our complete range of DIY tools and equipment and enjoy Fast UK Delivery right to your door.
Your perfect floor is just a few clicks away!
Frequently Asked Questions
Can I use a standard wood handsaw for laminate?
Yes, you can use a standard handsaw, but it's not the best tool for the job. The abrasive top layer of laminate flooring will dull a regular wood saw blade very quickly. If you must use one, choose a hardpoint saw with fine teeth for a cleaner cut. Be prepared for it to be slow and physically demanding, making it suitable for only one or two cuts rather than an entire room.
Which jigsaw blade is best for laminate flooring?
The best jigsaw blade for laminate is a fine-toothed, bi-metal blade specifically designed for cutting hard materials. Look for blades with 10-14 TPI (Teeth Per Inch) labelled for laminate or clean wood cutting. A reverse-tooth (or down-cut) blade is an even better choice, as it cuts on the downstroke, which prevents chipping on the visible top surface of the plank and gives you a flawless finish.
Do I need a special saw for 12mm thick laminate?
No, you don't need a special saw for 12mm laminate, but a capable tool with a sharp blade is essential. Thicker laminate puts more stress on a saw's motor. A mitre saw, circular saw, or a quality jigsaw will all cut 12mm boards effectively, provided they are fitted with a fresh, fine-toothed carbide blade. A dull blade will struggle, potentially burning the wood and leaving a rough edge.
How do I cut laminate flooring without it chipping?
To cut laminate without chipping, always use a sharp, fine-toothed blade. The most effective trick is to control which side the blade exits. With a circular saw or standard jigsaw, cut with the finished side of the plank facing down. For a mitre saw or a jigsaw with a down-cut blade, cut with the finished side facing up. Applying masking tape along the cut line also provides extra support to the surface layer.
Is a mitre saw better than a jigsaw for laminate?
A mitre saw is better for fast, perfectly straight crosscuts, while a jigsaw is unbeatable for custom shapes and notches. For cutting planks to length at the end of a row, a mitre saw is far more efficient and guarantees a precise 90-degree angle every time. A jigsaw is the essential tool you'll need for fitting boards around pipes, door frames, and other obstacles. Most projects benefit from using both.
Can I cut laminate flooring with a circular saw?
Yes, a circular saw is a great choice for cutting laminate flooring, particularly for long, straight rip cuts down the length of a plank. For the cleanest results, fit your saw with a fine-toothed carbide blade with at least 60 teeth. Always remember to place the plank with its decorative side facing down to ensure any potential chipping happens on the back, leaving your visible surface perfect.
What is the easiest tool for a beginner to cut laminate?
The easiest tool for a beginner is a manual laminate floor cutter. This device works like a guillotine, making clean, straight cuts with one pull of a long handle. It creates no dust and is almost silent, making it ideal for working indoors. When asking what saw do I need to cut laminate flooring as a first-timer, a manual cutter is the top choice for simplicity, though you'll still need a jigsaw for any curved cuts.
Leave a comment