


What Drill Bit for Porcelain Tiles? The Best UK Guide for 2026
Your standard masonry bit will likely smoke and burn before it even scratches the surface of a modern porcelain tile. To successfully drill through this dense material, you must use a diamond-tipped drill bit. Standard masonry or carbide-tipped bits are not hard enough and will fail to penetrate the surface. For a professional finish in 2026, a diamond core bit used with a water-cooling system is the most reliable method to prevent cracking. Using the correct what drill bit for porcelain tiles uk professionals recommend ensures a clean hole without damaging your expensive installation.
It's stressful to work on tiles that cost £45 per square metre, especially when you're worried about a single slip ruining the whole wall. We understand the frustration of watching a drill skid across a surface without making a mark. This guide provides the exact toolkit and step-by-step methods to achieve a flawless result with total confidence. We'll explore the best diamond bits available in the UK and explain when to choose wet versus dry drilling for your project.
Key Takeaways
- Learn why diamond-tipped bits are the only reliable choice for drilling through tough porcelain without cracking or damaging your expensive tiles.
- Master professional techniques like using masking tape to prevent slipping and starting at a 45-degree angle to create a perfect "starting notch."
- Understand the vital differences between wet and dry drilling methods to keep your tools cool and ensure your drill bits last longer.
- Discover exactly what drill bit for porcelain tiles uk experts recommend to achieve a clean, professional finish on every project.
- Identify the essential equipment required for success, including why a variable speed drill is a non-negotiable tool for porcelain installations.
Diamond Tipped Drill Bits are the Only Reliable Choice for Porcelain Tiles
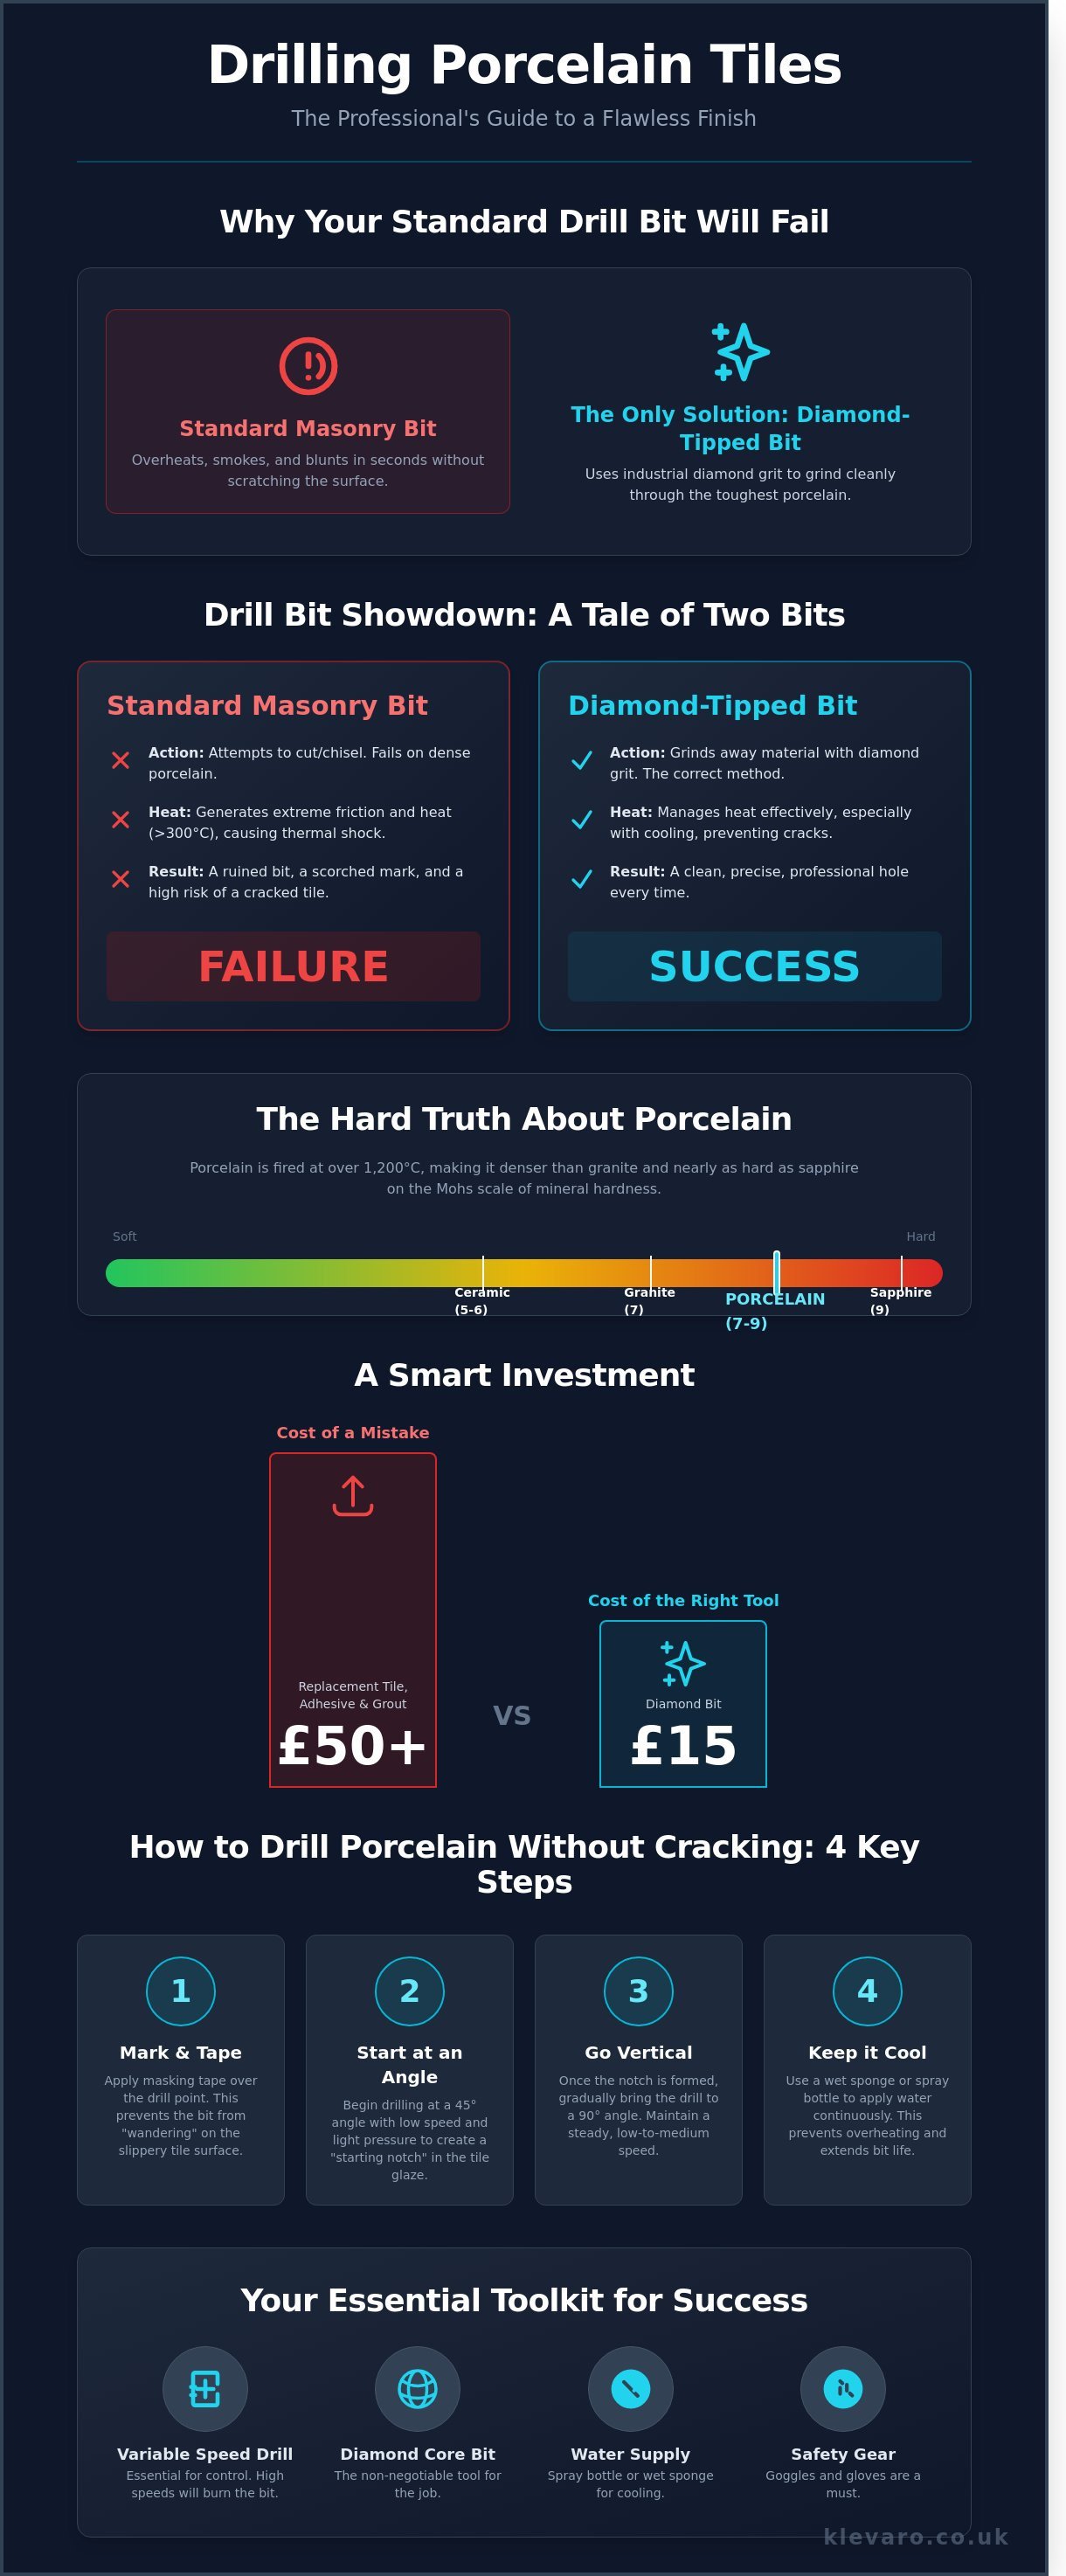
You must use a diamond-tipped drill bit for porcelain tiles to achieve a clean, professional finish without cracking the material. Porcelain is a vitrified, high-density product that's significantly harder and less porous than standard ceramic. Standard masonry bits or carbide-tipped "spear" bits will fail to penetrate the surface and will likely overheat within seconds. If you're searching for what drill bit for porcelain tiles uk projects require, the only reliable choice is a diamond-tipped bit. These tools use industrial-grade diamond grit to grind through the tile rather than cutting or punching it. This grinding action prevents the tile from shattering under pressure.
Standard drill bits rely on a sharp edge to slice through material, but porcelain's density makes this impossible. Most DIY enthusiasts find that a regular bit simply spins on the surface, creating heat but no hole. You'll likely ruin both the bit and the tile if you persist with the wrong equipment. Using a diamond bit ensures you can fix, build, and create with confidence in any room of your home.
Why Diamond Bits are Non-Negotiable
Porcelain sits between 7 and 9 on the Mohs scale of mineral hardness, making it nearly as tough as sapphire. Most standard drill bit materials like high-speed steel or basic carbide are too soft to make a dent in this surface. You need a material that's harder than the tile itself, which is why industrial diamonds are the industry standard for UK tilers.
Thermal shock is a major risk when you don't use the correct gear. Friction from a blunt bit can quickly raise the tile temperature above 300°C in a localised spot. This intense heat causes the porcelain to expand rapidly and snap, often leaving a jagged crack across your wall. A diamond bit, especially when used with water or cooling wax, keeps temperatures low and the tile intact.
Spending £15 on a high-quality diamond bit is a smart investment for any DIY project. Replacing a single high-end 600mm x 600mm porcelain floor tile can cost upwards of £50 when you factor in the replacement tile, adhesive, and grout. It's much cheaper to buy the right tool first time than to pay for expensive mistakes. You'll save time and money while ensuring your home transformation looks stunning.
The Difference Between Porcelain and Ceramic Bits
Ceramic tiles are relatively soft and porous, which allows a standard £3 carbide-tipped bit to work effectively. However, that same bit will glow red and blunt instantly if it touches a modern porcelain slab. Porcelain is fired at much higher temperatures than ceramic, resulting in a glass-like density that requires a different approach. You'll know you've used the wrong bit if you see sparks or smell burning without making any progress.
When shopping in UK retail stores, you'll see various "multi-purpose" bits, but these rarely handle 10mm thick porcelain. Look specifically for "vacuum-brazed" diamond grit, as these bits hold their diamonds more securely during high-speed rotation. This quality ensures the bit lasts for multiple holes rather than wearing out after a single use. It's a key part of getting the best value for your tool kit.
The role of the "core" in diamond hole saws is also vital for a smooth experience. A hollow core allows the bit to remove a small plug of porcelain rather than grinding the entire volume of the hole. This reduces friction and allows for better cooling, which is essential for maintaining the life of your bit. Always clear the "slug" or waste material from the bit after every hole to keep your projects moving quickly and efficiently.
Understanding Why Standard Masonry Bits Fail and Diamond Bits Succeed
To understand what drill bit for porcelain tiles uk DIYers should choose, you must look at how different materials respond to friction. Standard masonry bits fail because they rely on a "hammer and chisel" impact method that porcelain is too dense to accept. Diamond-tipped bits succeed by using industrial-grade grit to grind through the surface through constant abrasion. This grinding action creates a clean hole without putting unnecessary stress on the tile's structure. If you use a traditional bit, you'll likely spend 10 minutes creating nothing but a scorched mark and a ruined tool.
The physics of drilling comes down to the difference between impact and abrasion. Standard steel bits with carbide tips are designed for brick or concrete, which are relatively porous. Porcelain is fired at temperatures reaching 1,200°C, creating a glass-like density that's harder than natural granite. When a masonry bit spins against this surface, it can't "bite" into the material. Instead, it just generates immense heat through friction, which quickly reaches temperatures over 400°C.
This extreme heat buildup destroys the tempering of standard steel bits almost instantly. Once the metal softens, the sharp edge rounds off and becomes useless. You might encounter the "glazing" effect, where the bit spins rapidly but doesn't move deeper into the tile. The heat actually polishes the tile surface or melts the tip of the bit, creating a smooth, friction-less contact point. To avoid this, you need a diamond bit that stays sharp even as it wears down, exposing new layers of cutting grit.
The Problem with Hammer Action
You must never use the hammer or pulse setting on your drill when working with porcelain. Hammer action sends high-frequency vibrations through the tile, which leads to micro-fractures in the brittle body. These tiny cracks can stay hidden until you apply pressure to the tile later, causing it to snap unexpectedly. Achieving high torque at a low RPM is the safest way to progress. Aim for a speed between 600 and 900 RPM to keep the bit cool and the tile intact. It's also vital to manage the waste produced; always follow official guidance on silica dust control to keep your workspace safe from harmful fine particles.
PEI Ratings and Drill Resistance
PEI ratings are a measure of surface wear and hardness that tell you how much resistance a tile will offer. In the UK, most modern floor tiles carry a PEI 4 or PEI 5 rating, meaning they're built for heavy foot traffic and extreme durability. A PEI 5 tile is incredibly dense, often requiring three times as much effort to drill through compared to a standard ceramic wall tile. This density directly affects your project timeline; drilling a single 6mm hole in a PEI 5 slab can take up to 180 seconds of steady, patient work. If you're planning a full renovation, you can explore our range of durable tools to ensure you have the right gear for these high-resistance materials.
When you're deciding what drill bit for porcelain tiles uk projects require, always check the tile packaging for these ratings. A higher number means a more "vitrified" or glass-like interior, which is exactly why a diamond bit is non-negotiable. Using the right tool ensures you won't waste money on replacement tiles after an accidental crack. It also protects your drill motor from burning out due to excessive strain on a blunt bit.
Choosing Between Wet and Dry Diamond Drill Bits
You should choose a dry diamond bit for small, one-off tasks and a wet diamond bit for extensive tiling projects. Dry bits contain a cooling wax that melts during use, making them perfect for fitting bathroom cabinets or mirrors without the mess of water. Wet bits require a continuous water feed to dissipate heat, which is essential when drilling more than three or four holes in dense porcelain. Following guidance from The Tile Association ensures you select a specialist bit capable of penetrating fully vitrified surfaces. While dry bits offer speed, wet drilling remains the industry standard for durability and precision.
Deciding what drill bit for porcelain tiles uk DIYers need depends on the scale of the job. For a single hole to hang a picture, the convenience of a dry bit is hard to beat. If you're renovating an entire bathroom with 10mm thick porcelain floor tiles, investing in a wet-drilling setup will save you money on replacement bits. Wet drilling can extend the life of your tool by up to 500% because it prevents the diamond grit from overheating and stripping away. Always match the cooling method to the intensity of the task to get the cleanest finish.
The Benefits of Wax-Filled Dry Bits
Dry diamond bits feature a hollow core packed with a specially formulated paraffin wax. As the drill rotates at speeds between 1,500 and 3,000 RPM, the friction generates heat that melts the wax. This liquid then flows to the cutting edge, lubricating the diamond grit and absorbing thermal energy. These bits are the best choice for vertical walls where water runoff would damage paintwork or vanity units. They're ideal for installing mirrors, toilet roll holders, and shelving. Keep in mind that a standard £15 dry bit typically lasts for 5 to 10 holes before the cooling wax is exhausted and the diamonds dull.
Wet Drilling Techniques for Professional Results
Wet drilling is the most effective way to manage heat during long drilling cycles. You can create a simple "water dam" by shaping a ring of plumber's putty or high-quality masking tape around your marks. Fill this reservoir with a small amount of water to keep the bit submerged while you work. For larger projects, use a handheld spray bottle to provide a constant mist or a dedicated pressurized water feed system. This constant cooling prevents the porcelain from cracking due to thermal shock. Using these methods allows a single professional-grade bit to complete over 50 holes in Grade 5 porcelain, making it a cost-effective choice for large-scale renovations.
Safety is a vital factor when using water near power tools. Always use a cordless drill or a 110V transformer for wet applications to eliminate the risk of electric shock. Never allow water to splash into the motor vents of a 230V mains-powered drill. If you're working in tight spaces near electrical sockets or light switches, stick to dry-drilling methods. This keeps your workspace dry and removes the danger of short circuits. By choosing the right cooling method, you'll protect your tools and ensure a professional, crack-free finish on your tiles.
How to Drill Porcelain Tiles Without Cracking Them
To drill porcelain tiles without cracking them, you must use a diamond-tipped bit and a variable speed drill set to a low RPM, typically between 600 and 1,000 RPM. Start by marking the spot with masking tape to prevent the bit from slipping across the polished surface. Begin the cut at a 45-degree angle to create a small notch before slowly leveling the drill to a 90-degree position. Apply light, consistent pressure rather than forcing the tool; excessive force is the primary cause of tile fractures. Keep the bit cool by frequently dipping it in water or using a wet sponge to prevent heat build-up. Following these steps ensures a clean, professional finish on even the hardest Grade 5 porcelain.
Start by applying a small piece of masking tape over the intended hole location. This provides the necessary friction for the drill bit to bite into the surface. When considering what drill bit for porcelain tiles uk professionals recommend, a diamond core bit is the standard choice for its durability and precision. Position the drill at a 45-degree angle to the tile surface. This allows the edge of the diamond coating to grab the porcelain without skidding across the glaze.
Once you see a small crescent-shaped notch, gradually pivot the drill until it's perfectly perpendicular at 90 degrees. Maintain a steady hand and let the weight of the drill provide most of the pressure. Pushing too hard generates friction heat, which can cause the tile to expand and snap. For a standard 8mm hole in a 10mm thick porcelain tile, the process should take approximately 2 to 4 minutes. If you try to rush it in under 60 seconds, you're likely to overheat the bit or crack the material.
Preventing the Drill from Wandering
A common mistake is letting the bit "skate" across the tile, leaving unsightly scratches. You can prevent this by creating a simple template from a scrap piece of 12mm plywood. Drill a hole the same size as your bit into the wood, then clamp or hold the wood firmly against the tile. This guide keeps the bit locked in place during those critical first 10 seconds of drilling. If you don't have wood, a masking tape X works well by adding extra grip. Keep your drill speed low; high speeds reduce control and increase the likelihood of the bit wandering.
Managing Heat and Dust
Heat is the biggest threat to both your tile and your tools. Use a pulsing technique by drilling for 15 seconds and then backing off for 5 seconds. This allows air or water to reach the tip of the bit. If you notice a faint burning smell or see the bit turning a blueish hue, stop immediately. This indicates the temperature has exceeded 250 degrees Celsius, which will ruin the diamond coating. Clear the hole of white porcelain dust every 20 seconds to ensure the diamonds stay in direct contact with the tile surface. When you know what drill bit for porcelain tiles uk projects require, you'll find that keeping it clean is just as important as the bit itself.
Ready to start your project? You can explore our range of high-quality drill bits to find the perfect match for your next DIY task.
Essential Tools and Equipment for Your Tiling Project
A successful tiling project relies on more than just choosing a single drill bit. While knowing what drill bit for porcelain tiles uk professionals recommend is the first step, you also need a cohesive kit to ensure precision and safety. Porcelain is an incredibly dense material with a Mohs hardness rating often between 7 and 9, meaning every tool in your arsenal must be up to the task of handling high-pressure work without failing or damaging the tile surface.
Your drill is the heart of the operation. You must use a variable speed drill rather than a standard fixed-speed model for this specific task. Drilling into porcelain requires a slow, controlled start, typically between 200 and 400 RPM, to prevent the bit from skating across the glazed surface. High speeds generate excessive heat which can crack the tile or burn out your diamond-tipped bits in under 30 seconds if you aren't careful. A drill with a sensitive trigger allows you to maintain the consistent, low-speed torque necessary for a clean cut.
Safety gear is a non-negotiable part of a DIY toolkit. When you drill into brittle materials like porcelain, microscopic shards and dust particles can fly off at high velocity. Always wear impact-resistant safety goggles to protect your vision from these sharp fragments. A simple pair of £5 safety glasses can prevent a permanent injury during a weekend project. Additionally, consider using a dust mask to avoid inhaling the fine silica dust produced during the drilling process.
Accessories Ensure Professional Alignment
Precision is what separates a professional finish from a messy DIY job. You need a high-quality spirit level to ensure your fixtures, such as towel rails or floating shelves, are perfectly horizontal. Even a 2mm deviation over a meter can look obvious once the project is finished. You can explore our range of tools and equipment to find the exact measuring gear needed for your layout. Accurate marking is equally vital; standard pencils often rub off on polished porcelain, so use a wax chinagraph pencil or a fine-tip permanent marker instead.
Combine your marking tools with a 5-metre steel tape measure that features a reliable locking mechanism. This allows you to double-check your drill points multiple times before making that first permanent mark on your expensive tiles. Using a piece of masking tape over the drill site can also provide extra grip for the bit and give you a clearer surface to mark your measurements on. These small steps prevent costly mistakes and ensure your what drill bit for porcelain tiles uk choice performs at its best.
Quality Hand Tools Finish the Job
Having a dedicated set of quality hand and general tools nearby saves time and reduces frustration during the final stages of your project. Keep a rubber mallet, a set of tile spacers, and a grout float within reach at all times. These items ensure that once the holes are drilled, the rest of the installation proceeds smoothly without constant trips to the shed or garage. A well-organised toolkit allows you to focus on the craftsmanship rather than searching for missing equipment.
Drilling into porcelain is easy when you have the right preparation and the correct equipment. By following the slow-and-steady approach with diamond-tipped bits, you'll achieve clean, chip-free holes every time. Don't let the toughness of the material intimidate you; it's simply a matter of using the right physics and the right tools. With the correct kit, you can fix, build, and create with total confidence.
Ready to transform your bathroom or kitchen? Get your project started with Klevaro’s fast UK delivery on all essential gear. We stock everything from precision levels to the heavy-duty hand tools you need to finish the job to a professional standard. Shop today and build your home with the reliable equipment you deserve.
Master Your Next Tiling Project With Professional Gear
Selecting the correct equipment is the most important step in avoiding expensive mistakes. You've learned that diamond tipped bits are the only reliable option for 2026 standards because standard masonry bits simply won't penetrate modern, dense porcelain. Choosing what drill bit for porcelain tiles uk experts recommend ensures your project stays on track without a single cracked tile.
Heat is your biggest enemy during the drilling process. Whether you opt for wet or dry diamond bits, maintaining a steady speed and using proper cooling techniques will extend the life of your tools. A successful DIY project relies on high quality gear that doesn't fail when you're halfway through a job. We've curated a selection of durable DIY essentials to help you finish every task to a professional standard.
You can equip your toolkit with professional DIY gear from Klevaro today. As a trusted UK store with quality guaranteed, we provide fast UK delivery on all tool orders to get you started immediately. It's time to stop worrying about cracked surfaces and start creating the beautiful home spaces you've planned. You've got the knowledge; now get the gear and build something great.
Frequently Asked Questions
Can I use a standard masonry drill bit for porcelain tiles?
No, you shouldn't use a standard masonry bit for porcelain. These tiles are incredibly dense and often reach a 7 or 8 on the Mohs hardness scale. A standard tungsten carbide masonry bit will overheat and blunt within 10 seconds. You must use a diamond-tipped bit to safely grind through the surface without cracking the tile.
Do I need a special drill to go through porcelain?
You don't need a specialist drill machine, but the bit itself must be diamond-tipped. A standard cordless 18V drill or a corded power drill works perfectly for this job. The most important feature is a variable speed trigger so you can maintain a low RPM. High speeds generate excessive heat that can shatter the porcelain or ruin your tools.
How do I stop my drill bit from sliding on the tile surface?
Apply a piece of masking tape over your mark to provide immediate grip for the bit. This simple trick prevents the drill from "skating" across the glossy surface and scratching your expensive finish. For even better precision, use a suction-cup drill guide. These plastic templates hold the bit in a fixed position, ensuring your hole is exactly where you planned it.
Should I use the hammer setting on my drill for porcelain?
Never use the hammer setting when drilling into porcelain tiles. The percussive vibration of a hammer drill will almost certainly crack or shatter the brittle material. Always keep your drill on the standard rotary setting. Let the diamond grit do the work by grinding the hole rather than trying to punch through it with force.
How many holes can I expect to get out of one diamond bit?
You can typically expect between 5 and 30 holes from a single high-quality diamond bit. The exact number depends heavily on how well you manage heat during the process. Using water as a coolant can increase the lifespan of a bit by 50% compared to dry drilling. If the bit starts to glow or turns blue, the diamond coating has failed and it's time for a replacement.
What is the best speed (RPM) for drilling porcelain?
The best speed for drilling porcelain is generally between 150 and 400 RPM. When considering what drill bit for porcelain tiles uk DIYers should use, remember that slower is always safer for the material. High speeds create friction that destroys the diamond bond. Start very slowly to create a pilot notch, then maintain a steady, low speed while applying light pressure.
Can I drill into porcelain tiles that are already fixed to the wall?
Yes, you can safely drill tiles that are already fixed to the wall. This is a common task when installing bathroom accessories or heavy mirrors. Just ensure you use a diamond bit and keep it cool with a damp sponge or a spray bottle. Once you pass through the tile and reach the brickwork or timber behind it, switch to a standard masonry bit to finish the hole.
Is it better to drill porcelain tiles from the front or the back?
Always drill porcelain tiles from the front finished side. Drilling from the back often causes the glazed surface to "blow out" or splinter as the bit exits the other side. By starting on the front, you ensure a clean, professional entry point. Use a piece of scrap wood behind the tile if it isn't already installed to provide support and prevent breakout on the rear.
Leave a comment