


Nail Gun Guide 2026: How to Choose and Use the Right Power Nailer
The right power tool doesn't just save time; it transforms a weekend chore into a satisfying achievement. The best nail gun for your project is determined entirely by the job's demands. For robust tasks like building a garden shed or decking, a low-gauge (10-12) framing nailer provides the necessary power. For precision jobs like fitting architrave or beading, a high-gauge (16-18) brad nailer is your go-to tool. When choosing a power source, cordless battery models offer fantastic portability for smaller jobs, while gas nailers deliver the consistent drive needed for larger construction.
We know that staring at a wall of options, trying to decipher gauge sizes and power types, can feel a bit daunting. It's easy to worry about safety or making an expensive mistake by choosing the wrong model. That’s why we’ve created this comprehensive guide to help you fix, build, and create with complete confidence.
Discover exactly which tool you need for your next DIY win, how to use it safely, and what it takes to keep it running perfectly. Let's find the right nailer to get your project finished brilliantly.
Key Takeaways
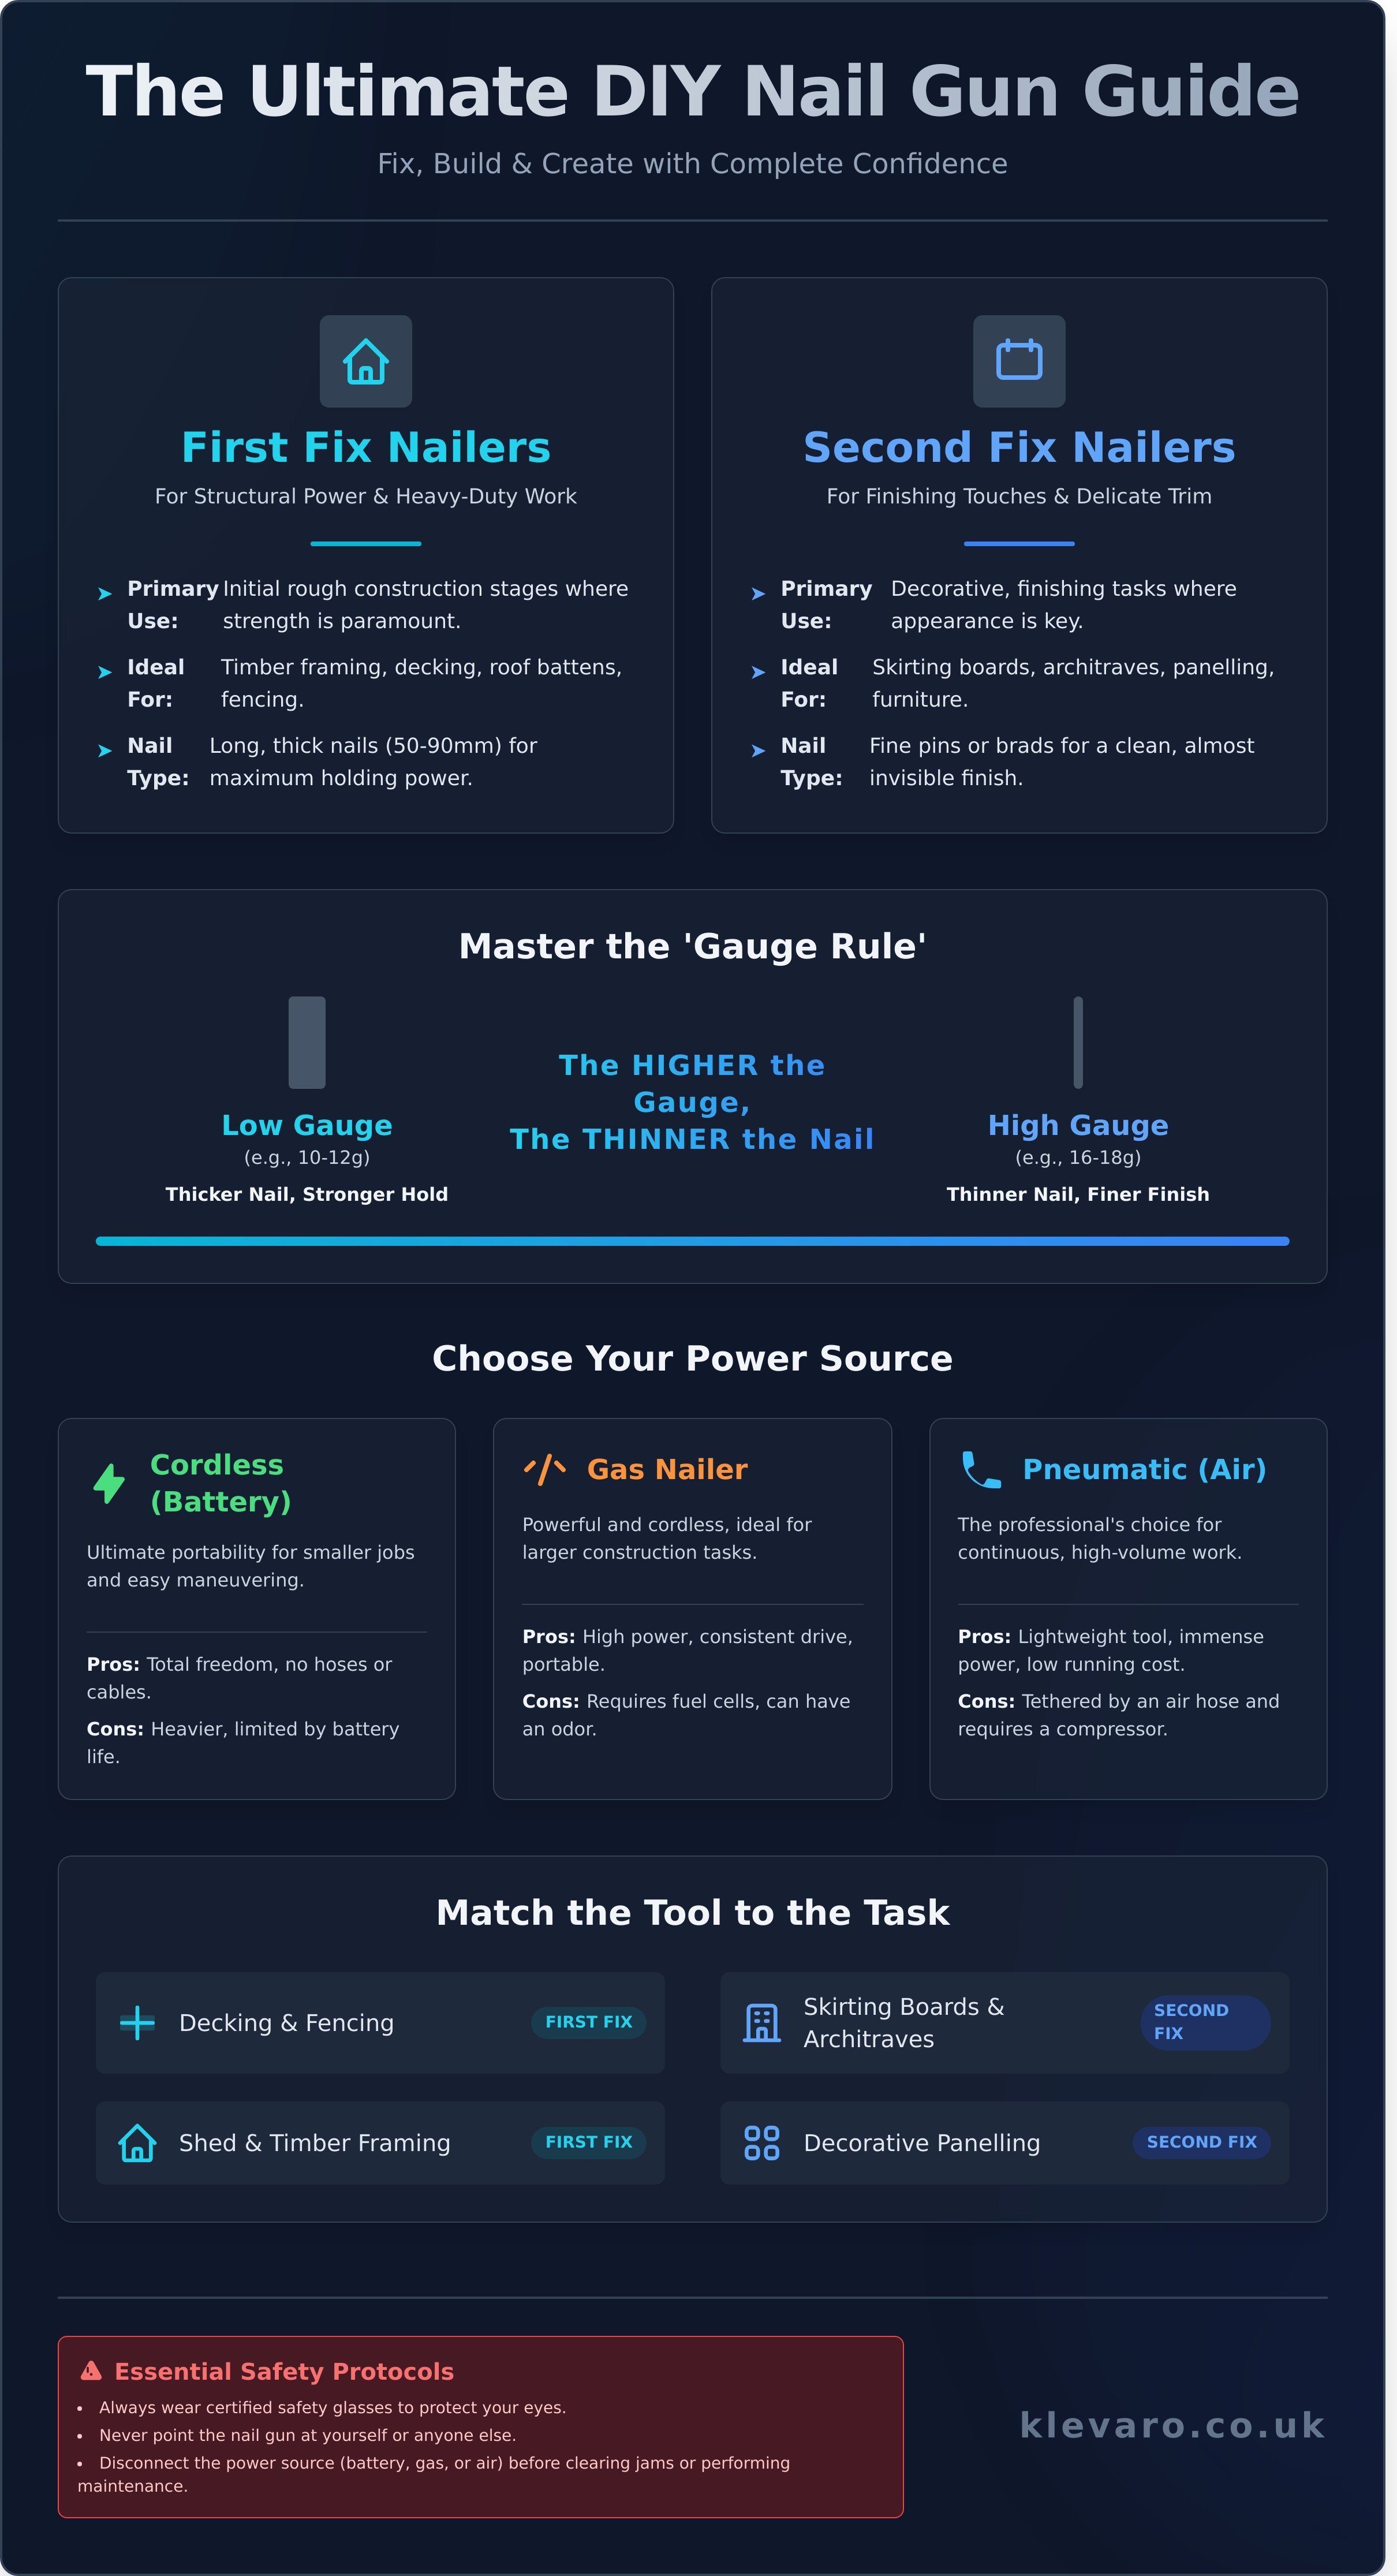
- Distinguish between 'first fix' nailers for structural jobs and 'second fix' nailers for delicate, decorative finishes to match the tool to the task.
- Weigh the pros and cons of cordless freedom versus the consistent power of pneumatic systems to find the right power source for your budget and projects.
- Master the 'gauge rule' (higher number means a thinner nail) to confidently select the correct nail size for everything from fencing to fine trim.
- Learn the essential safety protocols and operating steps to use your new nail gun effectively and safely from the very first shot.
What is a nail gun and how does it improve your DIY projects?
A nail gun is a power tool designed to drive nails and other fasteners into wood or masonry at high speed. For a detailed technical overview, you can explore the question What is a nail gun? on Wikipedia. Its main purpose is to save you a massive amount of time and effort compared to using a traditional hammer. You gain incredible speed and precision, transforming jobs that would take hours into tasks completed in minutes. This tool makes repetitive fastening work almost effortless. Most models are powered by one of three sources: convenient cordless batteries, powerful pneumatic (air) compressors, or versatile gas cartridges. Getting the right tool is the first step to a successful project, so be sure to explore our full range of tools and equipment before you begin.
The primary advantages of using a power nailer
Switching from a hammer to a power nailer unlocks a new level of efficiency and quality in your work. The benefits are immediate and will change how you approach your projects, giving you the confidence to fix, build, and create like a professional.
- Speed: A nail gun allows you to drive hundreds of nails in the time it takes to hammer just ten by hand. This dramatic increase in speed is perfect for large-scale projects like fencing, decking, or cladding, letting you finish the job faster and with far less fatigue.
- Precision: Because you operate the tool with one hand, your other hand is free to hold the workpiece securely in place. This guarantees more accurate placement every single time, which is essential for delicate trim work like skirting boards and architraves where a stray hammer blow could ruin your material.
- Finish: Modern nailers offer adjustable depth control, ensuring every nail is driven to a consistent, perfect depth. This prevents under-driving or over-driving nails, which can damage the wood surface. The result is a clean, professional finish without the hammer marks or dents that can spoil your hard work.
Common DIY projects that require a nail gun
A quality power nailer is one of the most versatile tools you can own, making it an essential for a wide variety of home and garden tasks. From heavy-duty construction to delicate finishing, there’s a nailer built for the job. It's the key to transforming your spaces with durable, stylish results.
- Structural work: For bigger builds, a nailer is a game-changer. It's ideal for assembling timber frames for sheds, building sturdy garden decking, and rapidly putting up fence panels and posts. The power and speed make light work of demanding jobs.
- Interior finishing: Achieve flawless results inside your home. A finishing nailer is perfect for attaching skirting boards, door architraves, dado rails, and creating feature walls with decorative panelling. It provides the delicate touch needed for a polished look.
- Furniture and crafts: Smaller, more precise nailers (like brad nailers or pinners) are fantastic for assembling furniture, securing backboards on cabinets, reupholstering chairs, and building custom craft projects like birdhouses or picture frames.
The main differences between first fix and second fix nail guns
Choose a first fix nail gun for heavy-duty structural work like building a timber frame or decking. Select a second fix nail gun for delicate, decorative tasks like attaching skirting boards or door trim. The core difference is power versus precision. First fix models drive large nails for maximum strength, while second fix models use fine pins for a clean, almost invisible finish.
You cannot use one for the other effectively. A powerful first fix nailer will split and ruin delicate trim, leaving a large hole that's difficult to hide. Conversely, the fine brads from a second fix nailer lack the structural integrity needed for framing, creating a weak and unsafe build. Your project phase directly dictates which tool you need to get the job done right.
First fix nailers: Framing and structural power
A first fix nail gun is your powerhouse for the initial, rough stages of construction. These tools are designed to drive long, thick nails (typically 50mm to 90mm) into dense timber, creating strong, durable joints. Think of them for jobs where strength is far more important than appearance, such as building a garden shed frame, securing roof battens, or constructing heavy-duty fencing.
These nailers often use "clipped head" or "D-head" nails, which allow more nails to be packed into the magazine. This power demands respect, so it's essential to always follow official nail gun safety guidelines to prevent serious injury. Because of the force they generate, these tools always leave a larger, more obvious mark on the wood surface, but this is rarely an issue as the work is usually covered later by plasterboard or cladding.
Second fix nailers: Finish and brad nailing
When your project needs a delicate touch and a flawless finish, you need a second fix nailer. These are ideal for all the "visible" jobs that complete a room, like fitting architrave around doors, attaching skirting boards, assembling cabinets, or securing decorative trim. Their purpose is to fasten wood securely without splitting it and leaving minimal evidence behind.
Second fix nailers use much thinner nails called brads or pins, typically 16-gauge (16g) or 18-gauge (18g). A higher gauge number means a thinner nail, resulting in a tiny, easily concealable hole. Often, a small touch of wood filler and a coat of paint are all that's needed to make the fixing completely disappear. For this reason, they are the most popular choice for general indoor DIY enthusiasts looking for a professional finish on their projects.
Ultimately, the choice comes down to your specific task. Are you building the bones of a structure or applying the finishing touches? Answering that question tells you exactly which tool you need. Whether you're building the frame or adding the final flourishes, you can explore our complete range of first and second fix nail guns to find the perfect partner for your project.
Choosing between cordless, electric, and pneumatic power sources
For most DIY projects, a cordless battery-powered nail gun is the best choice, offering unmatched freedom and convenience. Pneumatic nailers deliver consistent, professional-grade power and are lighter to hold, but require a bulky and noisy air compressor. Your decision ultimately rests on balancing the portability of cordless systems against the rapid-fire endurance of pneumatic tools.
The initial cost is a major factor. A cordless nail gun kit with a battery and charger can start around £250, while a pneumatic nailer might only be £80, but you must also purchase an air compressor for an additional £100 to £200. Consider your existing tools; if you already own a compressor or are invested in a battery platform, the choice becomes much simpler.
Cordless battery nail guns: The modern DIY standard
The biggest advantage of a cordless nail gun is its grab-and-go simplicity. There are no hoses to drag around or compressors to power up. You can move from the workshop to the garden effortlessly, firing nails on demand. This freedom makes them perfect for tasks like installing skirting boards, building garden furniture, or fixing fencing panels.
Modern batteries provide impressive runtime for a full day of work. A compact 2.0Ah battery can typically drive 400-600 brad nails, while a larger 5.0Ah battery can fire well over 1,200 nails on a single charge. Thanks to powerful brushless motors, today's cordless models rival the performance of many air tools, sinking nails cleanly into both soft and hardwood.
When you buy a cordless tool, you're investing in a battery ecosystem. Choosing a brand like DeWalt, Makita, or Ryobi allows you to share one or two batteries across dozens of tools, from drills to saws. This makes expanding your tool collection far more affordable, as you only need to buy the "bare tool" next time.
Pneumatic air nailers: Pro-level speed and reliability
Pneumatic nailers are the long-standing choice for professionals for two key reasons: speed and weight. Powered by a separate air compressor connected via a hose, they deliver consistent firing power that never fades. The tools themselves are noticeably lighter than cordless versions because they don't contain a heavy motor or battery, which significantly reduces fatigue during repetitive, all-day tasks like framing or roofing.
However, this professional setup has its downsides for the home user. The air compressor is the main drawback; it's bulky, takes up valuable workshop space, and can be incredibly noisy, often operating at over 80 decibels. Managing the air hose can also be a hassle, as it can snag on corners or limit your reach. Always follow safety best practices, such as those outlined in the OSHA nail gun safety guidelines, to prevent accidents with any type of nail gun.
While the initial cost of a pneumatic nailer is lower, the total investment in the system (nailer, hose, and compressor) can be similar to a cordless kit. This makes them best suited for dedicated workshop spaces where high-volume, rapid nailing is the priority.
Once you've chosen the right nail gun for your projects, you'll be ready to start building. To get everything you need in one place, you can explore our curated Klevaro home and garden collections for quality timber, fixings, and stylish finishing touches.
Understanding nail gauges and which size fits your project
Choosing the right nail for your project comes down to its gauge. The rule is simple: the higher the gauge number, the thinner the nail. An 18-gauge (18g) brad is much thinner than a 16-gauge (16g) finishing nail, which is thinner still than a 10-gauge framing nail. For most indoor DIY jobs in the UK, an 18-gauge brad nailer is the most versatile and useful tool you can own. Heavier tasks require lower gauge, thicker nails for superior holding power.
The terms "pins," "brads," and "nails" correspond to different gauges and jobs. Pins (23g) are headless and best for delicate trim. Brads (18g) have small heads and are the go-to for general joinery. Finishing nails (16g and 15g) have more substantial heads and provide a stronger fix for heavier materials.
Here is a quick-reference guide to match the nail gauge to your task:
- 23-Gauge (Pins): Ideal for securing delicate mouldings or holding glued pieces together while the adhesive dries. They are nearly invisible.
- 18-Gauge (Brads): The perfect choice for attaching architrave, standard skirting boards, dado rails, and decorative wall panelling.
- 16-Gauge (Finishing Nails): Use for thicker trim, door frames, fencing panels, and some exterior softwood cladding where more strength is needed.
- 10-Gauge or Lower (Framing Nails): Reserved for heavy-duty construction like building stud walls, decking frames, and other structural work.
The 18-Gauge brad nailer: The most versatile DIY tool
Think of the 18-gauge brad nailer as the perfect all-rounder for about 90% of interior DIY tasks. It's the "Goldilocks" choice for fastening common materials like MDF, softwood trim, and thin plywood without causing damage. It strikes the perfect balance between power and precision. An 18-gauge brad nailer provides enough hold for trim without splitting delicate wood grains.
The small head of an 18g brad leaves a tiny hole that is easily concealed for a professional finish. After nailing, a quick touch-up with a quality wood filler is all you need. You can find essential finishing supplies in our hand and general tools collection.
Heavy-duty 16-gauge and framing nails
When your project demands more holding power, it's time to step up. A 16-gauge finishing nail provides a much stronger fix, making it the right tool for attaching thick skirting boards or securing stair components. For major construction, like building a garden shed frame or a deck, you'll need a framing nail gun that fires 10-gauge or larger nails.
A critical safety and structural tip is choosing the right nail length. Always follow the "3x Rule" for a secure hold. The nail should be three times the thickness of the material you are fastening. For example, to securely attach a 20mm thick piece of wood, you need a 60mm nail to ensure it penetrates deep enough into the base material.
How to safely use and maintain your new nail gun
You’ve chosen the perfect tool, and now you’re ready to build. Using your new nail gun safely and effectively is simple once you master the basics. Think of it like any other powerful tool in your kit; it demands respect, a consistent routine, and a focus on safety to deliver professional-grade results every single time. With a little practice, you'll be speeding through your DIY projects with confidence.
Follow these essential rules and operating steps to get started correctly and keep your tool in top condition for years of reliable work.
Essential safety rules for every user
A nail gun drives fasteners at high velocity, making safety non-negotiable. Before you even load your first strip of nails, commit these three rules to memory. They are the foundation of safe and successful operation.
- Protect yourself first. Always wear certified safety glasses, preferably a pair with side shields that conform to BS EN 166 standards. Never, under any circumstances, disable or bypass the safety contact tip on the nose of the tool. It’s designed to prevent accidental firing.
- Adopt the "No Finger on Trigger" rule. Keep your finger off the trigger whenever you are not actively firing a nail. This includes when you are carrying the tool, climbing a ladder, or moving between firing positions. This simple habit prevents unintended discharges.
- Disconnect the power source for maintenance. Before you attempt to clear a jammed nail, make adjustments, or perform any maintenance, always disconnect the power. For pneumatic models, disconnect the air hose. For cordless models, remove the battery pack.
How to fire your first nail correctly
Your first few shots are all about getting a feel for the tool and dialling in the settings. Always use a scrap piece of the exact same wood you'll be using for your project to test your setup. This ensures the final result is exactly what you want.
- Check your depth settings. Start with the depth adjustment set to a medium or shallow setting. Fire a test nail into your scrap wood. The goal is to see how the tool performs before you start on your actual workpiece.
- Position the tool at 90 degrees. To prevent the nail from veering off course or blowing out the side of the wood, make sure the tool is held perfectly perpendicular to the surface. A firm, steady grip is key.
- Press, then pull. For the safest operation, use the sequential firing mode. First, press the safety contact tip firmly against the wood. Once it's fully depressed, pull the trigger to fire the nail. Release the trigger and lift the tool to reset for the next nail.
- Inspect and adjust. Look at your test nail. Is the head flush with the wood surface? Perfect. If it’s sitting proud (sticking out), increase the driving depth. If it has sunk too deep and torn the wood fibres, decrease the depth. Repeat this process until you get the perfect finish.
Keeping your tool in great shape is simple. For pneumatic models, add 3-4 drops of air tool oil into the air inlet at the start of each day. This lubricates the internal o-rings and moving parts. If a nail gets jammed, just disconnect the power, unlatch the nose piece, and use pliers to remove the bent fastener. Jams happen occasionally, but they are quick to clear.
Now that you're equipped with the knowledge to work safely and efficiently, you can tackle your next project with total confidence. Ready to put your new skills to the test? Transform your outdoor space by building a new planter box or repairing a fence. You can browse our garden accessories to find stylish and durable components for your next build.
Build, Fix, and Create with the Right Nail Gun
You're now equipped with the knowledge to choose the perfect power nailer and elevate your projects. Remember the core differences: first fix nailers for heavy-duty framing and second fix models for delicate, finishing touches. Matching the power source and nail gauge to your specific task is the key to achieving professional results every time.
With this guide, selecting the right nail gun is no longer a challenge; it's the exciting first step towards completing your work faster and more efficiently. Now it's time to find the tool that will bring your vision to life.
Ready to get started? Shop our full range of high-quality DIY tools and equipment and discover your ideal power nailer today. As a trusted UK store, we guarantee quality and provide fast UK delivery on all tool orders. If you ever need a hand, our team is here to offer expert support for your DIY journey.
Go on, build something brilliant.
Frequently Asked Questions
Do I need a first fix or second fix nail gun for DIY?
For most common home DIY projects, a second fix nail gun is the best choice. These are designed for finishing tasks like attaching skirting boards, door frames, and decorative trim. First fix nailers are for heavy-duty structural work like timber framing, which is typically not required for smaller home improvement jobs. A second fix tool provides a neater finish with smaller nail holes.
What gauge nail gun is best for skirting boards?
An 18-gauge brad nailer is the ideal tool for fixing most standard skirting boards. The 18-gauge brads provide strong holding power without the risk of splitting the wood, and they leave a very small hole that is simple to fill and paint for a flawless finish. For particularly thick or hardwood skirting, a slightly larger 16-gauge finish nailer is also a reliable option.
Can I use a nail gun for garden fencing?
Yes, but you must use a powerful first fix framing nailer for building or repairing garden fencing. This type of nail gun drives the long, thick nails required to create a strong, weather-resistant structure. It's crucial to use galvanised or stainless steel nails specifically designed for outdoor use, as standard nails will rust and fail within 1-2 years when exposed to the British weather.
Is a cordless nail gun as good as a pneumatic one?
For DIY use, a cordless nail gun is often better than a pneumatic one. Modern cordless models offer fantastic power and convenience, freeing you from the need for a noisy air compressor and a restrictive hose. While pneumatic nailers are lighter and can offer slightly faster firing speeds for professionals, the portability and easy setup of a cordless tool make it the perfect, practical choice for home projects.
Why does my nail gun keep jamming?
A nail gun usually jams because you are using the incorrect nails for the tool. Always check the manufacturer's instructions to ensure you have the right gauge, length, and collation angle. Other common causes include incorrect air pressure on pneumatic models, a dirty firing mechanism, or a worn driver blade. Regular cleaning and using the correct fasteners will prevent over 90% of jams.
Do I need to wear ear protection when using a nailer?
Yes, you must always wear ear protection when operating a nailer. A pneumatic nail gun can operate at over 110 decibels, a level that can cause hearing damage in a very short time. Even battery-powered cordless models are loud enough to pose a risk with repeated use. Always protect your hearing with certified ear defenders or earplugs to ensure your safety on every project.
Can I use a brad nailer for framing a shed?
No, you absolutely cannot use a brad nailer for framing a shed. Brad nailers use thin 18-gauge nails that are designed for delicate, non-structural work like attaching trim. Shed framing is a structural job that requires a first fix framing nailer using much thicker and longer nails to ensure the building is safe and stable. Using a brad nailer for framing would create a dangerously weak structure.
Leave a comment