


How to Use a Spirit Level for Shelves: A Step-by-Step DIY Guide
You’ve just drilled the second hole for your new floating shelf, stepped back to admire your work, and your heart sinks. It’s crooked. We’ve all been there, staring at a wonky shelf and the "mistake" holes that now need patching up.
It’s a frustrating moment that can knock your DIY confidence, but it doesn’t have to be your reality. This guide will show you exactly how to use a spirit level for shelves to get a perfectly straight, professional-looking result on the very first try. You can achieve a secure, stylish finish without ever having to call a handyman.
Get ready to learn the simple process for marking your wall, reading the bubble vial correctly, and hanging shelves that are not just level, but a home upgrade you can be proud of.
Key Takeaways
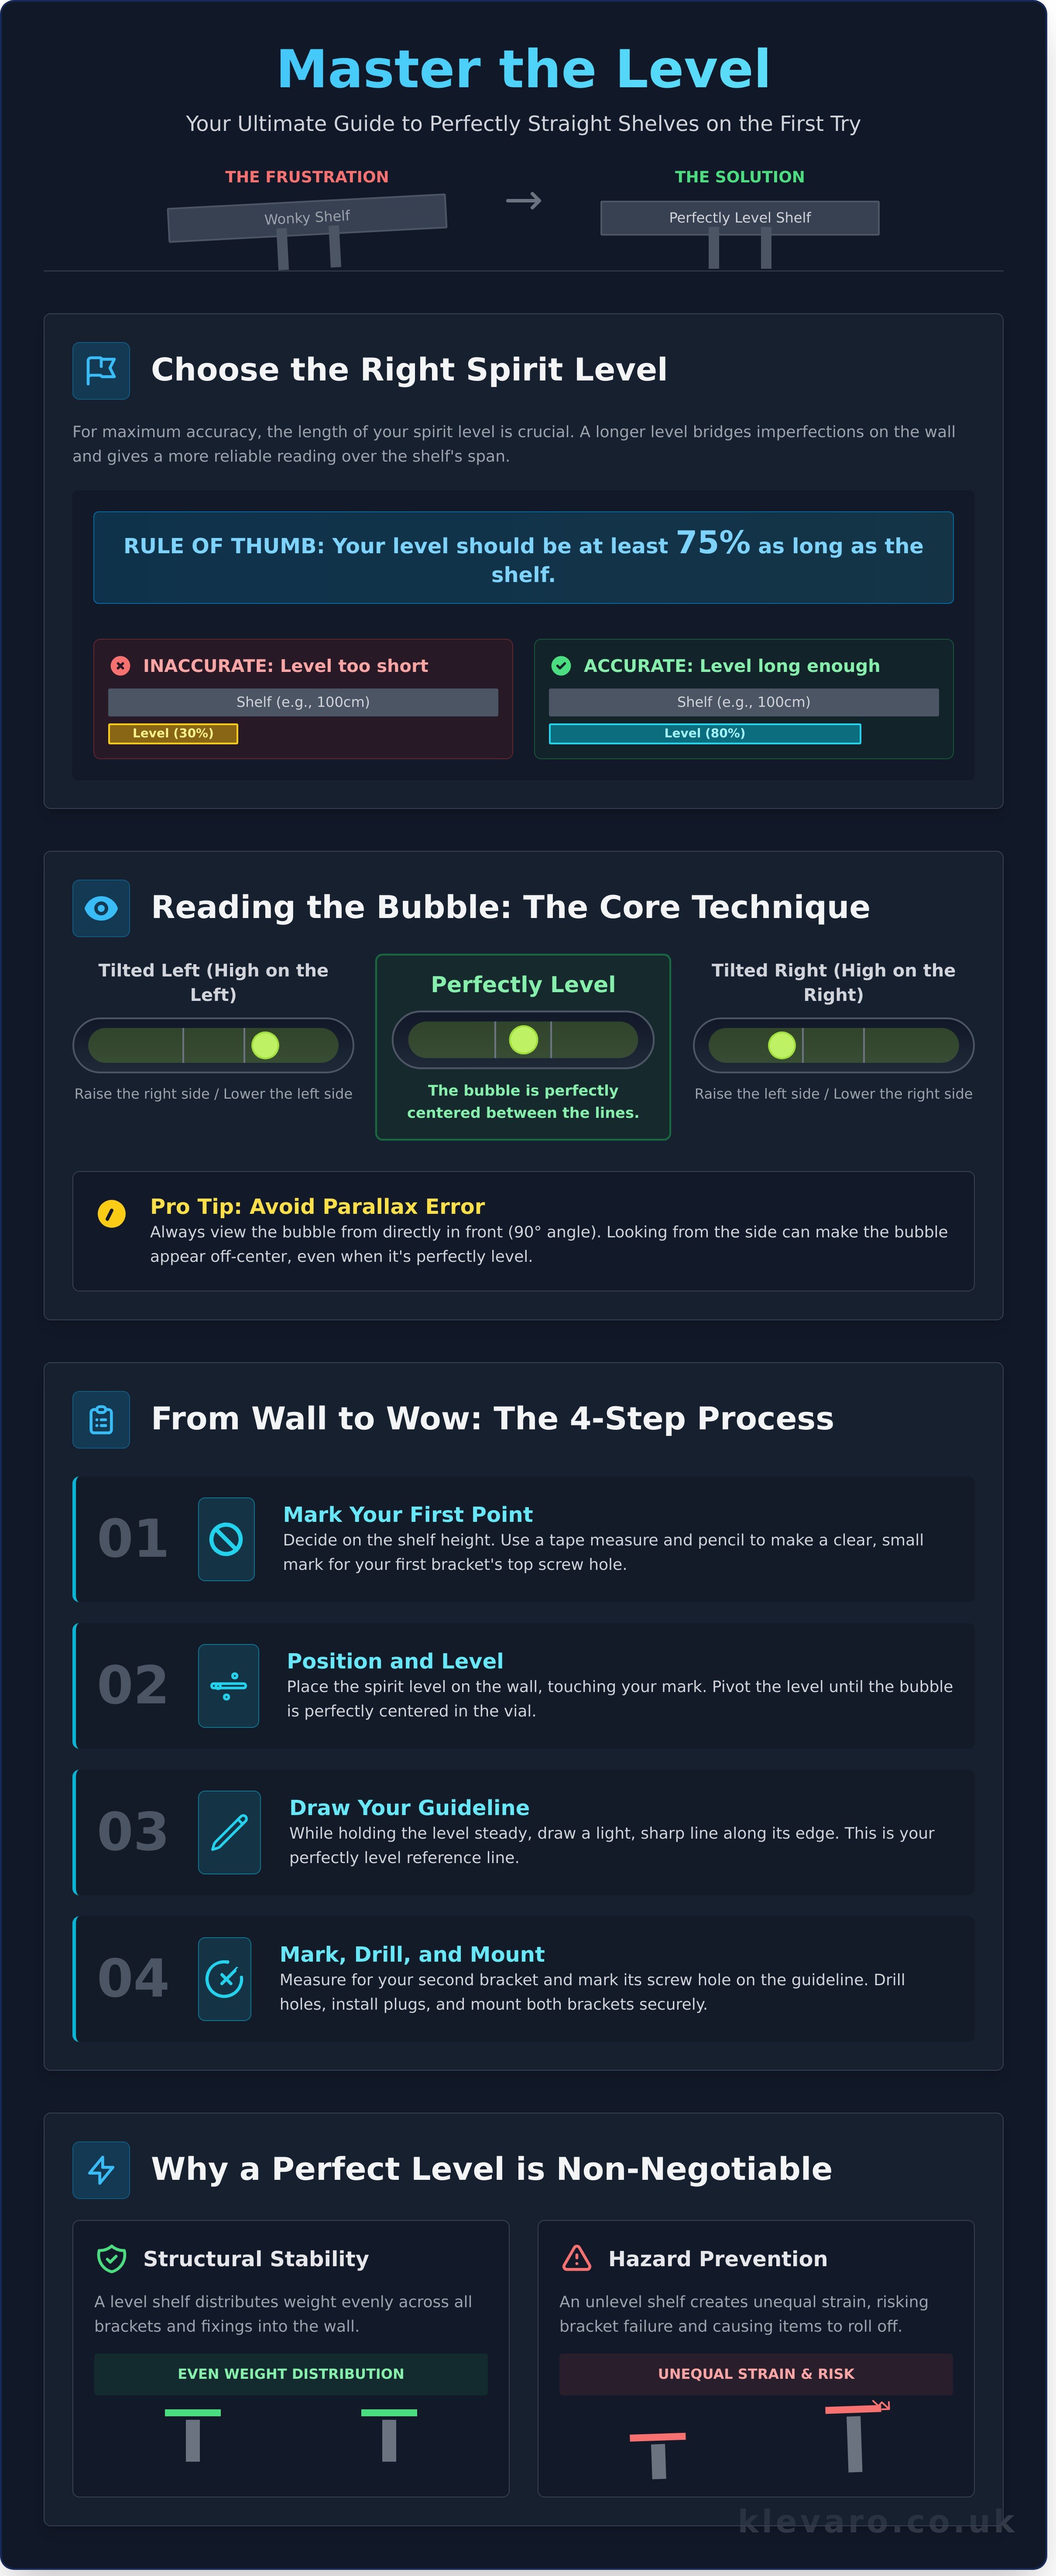
- Learn the core technique for how to use a spirit level for shelves: place it flat on the surface and adjust until the bubble is perfectly centered between the vial lines.
- Choosing the right tool is crucial; for maximum accuracy, your spirit level should be at least 75% as long as the shelf you are installing.
- Discover a precise, step-by-step method for marking your first drill hole and transferring that measurement perfectly to ensure your brackets are aligned.
- Find out how to tackle the challenge of uneven walls in older UK homes, including when to trust the level and when to align your shelf by eye for the best look.
How to Use a Spirit Level for Perfectly Straight Shelves
Learning how to use a spirit level for shelves is a fundamental DIY skill. The process is straightforward: place the tool flat against the surface you intend to hang and adjust it until the air bubble sits exactly between the two etched lines in the central vial. A centered bubble confirms the surface is "level" (perfectly horizontal). For shelf brackets, use the vertical vial to ensure they are "plumb" (perfectly vertical). Once the bubble is centered, use a sharp pencil to mark a clear guideline on the wall along the bottom edge of your level. This line becomes your trusted reference for drilling and mounting.
Mastering this essential skill is the first step towards a flawless finish. It guarantees that your treasured home decor, books, and photos are displayed safely and look professionally installed. Get this right, and you can build with confidence every time.
Once your shelves are perfectly level, you'll need something special to display. For inspiration, you can find a wide collection of fine art photography, posters, and collectable prints at galerieprints.com.
The Anatomy of a Spirit Level
A spirit level might seem simple, but its design is precise. Every level contains at least one small glass vial set into its frame. The main, horizontal vial is used to check for "level," while a second, vertical vial is used to check for "plumb." Some models even include a 45-degree vial for angled installations, giving you extra versatility for your projects.
Inside each vial is a coloured liquid, usually ethanol, known as the "spirit." This liquid is chosen because it has a low viscosity and freezing point, allowing the single trapped air bubble to move freely and quickly. For a deeper dive into the physics, Wikipedia offers a great resource for Understanding How Spirit Level Vials and Bubbles Work. The accuracy of the tool also depends heavily on its frame; a quality level will have perfectly flat, precision-milled edges to ensure it sits flush against any surface without rocking.
Why Accuracy Matters for Shelving
Even a tiny error can have big consequences. A shelf that is off by just one degree can cause round objects like pens, marbles, or small decorative spheres to slowly roll towards the lower edge and fall. This isn't just an annoyance; it can be a hazard, especially if the shelf holds fragile or valuable items you've carefully chosen.
Accuracy is also critical for structural stability. When a shelf is perfectly level, the weight of its contents is distributed evenly across all brackets and fixings. An unlevel shelf places significantly more strain on the bracket at the lower end. Over time, this imbalance can cause the fixings to pull away from the wall, leading to a sagging shelf or complete failure. In short, "level" is the state of being perfectly parallel to the horizon, a non-negotiable standard for strong, reliable shelving.
Understanding How Spirit Level Vials and Bubbles Work
A spirit level might seem simple, but its accuracy comes from clever, precise design. Inside the glass or plastic vial is a liquid, typically a coloured alcohol, and a single bubble of air. The vial itself isn't perfectly straight; it has a slight upward curve. Because air is lighter than the liquid, the bubble naturally floats to the highest point within this curve. When your surface is perfectly flat, that highest point is dead centre between the two marked lines.
This simple mechanism is key to knowing how to use a spirit level for shelves correctly. It allows you to measure two critical orientations. "Level" refers to a perfectly horizontal plane (like a shelf), while "plumb" refers to a perfectly vertical plane (like the shelf brackets against the wall). Most spirit levels have vials for both, letting you master every angle of your project.
How to Read the Bubble Without Errors
To get a true reading, you must look at the vial from a direct, 90-degree angle. Viewing it from the side can create a "parallax error," where the bubble appears to be in a different position than it actually is. Always position your head so you're looking straight at the face of the vial for an honest measurement.
A perfectly level surface will show the bubble sitting exactly between the two black lines, not touching either one. If the edge of the bubble is just touching one of the lines, it means you're very close but not quite there. Make a tiny adjustment to your shelf and check again. For those tricky, low-light spots like inside a cabinet or a dark corner, simply shine your phone's torch behind the vial to make the bubble and lines stand out clearly.
Checking Your Level for Accuracy
Even the best tools can get knocked out of alignment. Before you start drilling holes, it’s essential to check if your spirit level is accurate with a quick "180-degree flip" test. It only takes 30 seconds and can save you from a frustratingly wonky shelf.
- Step 1: Place your level on a flat surface, like a countertop. Wait for the bubble to settle and note its exact position.
- Step 2: Without lifting the level, make a small pencil mark on the surface at each end of the level.
- Step 3: Flip the level 180 degrees end-to-end and place it back between your two pencil marks.
- Step 4: Check the bubble again. If it has settled in the exact same spot as the first reading, your level is accurate and ready to go.
If the bubble gives a different reading after the flip, your level is inaccurate and shouldn't be used for projects that require precision. This can happen if it's been dropped or damaged. For most non-calibratable levels, the best course of action is to replace it. You can find a huge selection of reliable tools & equipment to ensure your next project is a success.
Making this check a habit before every new project is a professional practice that guarantees reliable results. Once you trust your tool, you can confidently proceed with marking your wall. For a detailed walkthrough of this part of the process, the guide on How to Mark and Drill Shelf Brackets Using a Spirit Level offers excellent, practical steps from a trusted expert.
Choosing the Right Spirit Level for Your Shelving Project
The most important factor when choosing a spirit level for your shelving project is its length. To guarantee a perfectly straight result, you should select a level that spans at least 75% of your shelf's length. For most standard floating shelves or bookcases, a 60cm box beam level provides the ideal balance of accuracy and convenience. Using a level that is too short, like a small torpedo level, can magnify tiny errors over a long distance, leading to a visibly sloped shelf.
A longer level averages out minor imperfections on the wall surface, giving you a truer horizontal line. An accurate level is the foundation of a successful installation, a point reinforced by DoItYourself.com's guide to level shelving, which shows how precise markings prevent wonky results. While magnetic levels are a fantastic help for metal shelving units by clinging to the frame and freeing up your hands, they are not necessary for standard timber or MDF shelves.
Torpedo, Box Beam, or I-Beam: Which is Best?
Your project's scale will determine the best type of level for the job. Each design offers specific advantages:
- Torpedo Levels (15-25cm): These compact levels are perfect for tight spaces and small jobs. Use them for hanging single picture frames, small spice racks, or checking the level of appliances. They are not recommended for shelves longer than 40cm.
- Box Beam Levels (60cm+): This is the go-to standard for most DIY shelving. Their rigid, rectangular frame is extremely durable and resistant to warping, ensuring accuracy for years. A 60cm or 90cm version is the ideal tool when learning how to use a spirit level for shelves, alcove units, and kitchen cabinets.
- I-Beam Levels: Similar in length to box beam levels, I-beam models are constructed with a lighter frame. This makes them easier to handle, but they can be slightly less robust than their box beam counterparts if dropped or mishandled.
Digital Readouts vs. Classic Bubbles
While the traditional bubble vial has been trusted for centuries, digital levels offer modern precision. For beginners, a digital level’s clear LCD screen, which displays the angle in degrees or as a percentage, can remove any guesswork. Many also feature an audible beep that sounds when you hit a perfect level, which is useful when you can't easily see the screen.
However, for simple shelving tasks, a traditional spirit level is often more reliable and practical. It has no batteries to run out mid-project and is typically more durable. For the average home DIYer, the cost-benefit analysis leans heavily towards a traditional model. A quality 60cm box beam level might cost between £15-£25, whereas a digital equivalent often starts at £40. Unless you need to measure precise angles for other projects, the classic bubble is all you need for perfectly straight shelves.
Getting the right tool is the first step to a successful project you can be proud of. Find the perfect size and style for your toolkit by exploring our durable hand and general tools, built to help you create with confidence.
How to Mark and Drill Shelf Brackets Using a Spirit Level
With your tools ready, it’s time to transform that empty wall. Accurate marking is the secret to shelves that are not just level, but look professionally installed. Follow these steps to get it right the first time, ensuring your brackets are perfectly positioned for a sturdy, stylish result.
Step 1: Mark your first point. Decide on the final height for your shelf. Use a tape measure to measure up from the floor or down from the ceiling and make a small, clear pencil mark where the top screw of your first bracket will go. This is your starting anchor point.
Step 2: Create your level line. Place your spirit level on the wall, resting its top edge against your first mark. Now, pivot the other end of the level up or down until the bubble in the main vial is perfectly centred between the two black lines. Don't rush this part; precision here is key.
Step 3: Draw a guide. Once the bubble is centred, hold the level firmly in place with one hand. With your other hand, draw a light, straight pencil line along the top edge of the level. Extend this line to where you plan to place your second bracket.
Step 4: Mark the second bracket. Take your second bracket and align its top edge perfectly with the pencil line you just drew. Position it at the desired distance from the first bracket and carefully mark the locations for its screw holes. This is a crucial part of how to use a spirit level for shelves correctly.
Step 5: Drill and do a final check. After drilling your holes and loosely attaching both brackets to the wall, perform one last check. Place your spirit level across the top of both brackets. If the bubble is still centred, you're ready to tighten the screws and fit the shelf board. If not, you can make minor adjustments before everything is permanently fixed.
Getting this process right ensures your shelves are strong and visually perfect. If you're tackling a big project, having the right gear makes all the difference. Find the perfect tool for the job in our quality range of spirit levels.
Marking the Wall for Floating Shelves
Floating shelves use a concealed metal bracket, which requires a slightly different approach. For these, use a longer spirit level, such as a 600mm or 900mm model, to draw one continuous level line for the entire bracket. Before drilling, double-check your measurements by measuring from the floor to each end of your marked line; they should be identical. This ensures the shelf looks parallel to the floor, which is vital for visual harmony.
Your wall type also matters. For plasterboard, use a stud finder to locate the wooden supports and mark them. Aim to fix at least one point of the bracket into a stud for maximum strength. For solid masonry walls, you’ll need a hammer drill with a masonry bit and appropriate wall plugs to get a secure fixing.
Leveling Individual Brackets Vertically
Horizontal alignment is only half the battle. Each bracket must also be perfectly vertical, or 'plumb'. To check this, hold your spirit level against the side of the bracket and look at the vertical (plumb) vial. The bubble should be perfectly centred before you fully tighten the screws.
Why is this so important? A bracket that isn't plumb will cause the shelf to tilt forward or back, even if it's horizontally level. This can make items unstable and creates a sloppy, unprofessional finish. A common mistake is to drill and fully tighten the top screw first, which can pivot the bottom of the bracket out of alignment. Instead, get both screws started in their holes, check for plumb, and then tighten them alternately for a perfectly upright result.
Troubleshooting Wonky Shelves and Period Property Problems
You've followed every step, your spirit level bubble is perfectly centred, but something still looks… off. Welcome to the unique charm of older UK properties! Walls that lean and floors that slope are common features, not flaws. In these situations, a technically perfect level shelf can sometimes look crooked to the eye, creating a real DIY dilemma.
This is where your project moves from pure measurement to a bit of an art. The key is to understand why it looks wrong and how to make a smart adjustment that pleases both your spirit level and your eye. It's about creating a finish that feels right for the space.
Dealing with Slanted Walls and Ceilings
The biggest challenge in a period home is the "Aesthetic Compromise": choosing between what's technically level and what's visually correct. If your ceiling slopes downwards by 10mm over a 1-metre span, a perfectly level shelf below it can appear to be tilting upwards. Your eye naturally uses the ceiling or a picture rail as a reference line, so the conflict is jarring.
To make an informed choice, use your spirit level to find out exactly how slanted the feature is. Hold the level against the ceiling line where your shelf will go. The bubble will drift to one side, showing you the direction and severity of the slope. Now you can decide your strategy. You could install the shelf perfectly level, parallel to the crooked line, or find a happy medium. A common trick is to split the difference, installing the shelf with a 5mm slope to soften the visual clash.
For complex projects with multiple shelves, like fitting out an alcove, a laser level is a fantastic tool. It allows you to project a single, consistent reference line across the entire space. This ensures all your shelves are perfectly parallel to each other, even if you decide to angle them slightly to match the room's character.
Fixing a Shelf That Isn’t Level
What if your shelf has dipped after you've installed it? Don't panic, this is usually fixable. First, diagnose the cause. Place your level on the shelf to see which way it dips. Check the brackets; is one lower than the other? Check the fixings; has a screw pulled away from a crumbling plaster wall? Finally, check the shelf board itself by flipping it over to see if it's warped.
Simple fixes often work best. If a bracket is secure but low, you can use a shim. Loosen the bracket's wall screws, slip a thin piece of folded card, a plastic packer, or a small washer behind the bottom of the bracket, and then re-tighten. This tiny adjustment pushes the front of the bracket upwards, levelling your shelf. Sometimes, the problem is as simple as a loose wall plug; replacing it with a more robust one can solve the issue instantly.
If a shelf is significantly out of level, your best bet is to remove it completely and re-mark your lines rather than trying to patch the installation. This is a crucial part of knowing how to use a spirit level for shelves effectively; sometimes the best fix is a fresh start.
Your success in any DIY project depends on having reliable gear. A spirit level that has been dropped or banged around can lose its accuracy, leading to frustration down the line. You can quickly check its calibration by placing it on a near-level surface, noting the bubble's position, and then rotating the level 180 degrees end-to-end. If the bubble isn't in the same spot, it's time for a replacement.
Keeping your equipment in top condition is a small step that pays off big. Maintaining your tools ensures they stay reliable for years of creative home and garden improvements. By combining accurate measurements with a little creative problem-solving, you can hang shelves that are sturdy, functional, and look fantastic in any room, no matter how quirky its angles are. Get ready to fix, build, and create with confidence!
Get Ready to Hang Shelves Like a Pro
You're now equipped with the knowledge to banish wonky shelves for good! The secret is simple: always trust the bubble. By ensuring it's perfectly centered, marking your bracket positions with care, and double-checking your work, you've mastered the fundamentals of how to use a spirit level for shelves. Even tricky walls in older properties are no match for your new skills.
Great projects start with great tools. A reliable spirit level doesn't just make the job easier; it gives you the confidence to fix, build, and create amazing spaces in your home. It’s the difference between a good-enough job and a finish you can be proud of.
Ready to find the perfect tool for your project? Shop our range of high-quality spirit levels and DIY tools today. As a trusted UK store, we stock quality tools from reliable brands and offer Fast UK Delivery on all your essentials, backed by our easy returns policy. Get started and transform your space with confidence!
Frequently Asked Questions
Can I use a spirit level app on my phone for shelves?
Yes, you can use a phone app for a quick check, but it's not recommended for the final installation. Phone apps rely on internal sensors that aren't as consistently accurate as a dedicated spirit level. Their small size also makes it difficult to get a true reading across a longer shelf. For a perfectly straight result when learning how to use a spirit level for shelves, a traditional spirit level is always the most reliable and trusted tool.
What is the most accurate type of spirit level for DIY?
The most accurate type for general DIY projects is a high-quality box beam level. Box beam levels are more durable and less likely to warp than I-beam levels, which helps them maintain their accuracy over time. Look for a model with a solid, milled surface and clear acrylic vials. These features ensure you get a precise reading every time you fix, build, and create with confidence.
Should I level the shelf board or the brackets?
You should always level the brackets first and then double-check the shelf board once it's in place. Getting the brackets perfectly level is the most critical step, as this provides the foundation. After placing the shelf board on top, run the level over it one last time to account for any minor imperfections in the board itself. This two-step process guarantees a sturdy, professional-looking finish.
Why is the bubble in my spirit level not moving?
The bubble may not be moving because the surface you're measuring is already perfectly level or the tool is faulty. First, test it on a surface you know is sloped to see if the bubble moves. If it remains stationary, the vial could be damaged or the liquid may have thickened, which can happen with older levels. It's also possible the level's sensitivity is too low for detecting very minor slopes.
How long should my spirit level be for a 1-metre shelf?
For a 1-metre shelf, a spirit level between 60cm and 120cm is ideal. A longer level provides a more accurate reading because it averages out any small bumps or imperfections across the surface. A 60cm level is a fantastic, versatile size for most DIY tasks, including this one. A 120cm level offers maximum precision for shelves of this length, ensuring a perfect result from end to end.
What is the difference between level and plumb?
"Level" refers to a perfectly horizontal line, while "plumb" refers to a perfectly vertical line. Think of it this way: your shelf board should be level (flat from side to side), while the shelf brackets or upright supports should be plumb (straight up and down). Most spirit levels have separate vials to measure both. The horizontal vial checks for level, and the vertical vial checks for plumb.
Is a 2-vial or 3-vial spirit level better for beginners?
A 3-vial spirit level is better for beginners because it offers much more versatility. A standard 2-vial level measures horizontal (level) and vertical (plumb). A 3-vial model adds a 45-degree vial, which is incredibly useful for tasks like installing stair handrails or angled braces. Starting with a 3-vial level means you have the right gear for a wider range of future home improvement projects.
How do I clean a spirit level without damaging the vials?
Clean your spirit level using a soft cloth dampened with a simple solution of mild soap and water. Avoid using harsh chemicals, solvents, or abrasive pads, as these can easily scratch the acrylic vials or damage the level's frame and measurement markings. Gently wipe down the body and vials, then dry it completely with a clean cloth before storing it. Proper care keeps your tool accurate for years.
Leave a comment