


How to Use a Nail Gun for Fencing: A Step-by-Step DIY Guide for 2026
You can install a standard 1.8-metre garden fence panel in under five minutes without swinging a single hammer. To master how to use a nail gun for fencing, you should use a cordless framing nailer loaded with 50mm to 65mm hot-dipped galvanised nails to resist the damp British climate. Hold the tool firmly against the timber, engage the safety tip by pressing down, and fire directly into the horizontal rail to prevent the wood from splitting. Maintaining a balanced stance helps you manage the slight recoil and ensures every nail sits flush with the surface. This approach delivers a professional-grade boundary that stays secure for years.
It's natural to feel a bit nervous about tool recoil or the risk of ruining expensive timber pales with a misplaced shot. We're here to help you turn that hesitation into confidence so you can finish your garden project in record time. This guide teaches you the precise steps to safely and efficiently use a nail gun for fencing, covering everything from nail selection to pro firing tips. You'll learn how to prep your gear, handle the tool like a veteran, and achieve a sturdy, stylish finish that transforms your outdoor space.
Key Takeaways
- Master how to use a nail gun for fencing by selecting weather-resistant galvanised nails that keep your garden boundary secure against the British elements.
- Choose the right tool for every task, using powerful framing nailers for heavy rails and high-capacity coil nailers for fixing pales with speed and precision.
- Learn professional firing techniques, including how to drive nails perpendicular to the grain to prevent "shiners" and ensure long-lasting structural integrity.
- Calibrate your equipment like a pro by adjusting the depth of drive on scrap timber to achieve a perfectly flush finish across your entire project.
- Keep your DIY gear in top condition with simple maintenance steps that prevent sap and sawdust buildup, ensuring your tools are ready for your next garden transformation.
Quick Steps for Using a Nail Gun on Garden Fencing
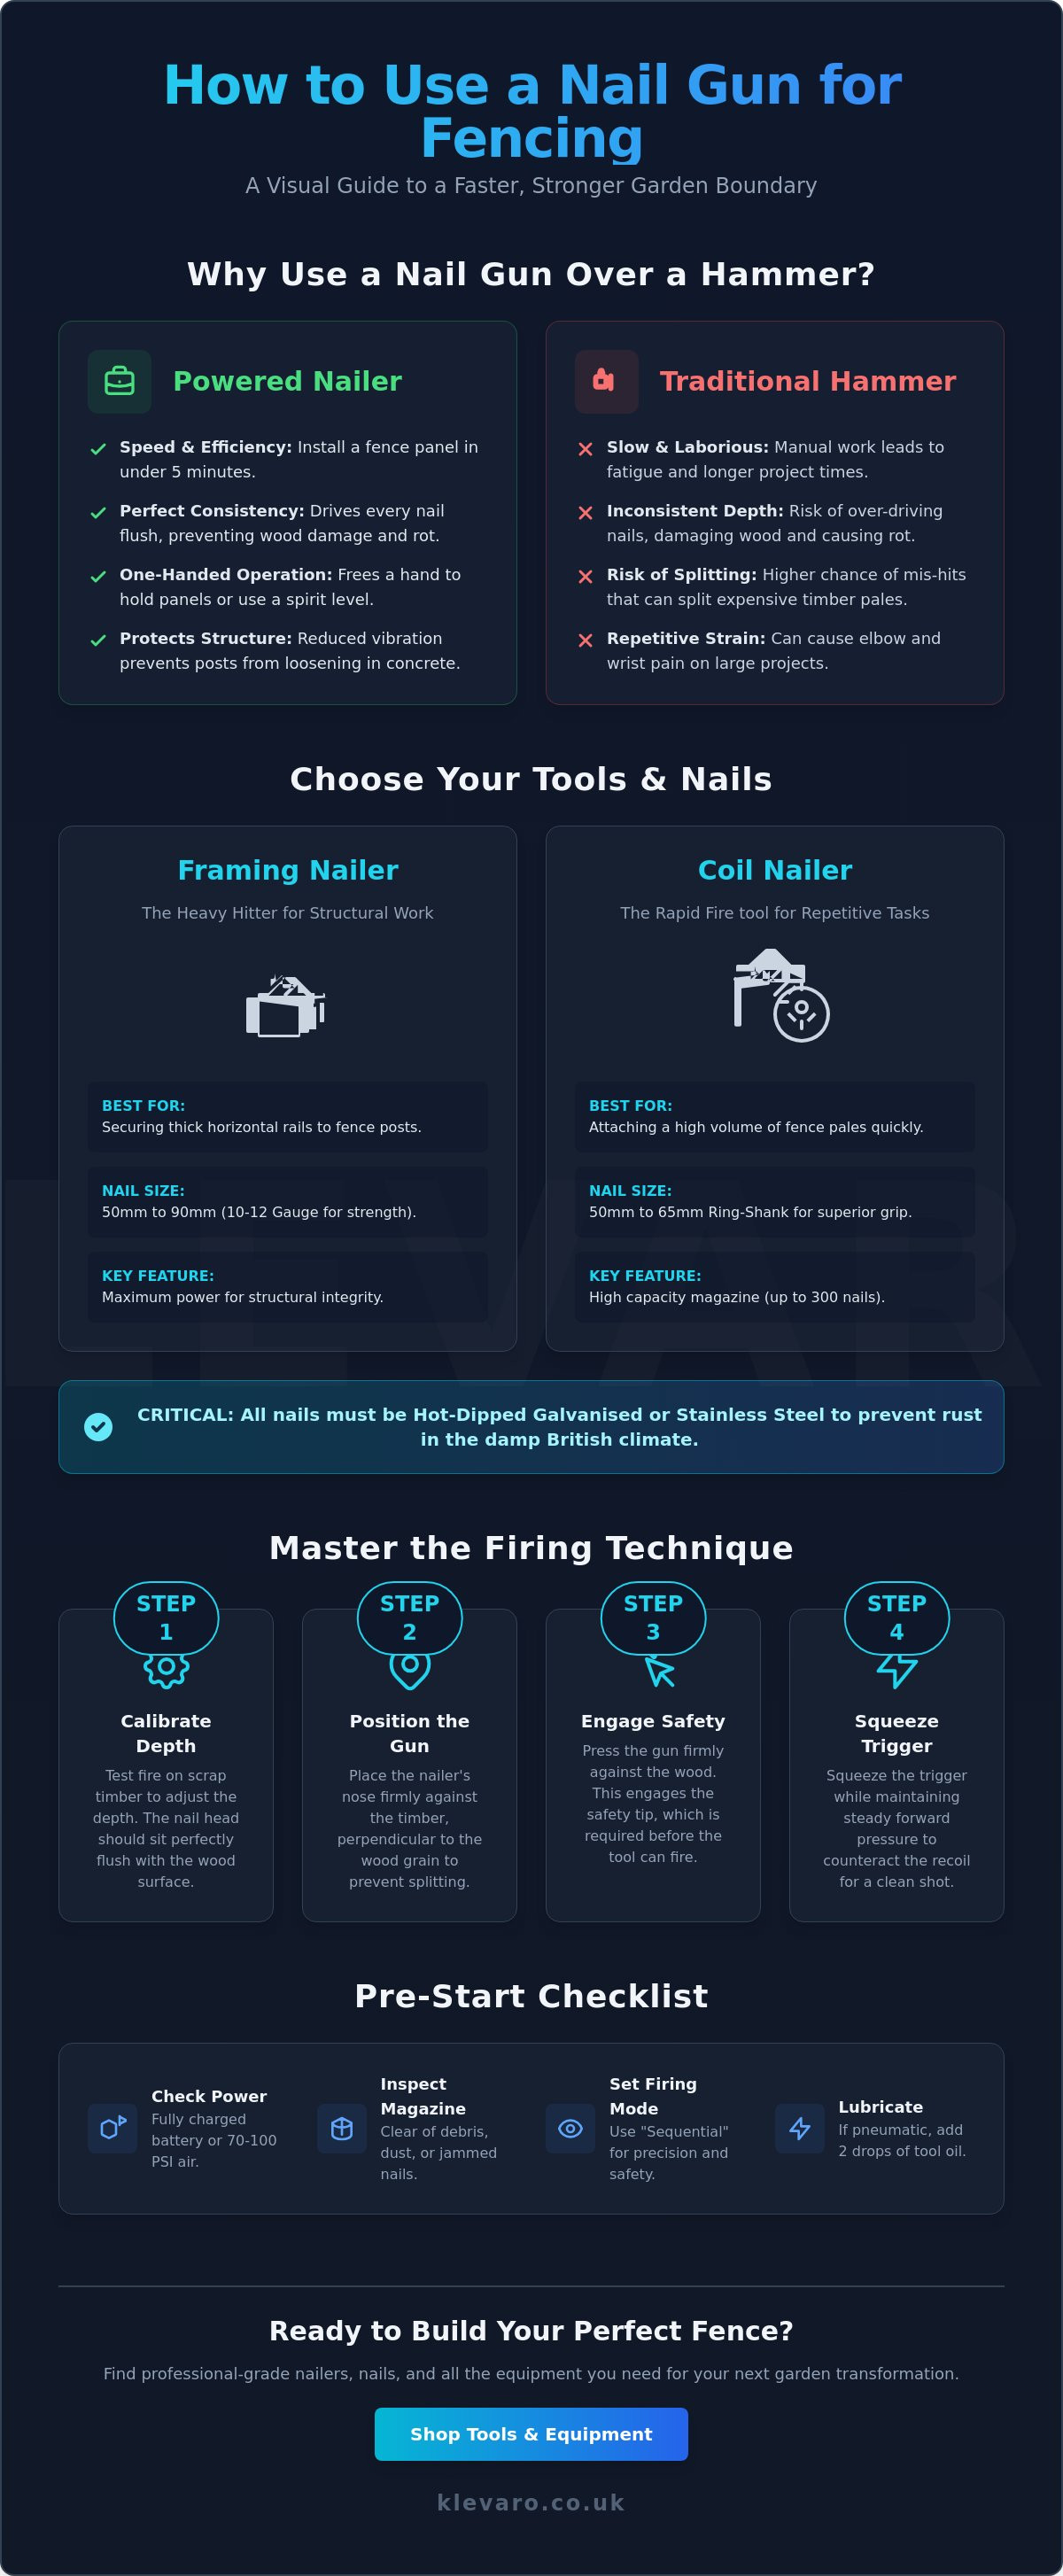
To use a nail gun for fencing, load the tool with 50mm to 65mm galvanised nails, set the firing mode to sequential, and adjust the depth of drive so the fastener sits flush with the timber surface. Position the nose of the gun firmly against the fence pale, ensuring it is perpendicular to the wood grain to prevent splitting. Squeeze the trigger while maintaining steady forward pressure to counteract the tool's recoil. Learning how to use a nail gun for fencing properly saves hours of manual labour while ensuring your garden boundary remains structuraly sound for years. Always test your settings on a scrap piece of fence rail before starting the main installation to avoid damaging your materials.
Start your project by calibrating the depth of drive on a scrap piece of timber that matches your fence pales. This step is vital because different wood densities, such as pressure-treated softwood or larch, react differently to pneumatic or battery power. Once the depth is correct, position the nose of the gun firmly against the fence pale or rail. Squeeze the trigger while maintaining steady pressure to prevent recoil-related misfires. If the gun isn't held tight against the wood, the safety tip might disengage, leading to an incomplete drive or a jammed fastener.
The Immediate Setup Checklist
Before you begin firing fasteners into your new garden boundary, run through this essential pre-start checklist. Ensuring your tools and equipment are ready prevents mid-project delays and safety hazards.
- Check the power source: Ensure your Li-ion batteries are fully charged or your air compressor is regulated between 70 and 100 PSI.
- Inspect the magazine: Verify the nail magazine is clear of debris, dust, or previously jammed fasteners that could cause a malfunction.
- Set the firing mode: Switch the trigger to "sequential" mode rather than "bump fire" to ensure maximum precision and safety on fencing projects.
- Lubricate if required: If using a pneumatic model, add two drops of tool oil into the air inlet to keep the internal pistons moving smoothly.
Why Use a Nail Gun Over a Hammer?
Switching from a traditional claw hammer to a powered nailer offers several advantages beyond just saving your elbow from repetitive strain. Efficiency is the most obvious benefit; increased speed allows for easy one-handed positioning of heavy fence panels or awkward gravel boards. This leaves your other hand free to use a spirit level, ensuring every pale is perfectly vertical.
Consistency is another factor that DIY enthusiasts appreciate. By understanding the types of nail guns available, you can choose a tool that provides a consistent depth of drive. This prevents nail heads from being over-driven, which often crushes wood fibres and creates a pocket where rainwater can sit and cause rot. Furthermore, the reduced vibration of a concentrated nail strike protects the structural integrity of your fence posts, preventing them from loosening in their concrete footings during the installation process.
Choosing the Right Nailer and Nails for Outdoor Fencing
Learning how to use a nail gun for fencing starts with selecting a framing nailer for structural rails and a coil nailer for pales. You must use 50mm to 65mm ring-shank nails for pales to ensure a 25mm depth into the rail. Structural rails require 10-gauge or 12-gauge nails to provide necessary shear strength against wind and weight. All fasteners must be stainless steel or hot-dipped galvanised to prevent rust bleeding in the damp British climate. These specific tool and nail combinations allow the fence to withstand timber movement over time. Proper preparation ensures your DIY project remains durable and professional for years to come.
Framing Nailers vs. Coil Nailers
Framing nailers are the heavy hitters of any fencing project. They are designed to fire 50mm to 90mm nails, making them the best choice for securing thick horizontal rails to sturdy fence posts. For the best experience on long garden boundaries, choose cordless gas or battery-powered models. These options provide maximum mobility and eliminate the trip hazards of air hoses or power cables.
Coil nailers are superior when you have a high volume of fence pales to attach. Their circular magazines can hold up to 300 nails at once, which significantly reduces the time spent reloading. This efficiency is vital when you are installing hundreds of slats across a large property. If you're planning a full garden overhaul, consult our essential gardening tools checklist to ensure you have all the necessary support gear ready.
Nail Gauge and Length Recommendations
The length of your nail determines the structural integrity of the fence. Use 50mm to 65mm nails for attaching pales to rails. This length provides the ideal 25mm of penetration into the rail without the tip of the nail poking through the other side. For the main structural rails, select 10-gauge or 12-gauge nails. These thicker fasteners offer the shear strength required to hold heavy timber in place during high winds.
Always ensure your nails are ring-shanked rather than smooth. Ring-shank nails feature small ridges along the shaft that grip the wood fibres like a screw. This is especially important for pressure-treated softwood, which tends to expand and contract as it reacts to the weather. The extra grip prevents nails from "popping" out as the wood moves. To keep your workspace secure, always follow essential safety gear and practices when operating high-pressure tools.
British weather is notoriously wet, so standard steel nails will quickly develop "bleeding" rust stains that ruin the look of your timber. Only use hot-dipped galvanised or stainless steel nails to ensure your fence looks great for a decade or more. If you're ready to start your project, explore our reliable range of DIY tools and equipment to find the perfect match for your garden needs.
Essential Safety Gear and Tool Calibration for Fence Projects
Safe operation of a nail gun depends on using the correct protective gear and setting your tool's depth levels accurately. You should always wear impact-resistant eye protection and ear defenders to mitigate the risks of wood ricochets and pneumatic noise. Calibrating your tool involves testing the firing depth on scrap timber until the nail head sits perfectly flush with the wood grain. This step is vital when learning how to use a nail gun for fencing because it prevents damage to thin pales and ensures the fence remains structurally sound for years. Consistent results require you to monitor air pressure or battery strength every 15 minutes during the build. For reliable protection on your next project, explore our tools and equipment collection for high-quality safety gear and accessories.
Personal Protective Equipment (PPE)
Safety is the foundation of any successful DIY project. You must wear impact-resistant safety glasses that meet EN166 standards to protect against flying splinters or stray nails. Pneumatic nail guns often produce noise levels exceeding 100 decibels; high-quality ear defenders are essential to prevent long-term hearing damage. Heavy-duty work gloves are another necessity for handling pressure-treated timber. This wood is often abrasive and can cause painful splinters if handled with bare hands. Steel-toed boots provide a final layer of security. They protect your feet from heavy fence panels or tools that might accidentally slip during the installation process.
Calibrating Your Depth of Drive
Correct calibration ensures your nails provide maximum grip without compromising the timber. You should always perform a test fire on a scrap piece of the exact timber you've chosen for your fence. Adjust the thumbwheel or the air regulator on your compressor until the nail head sits flush with the surface. If the nail is buried too deep, it can "over-drive" through thin 12mm pales and cause the wood to split or rot prematurely. If it sits too high, it creates a snagging hazard and looks untidy. Check your depth of drive every 10 to 15 minutes. Battery power in cordless models or air pressure in pneumatic systems can fluctuate; these changes lead to inconsistent nail depths that require manual correction with a hammer.
Taking five minutes to dial in your settings saves hours of repair work later. A well-calibrated gun makes the job feel effortless and ensures your fence looks professionally installed. Once your gear is on and your settings are locked, you're ready to start firing with confidence.
Mastering the Technique: Securing Fence Posts, Rails, and Pales
To master how to use a nail gun for fencing, you must fire nails at a 90-degree angle to the timber surface while maintaining a 25mm distance from all edges. Proper technique involves using a staggered nailing pattern for structural rails and securing pales with two nails at every intersection point. These methods ensure the fence remains upright during 60mph winds and prevents the wood from splitting as it expands and contracts through UK seasons. Reliable fastening is the difference between a fence that lasts twenty years and one that leans after the first winter storm.
Firing nails perfectly perpendicular to the wood surface prevents "shiners," which are unsightly and dangerous protruding nail tips. If you fire at an angle, the nail often exits the side of the timber rather than burying deep into the core of the post. Always keep the nose of the nail gun flush against the material to ensure a secure, professional finish. This direct contact allows the tool's safety mechanism to engage properly and delivers the full driving force into the grain.
Wood grain splits easily when fasteners are placed too close to the end of a board. Maintaining a 25mm buffer from the edge of your timber pales or rails protects the structural integrity of the wood. For heavy-duty structural rails, use a staggered nailing pattern rather than a straight vertical line. This distribution of load prevents the rail from pivoting or pulling away from the post under the heavy weight of wet timber or high wind pressure.
Attaching Rails to Posts
Rails provide the skeleton of your fence and require the most strength to resist sagging. Use a spirit level to verify each rail is perfectly horizontal before you pull the trigger. Drive two 90mm nails at a slight downward angle into the post to create a mechanical bond that resists pulling forces. It's helpful to support the rail from beneath with a temporary timber block so it doesn't slip while you're positioning the nail gun for the first shot.
Nailing Pales and Slats
Consistency is the key to a professional-looking garden boundary. Use a wooden spacer block between each pale to ensure uniform gaps across the entire fence run. When learning how to use a nail gun for fencing, remember to fire two nails at every rail intersection point, typically at the top, middle, and bottom rails. Safety is vital during this repetitive task; keep your free hand at least 30cm away from the firing tip at all times to avoid injury from potential nail deflections or knots in the wood.
Finishing Your Project and Maintaining Your Equipment
Proper maintenance extends the life of your tools and ensures your fence lasts for decades. You should clean the nosepiece and magazine after every use to prevent sap and sawdust buildup from causing mechanical jams. Apply a high-quality wood preservative to any nail holes that have broken the timber seal to prevent moisture ingress. Learning how to use a nail gun for fencing effectively requires mastering these final care steps to protect your investment and your equipment. Regular inspections of the firing pin and air inlet will prevent costly repairs and ensure your tool is ready for the next project.Nail Gun Maintenance Tips
If you're using a pneumatic tool, add 2-3 drops of pneumatic tool oil to the air inlet daily. This simple habit keeps the internal O-rings lubricated and prevents air leaks during operation. Inspect the firing pin for signs of wear, such as mushrooming or chipping, and replace damaged parts immediately to maintain firing accuracy. For those using cordless models, store your batteries in a cool, dry place to maintain their charge cycles. Avoid leaving batteries in a cold garage over winter, as extreme temperatures can reduce the lifespan of lithium-ion cells by up to 30 percent.- Clean the magazine with a stiff brush to remove grit and debris.
- Check all screws and bolts on the tool body to ensure they haven't vibrated loose.
- Wipe down the exterior with a damp cloth to remove corrosive garden chemicals or salt air.
Post-Project Fence Care
Walk the entire length of your fence to check for any missed nails or "proud" heads that aren't sitting flush. Use a hammer to tap these heads into the timber gently so they don't snag clothing or skin. Apply a weather-resistant finish or UV-rated stain to the entire fence to protect the wood from the UK's frequent rain and sun cycles. This seal is vital for preventing the timber from warping or rotting prematurely. A well-built fence using these professional techniques can last between 15 and 20 years with minimal intervention. Don't forget to treat the end grain of any cut posts, as this is where moisture is most likely to enter. Once your fence is secure and sealed, you can enjoy a professional-looking boundary that adds value to your home. Visit Klevaro to shop tools and equipmentTransform Your Garden With Professional Fencing Results
Mastering how to use a nail gun for fencing is the fastest way to achieve a professional finish on your garden boundary. By selecting 50mm to 65mm galvanised nails, you ensure your fence stands strong against the British weather for years to come. Always remember to calibrate your tool's depth of drive on a spare timber pale before starting your main run. This simple step prevents over-driving and keeps your timber split-free. Safety remains the priority, so keep your eye protection on and your fingers clear of the discharge area at all times.
You're now ready to tackle your project with confidence and precision. To get the best results, upgrade your DIY kit with Klevaro tools and equipment. As a Trusted UK Store offering Fast UK Delivery and Quality Guaranteed on all tools, we're here to help you build something brilliant. Grab your gear and start creating a garden space you'll love all year round.
Frequently Asked Questions
What size nail gun do I need for fencing?
A framing nailer is the correct tool for building a sturdy garden fence. This heavy-duty tool handles the 50mm to 90mm nails required to secure thick pales to horizontal rails. For the best results, choose a 21-degree or 30-degree framing nailer that accommodates clipped or full-head nails to ensure your structure stays upright during UK winter storms.
Can I use a brad nailer for a garden fence?
You shouldn't use a brad nailer for structural fencing projects. Brad nailers fire thin 18-gauge wire nails that lack the head surface area and grip needed to hold heavy timber pales. These small fixings will likely pull through the wood as it swells and shrinks in the rain, leading to a collapsed fence within a single season.
Should I use galvanised or stainless steel nails for fencing?
Use hot-dipped galvanised nails for standard pressure-treated timber and stainless steel nails for premium woods like cedar or larch. Hot-dipped galvanising provides a thick protective layer that resists rust in damp environments. If you're using cedar, stainless steel is essential because it won't react with the wood's natural tannins, which often causes unsightly black streaks on your pales.
How do I stop my nail gun from splitting the fence pales?
Adjust the depth-of-drive dial on your tool so the nail head sits flush with the surface rather than burying deep into the grain. Keep your fixings at least 25mm away from the edge of the timber to prevent the wood from blowing out. If you're working with particularly dry or brittle wood, reducing the air pressure on your compressor can help you maintain control and protect your materials.
Is it better to use a cordless or pneumatic nail gun for a long fence?
A cordless nail gun is the best choice for long fences because it offers total freedom of movement without dragging a heavy air hose across the garden. Modern 18V battery-powered framing nailers can fire up to 700 nails on a single charge, which is enough to install roughly 15 standard panels. This makes the job much faster and safer as you won't have any trip hazards while you work.
What is the best nail length for 19mm fence pales?
Use 50mm nails when you're attaching 19mm thick pales to your fence rails. This length allows the nail to pass through the pale and penetrate 31mm into the structural rail, providing a rock-solid connection. Choosing this specific size ensures you have maximum holding power without the sharp tip of the nail poking through the back of the timber.
How do I unjam a nail gun safely during a project?
Disconnect the battery or air supply immediately before you touch the nose of the tool. Once the power is off, slide back the magazine to remove the remaining nail strips and use the tool-free clearing latch to expose the jammed fastener. After you've removed the bent nail with pliers, you can snap the latch shut and get back to mastering how to use a nail gun for fencing with confidence.
Leave a comment