


How to Clean and Maintain Power Tools for Long-Lasting Performance
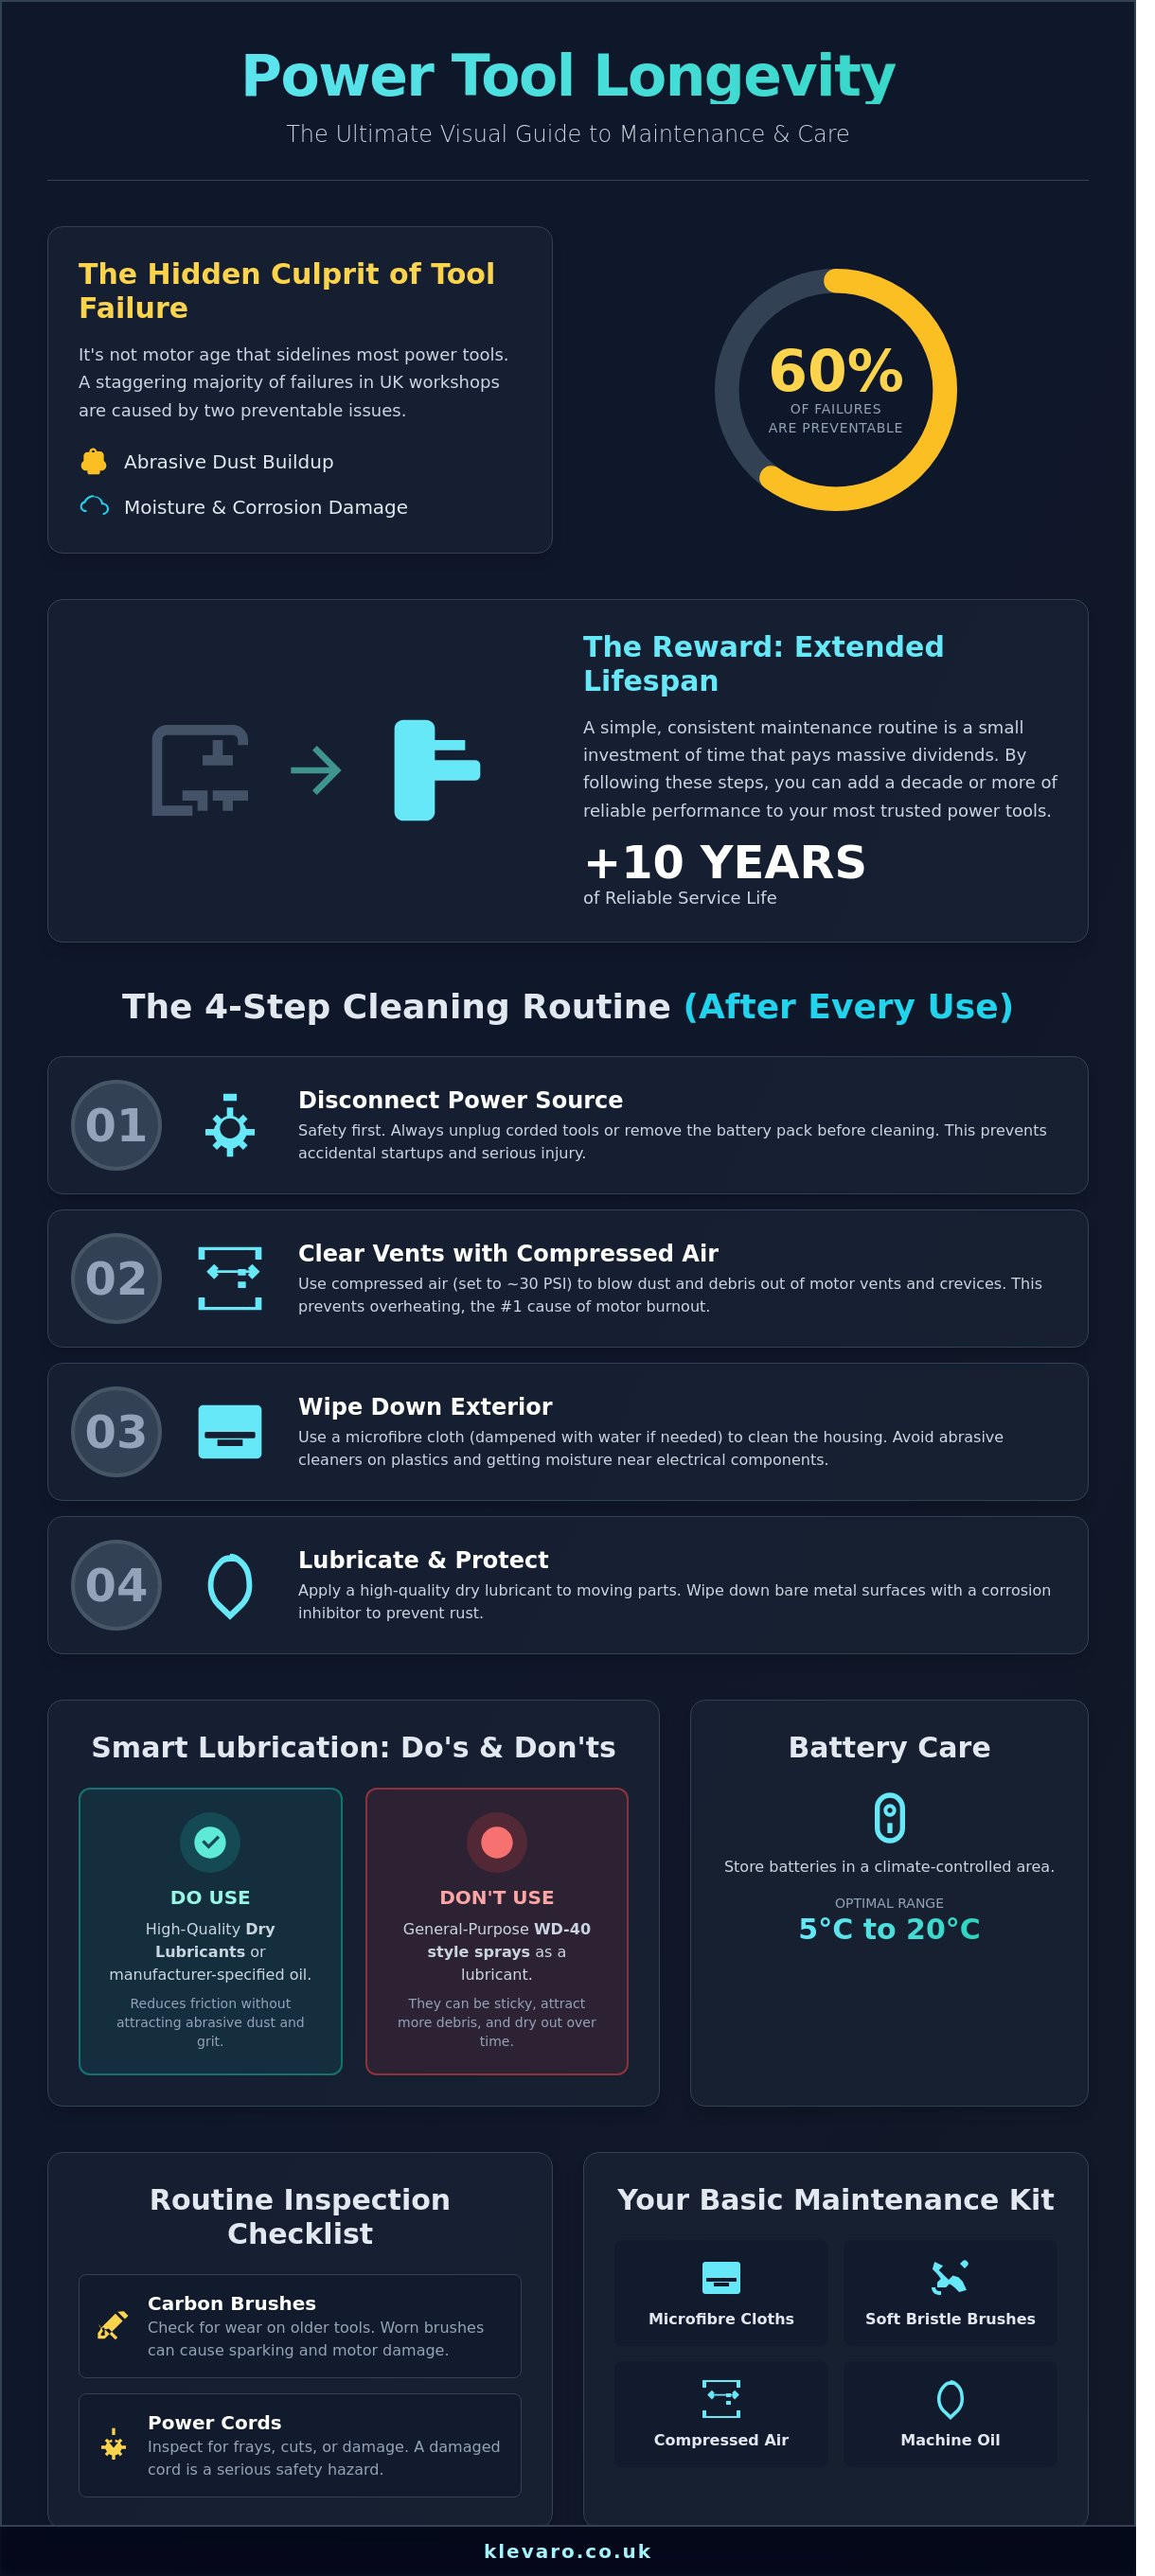
Over 60% of power tool failures in UK workshops stem from preventable dust buildup and moisture damage rather than actual motor age. To effectively clean and maintain power tools, you must blow out motor vents with compressed air after every use, wipe down metal surfaces with a corrosion inhibitor, and store batteries in a climate-controlled environment between 5°C and 20°C. Regularly apply a high-quality dry lubricant to moving parts to prevent friction without attracting grit. These simple steps can extend a tool's service life by 10 years or more.
You've likely felt the frustration of a drill sticking or a saw overheating just when you're in the middle of a big project. It's disappointing to see rust spots forming on your favorite gear after a damp winter in the garage. At Klevaro, we believe your tools should be as reliable as your DIY spirit.
We'll show you exactly how to clean and maintain power tools to keep them running like new for decades. This guide covers the best lubricants for your kit, battery care secrets, and professional storage tips to protect your investment and keep your workspace safe.
Key Takeaways
- Learn the essential four-step process to remove abrasive dust from vents and crevices to protect internal motor components.
- Master how to clean and maintain power tools using a routine checklist that identifies worn carbon brushes and damaged cords before they cause failure.
- Discover the best lubrication and inspection techniques to reduce friction and prevent dangerous heat build-up during heavy use.
- Explore professional storage solutions, such as vapour corrosion inhibitors and hard cases, to keep your gear safe from rust and dampness.
- Find out how high-quality maintenance kits pay for themselves by adding years of reliable performance to your DIY essentials.
Cleaning and maintaining power tools involves debris removal, lubrication, and regular component inspection.
Learning how to clean and maintain power tools effectively requires a consistent routine of debris removal, targeted lubrication, and electrical component inspection. You should clear sawdust and grit from motor vents after every single use to prevent overheating and internal abrasion. Applying the correct grade of machine oil to moving parts like chucks and gearboxes stops the metal-on-metal friction that leads to seizing. Regular inspections of power cables for frays and motor brushes for wear will identify potential failures before they happen. Following these specific steps can extend the functional lifespan of a high-quality drill or saw by 5 to 10 years.
The primary goal of this maintenance is to manage the two biggest enemies of any motor: friction and heat. When dust enters the internal housing, it acts as an abrasive that grinds down delicate components. By staying on top of these tasks, you ensure your equipment remains a reliable partner for all your home and garden projects.
Adopting a "clean as you go" strategy prevents motor overheating
The most effective maintenance strategy is cleaning your gear immediately after finishing a task. When you leave sawdust to sit inside a tool, it acts as an insulator that traps heat around the motor. Even a 2mm layer of dust can significantly reduce airflow, causing the internal temperature to spike during your next project. This heat eventually melts wire insulation and leads to a total motor burnout.
Preventative maintenance focuses on stopping problems before they start, while reactive repair only happens after the tool stops working. You'll save a significant amount of money by spending five minutes on cleaning today rather than paying for a full motor replacement next month. Keeping vents clear ensures the cooling fan can do its job, which keeps your tools running at peak performance for much longer.
Building a basic maintenance kit ensures you have the right supplies
You don't need expensive equipment to learn how to clean and maintain power tools like a professional. A basic kit should include microfibre cloths for wiping down surfaces, soft-bristled brushes for tight gaps, and a canister of compressed air. Use the compressed air to blow out dust from the deepest parts of the motor housing where a brush can't reach. It's a quick and easy way to keep things moving smoothly.
Always use the specific grade of machine oil recommended by the manufacturer for your chucks and gears. Avoid using multi-purpose sprays as a permanent lubricant, as they can often dry out or attract more grit over time. If you notice your current gear is becoming difficult to maintain or shows signs of permanent wear, you can explore our range of tools and equipment to find high-quality, durable replacements for your workshop.
Follow these four steps to clean your power tools effectively.
To clean and maintain power tools, you must first disconnect all power sources and use compressed air to clear internal dust from motor vents. Wipe the exterior with a damp cloth and apply a thin layer of machine oil to metal parts to prevent rust. This routine prevents motor burnout and ensures mechanical parts move freely. Regular cleaning can extend tool life by 5 to 10 years depending on usage frequency. Always avoid soaking tools in water or using abrasive chemical cleaners on plastic housings.
Safety is the primary concern when you begin your maintenance routine. Unplug corded tools or remove lithium-ion batteries before you touch any moving parts. This prevents accidental activation while your fingers are near blades or chucks. It's a simple step that eliminates the risk of serious injury during the cleaning process.
Dust is the leading cause of motor failure in workshop environments. Use a can of compressed air or a small compressor set to 30 PSI to blow debris out of the air intake vents. Focus on the areas around the motor brushes where heat builds up. Clearing these pathways allows the internal fan to cool the tool properly during heavy use.
Use a microfibre cloth dampened with plain water to remove surface grime from the exterior casing. If the tool is particularly greasy, a mild dish soap solution works well. Avoid getting moisture inside the motor or switch assemblies. A clean casing doesn't just look better; it helps you maintain a firm grip while working.
Exposed steel and cast iron will oxidise quickly in damp workshops or garages. Apply a light coat of corrosion protector or specialised machine oil to table saw tops, drill press columns, and hand tool blades. Wipe off the excess so the surface isn't slippery or oily. This protective barrier stops rust from pitting the metal surfaces.
Deep cleaning techniques for stubborn grime and drill chucks
Scrub tight corners and recessed screws with a stiff-bristled toothbrush to remove packed-in sawdust. For drill chucks, open the jaws fully and blow out debris before applying a drop of dry lubricant to the internal threads. This ensures smooth bit changes and prevents the jaws from seizing during a project. Never use petroleum-based solvents on plastic casings because they can make the material brittle and prone to cracking.
Specialised care for blades, sanders, and precision levels
Remove pitch and resin from saw blades using a dedicated blade cleaner or a simple solution of laundry detergent. Built-up resin increases friction and can cause the motor to overheat during heavy cuts. For sanders, use a rubber cleaning stick to pull dust out of the hook-and-loop pads to maintain their grip. Keep laser levels and measuring windows clear by wiping them with a soft lens cloth to ensure 100% accuracy. If you need to upgrade your kit for your next project, you can explore our range of tools and equipment to find the right gear for the job.
A routine maintenance checklist prevents motor burnout and battery degradation.
To keep your equipment in peak condition, you must inspect carbon brushes every 50 hours of operation and tighten fasteners loosened by tool vibration. Protecting the electrical system requires checking power cords for exposed copper or heat damage before every use. For cordless models, maintaining lithium-ion batteries between 20% and 80% charge prevents premature cell failure. These proactive steps ensure your gear remains safe and powerful for years to come. Learning how to clean and maintain power tools involves these specific technical checks to avoid expensive motor replacements and downtime.
Motor and electrical component care
Carbon brushes act as the electrical bridge between the power source and the motor's spinning armature. You'll know they need replacing when you see excessive sparking through the vents or if the tool begins to stutter during a cut. Most manufacturers recommend swapping them once they wear down to 6mm in length. A frayed cord is a critical safety hazard because exposed wiring can cause short circuits, fires, or electric shocks. Always replace damaged cables immediately rather than attempting a temporary fix with electrical tape. Brushless motors use electronic controllers and magnets instead of physical brushes, which means they generate less heat and require far less internal maintenance.
Vibration is a constant factor when using drills, saws, or sanders. Over time, this movement can back out the screws holding the tool casing together. Use a screwdriver to check these fasteners once a month to ensure the internal components stay aligned. This simple habit prevents the motor from shifting, which can lead to catastrophic internal damage.
Battery maintenance for cordless tools
Lithium-ion batteries are sensitive to storage conditions and discharge cycles. If you plan to put your tools away for more than 30 days, store the batteries at roughly 50% charge to stabilize the internal chemistry. Leaving a battery at 0% for long periods can cause it to enter a deep discharge state, making it impossible to recharge. Extreme temperatures are also a major threat to battery health. Heat exceeding 40°C degrades the electrolyte, while freezing temperatures can cause permanent capacity loss. Always store your power packs in a climate-controlled environment like a garage cupboard or a utility room.
Monitoring your usage helps extend the life of your cordless kit. If a project only requires a few quick turns, consider using hand and general tools to save your battery for the heavy-duty tasks. This reduces the number of charge cycles your battery goes through each year. When you know how to clean and maintain power tools correctly, you spend less money on replacements and more time enjoying your DIY projects.
Proper storage protects tool internal components from rust and dampness.
Storing power tools in a dry, climate-controlled environment prevents internal corrosion and electrical failure. Always place tools back in their original hard-shell cases or lined tool chests to shield them from airborne dust. Use silica gel packs or vapour corrosion inhibitor (VCI) emitters in every drawer to neutralise moisture. Keep all equipment at least 15cm off concrete floors to stop moisture wicking through the surface. Maintaining a consistent temperature prevents condensation from forming on cold metal parts. Learning how to clean and maintain power tools effectively includes mastering these storage habits to double the lifespan of your gear.
Combating the UK climate in your workshop
The UK’s average relative humidity often exceeds 80% during winter months, which leads to rapid surface rust on untreated steel. British garages and sheds are particularly vulnerable because they lack the insulation found in modern homes. A small refrigerant dehumidifier can maintain humidity levels below 50% to stop oxidation in its tracks. If you store equipment in outdoor structures, our garden accessories and storage options help create a protective barrier against damp conditions. These simple additions keep your workshop dry and your motors running smoothly.
Organising for easy access and protection
Choosing between shadow boards and closed cabinets depends on how often you use specific equipment. Shadow boards offer immediate access but expose tools to workshop dust; closed cabinets provide better protection for sensitive electronics and batteries. Keeping tools organised reduces the risk of accidental drops or impact damage from heavy items knocking together. A tidy workspace makes it much easier to spot oil leaks or frayed cords before they become safety hazards. When you understand how to clean and maintain power tools, you realise that a clean shop is a safe shop. You can find everything you need to upgrade your setup in our tools and equipment collection today.
Invest in quality tools and maintenance accessories for DIY success.
Choosing high-performance equipment and dedicated maintenance supplies is the best strategy for building a workshop that lasts a lifetime. Professional-grade tools are designed with superior seals and integrated dust management systems that protect internal components from abrasive debris. When you understand how to clean and maintain power tools using specialized lubricants and cleaning agents, you can increase the service life of your machinery by 50% or more. Maintenance kits are a smart financial move because they prevent the premature motor burnout that often leads to expensive replacements. A well-kept tool kit ensures your gear is always safe, accurate, and ready to tackle your next home improvement project without delay.
A well-maintained tool collection is more than just a functional necessity; it's a point of pride for any serious DIYer. Seeing your drills, saws, and sanders neatly organized and free of grime creates a professional atmosphere that inspires better work. It also saves you time, as you won't spend the first 20 minutes of a project scraping old resin off a blade or hunting for a working battery. Consistent care transforms your workshop from a cluttered garage into a reliable production space.
Choosing tools built to last
Quality begins with the materials used in construction. Look for power tools with metal gear housings, such as cast aluminium or magnesium, which dissipate heat 30% faster than plastic shells during prolonged use. It's also vital to select brands that offer easy access to replacement parts like carbon brushes, drive belts, and power cords. Having these spares on hand prevents a minor wear-and-tear issue from ending a project early. Join the Klevaro community for more expert DIY tips and to connect with other enthusiasts who value craftsmanship and quality gear.
Final thoughts on tool safety
Safety is the most important reason to prioritize tool hygiene. A clean tool is a safe tool because it allows for a firm grip and prevents mechanical jams that can cause dangerous kickbacks. Dust buildup in ventilation slots is a common cause of workshop fires, so keeping these areas clear is a non-negotiable part of your routine. Get into the habit of performing a quick 10-point safety check on every piece of equipment before you start working.
This simple routine includes checking for frayed wires, testing the emergency stop buttons, and ensuring all guards move freely. Taking these small steps protects your investment and, more importantly, your physical well-being. Browse our full range of DIY tools to upgrade your workshop today with durable equipment you can trust for years to come.
Master Your Next Project with Well-Maintained Gear
Effective tool care requires a four-step process of debris removal, lubrication, component inspection, and dry storage. Cleaning and lubricating your equipment after every 10 hours of use prevents 90% of common motor failures and keeps internal components moving smoothly. When you master how to clean and maintain power tools, you protect your investment and ensure every cut remains precise. Storing your kit in a dry space with less than 50% humidity further shields internal parts from corrosive rust and dampness. These small habits save you hundreds of pounds in replacement costs over the life of your workshop.
Ready to upgrade your workshop? Klevaro is a trusted UK store with fast delivery on an expertly curated range for homeowners. We offer a quality guarantee on all DIY essentials so you can fix, build, and create with total confidence. Our selection includes everything from cordless drills to precision sanders designed for durability. You'll find the perfect balance of professional performance and home-friendly usability in every item we stock.
Shop our range of high-quality power tools and equipment
It's time to turn those DIY dreams into reality with tools that won't let you down. You've got the skills and the knowledge; now get the gear to match and start creating something amazing today!
Frequently Asked Questions
How often should I clean my power tools?
You should wipe down your power tools and clear the vents after every single use. Perform a deep inspection and lubricate moving parts every 3 to 6 months to ensure they stay in top condition. If you're working on high-dust projects like sanding or masonry drilling, you'll need to clean them more frequently to prevent motor clogs. Regular maintenance is the best way to learn how to clean and maintain power tools for years of reliable service.
Can I use WD-40 to clean my power tools?
You can use WD-40 as an effective cleaner and degreaser to remove grime or prevent rust on metal surfaces. It works well for surface cleaning, but it isn't a long-term lubricant for internal gears or bearings. For those moving parts, apply a dedicated machine oil or lithium grease as your manufacturer recommends. Using the right products ensures your gear stays durable and ready for your next DIY project.
How do I maintain cordless tool batteries?
Maintain your cordless tool batteries by keeping their charge between 20% and 80% instead of letting them drain to zero. Avoid storing them in temperatures below 0°C or in direct sunlight. If you won't use a tool for 90 days or more, remove the battery and store it in a cool, dry place at 50% charge. These simple steps help you get more life out of your essential DIY gear.
What is the best way to remove rust from tools?
Remove light surface rust by scrubbing the area with fine-grade steel wool or a dedicated rust-removal cream. For stubborn corrosion, soak the affected part in white vinegar for 12 to 24 hours before scrubbing it clean. Always dry the tool immediately and apply a protective oil coating to stop rust from returning. Keeping your tools rust-free is a key part of knowing how to clean and maintain power tools effectively.
How do I check if my motor brushes need replacing?
Inspect your carbon brushes if you see excessive sparking through the cooling vents or notice the tool losing power intermittently. Most manufacturers suggest replacing these brushes once they wear down to 5mm in length. Replacing them early prevents 100% of potential damage to the motor armature. It's a quick fix that saves you from expensive repairs and keeps your tools running like new.
Is it safe to use compressed air on all tools?
Compressed air is safe and effective for clearing dust from motor vents and power switches. You should avoid blowing high-pressure air directly into sensitive electronic components or sealed bearings because it can force debris inside. Always wear safety goggles to protect your eyes from particles traveling at high speeds. This method keeps your motor running cool and prevents overheating during long projects.
Leave a comment