


How to Change a Jigsaw Blade Safely: A Step-by-Step UK Guide 2026
A blunt or poorly fitted jigsaw blade is significantly more dangerous than a sharp one. You likely feel a bit of tension when it is time to swap parts, especially if you've ever had a blade snap or get stuck due to debris. We'll show you exactly how to change a jigsaw blade safely so you can get back to your project without any risk of injury. Safe replacement starts with disconnecting the power source or removing the battery. You must wait two minutes for the metal to cool before touching the blade. The quick-release lever opens the blade clamp to eject the old part. A new T-shank or U-shank blade slides into the chuck until it clicks into place. The blade teeth must face forward with the rear edge seated in the guide roller before you lock the clamp.
This guide provides the exact steps for securing your equipment while avoiding common maintenance mistakes. You'll gain the confidence to handle your power tools like a pro and know exactly which blade to buy for your next UK home improvement task. Once you're ready to upgrade your kit, explore our range of durable jigsaw blades to find the perfect match for your project. Let's make sure your gear is ready for a perfect cut.
Key Takeaways
- Always disconnect the power source or remove the battery to ensure you know how to change a jigsaw blade safely and prevent accidental starts.
- Identify the crucial differences between T-shank and U-shank blades to guarantee a secure fit for your specific UK tool model.
- Learn how to maintain the blade chuck and clear debris to solve common issues like wobbly blades or slanted cuts.
- Select the ideal Teeth Per Inch (TPI) for your material to achieve professional results, whether you need a fast cut or a clean finish.
- Master the five essential steps for both tool-less and manual release systems to swap blades efficiently and keep your project moving.
How to Change a Jigsaw Blade Safely in Five Simple Steps
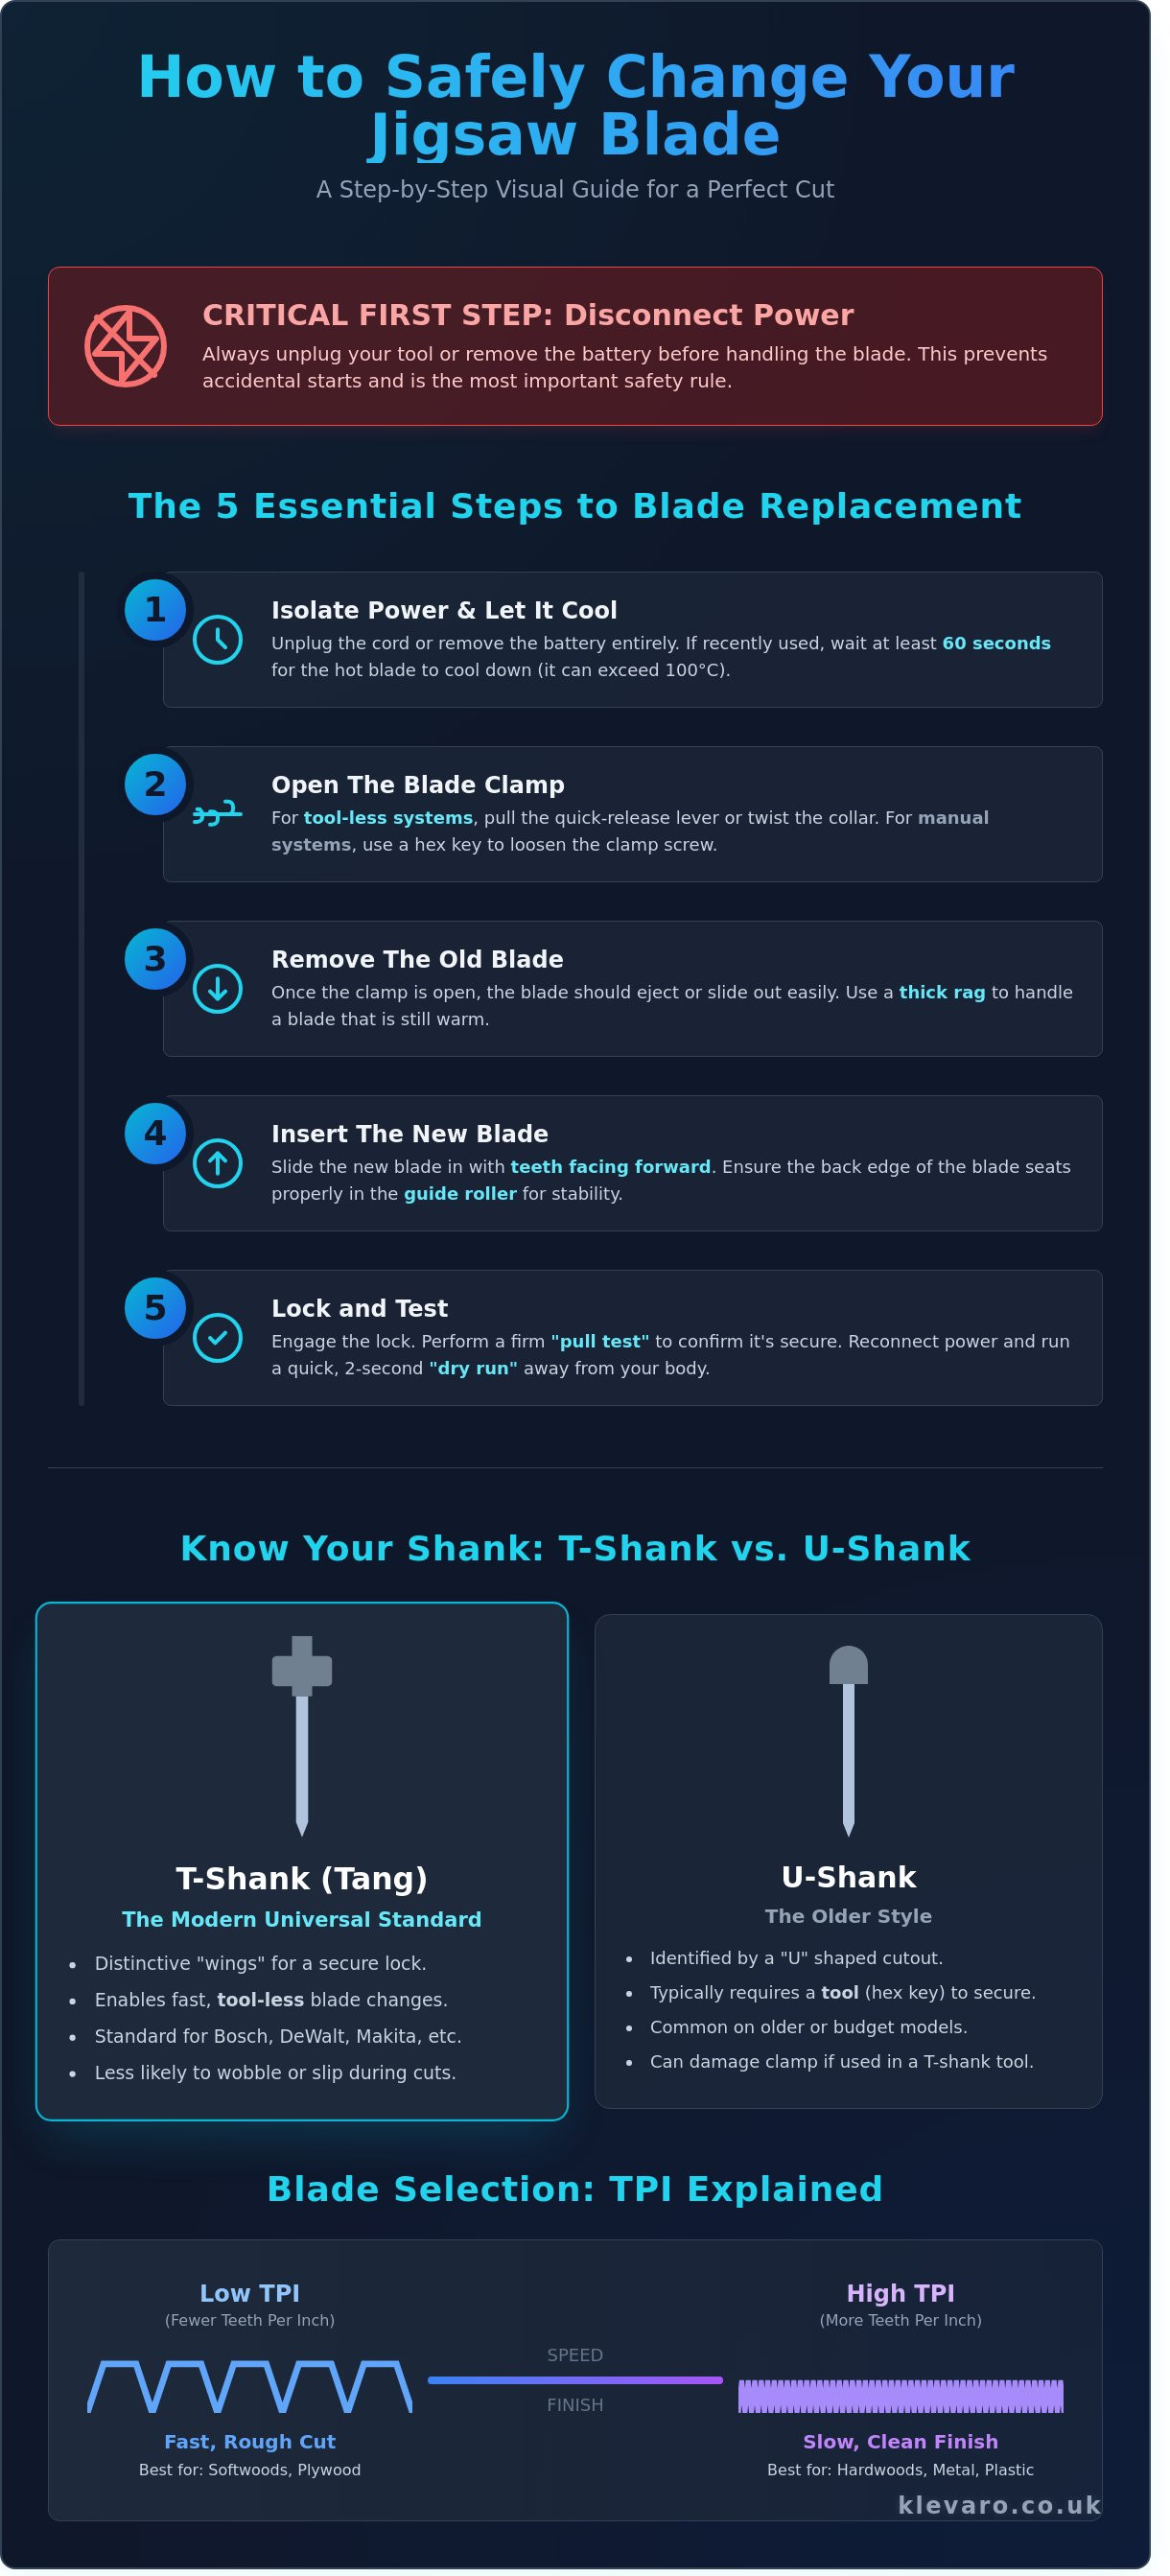
To change a jigsaw blade safely, you must first isolate the power by removing the battery or unplugging the cord from the mains. Open the blade clamp using either the tool-less quick-release lever or by loosening the manual hex screw with an Allen key. Remove the old blade carefully, then insert the new blade into the guide roller until it clicks or is tightened firmly into place. Perform a manual pull test to ensure the locking mechanism is fully engaged. Finally, run the tool briefly for two seconds away from your body to verify the fit. This entire maintenance task takes less than two minutes to complete correctly.
Modern jigsaws generally feature one of two release systems. Tool-less systems are the standard for most 2026 models, allowing you to swap blades by simply pulling a spring-loaded lever. Manual systems are more common on older or budget-friendly tools and require a small tool to loosen the clamp. Regardless of the system, using high-quality blades from our tools and equipment collection ensures your Jigsaw (tool) performs at its best and keeps your cuts precise.
Step 1 to 3: Isolation and Removal
Safety starts with total power isolation. For cordless models, slide the battery out completely to ensure the motor cannot engage. If you're using a corded version, pull the plug from the wall socket rather than just switching off the tool. Once the power is dead, locate your release mechanism. For tool-less models, pull the lever forward or twist the collar to eject the blade.
If your saw uses a manual clamp, use a hex key to loosen the screw holding the blade shank. Metal blades can reach temperatures exceeding 100°C during heavy use. Never grab a blade with bare skin immediately after a long cut. Wait at least 60 seconds for the metal to cool, or use a thick rag to pull the blade out of the housing safely.
Step 4 to 5: Insertion and Testing
Hold the new blade with the teeth facing forward and slide the shank into the slot. You must ensure the back edge of the blade sits snugly inside the groove of the guide roller. This roller provides the essential stability needed for straight, accurate cuts. Once the blade is fully inserted, release the spring-lever or tighten the hex screw firmly to lock it in place.
Knowing how to change a jigsaw blade safely involves a final physical check. Perform a "pull test" by gently but firmly tugging the blade downward to confirm the locking mechanism hasn't slipped. Finally, reconnect the power and give the trigger a quick, one-second "dry run" squeeze while holding the saw away from your body. This simple test confirms the blade is seated correctly before you begin your actual project.
Understanding Jigsaw Blade Shanks: T-Shank vs U-Shank
To change a jigsaw blade safely, you must first identify if your tool requires a T-shank or a U-shank blade. T-shanks are the modern UK standard and feature "wings" for tool-less installation. U-shanks have a "U" shaped cutout and usually require a hex key or screwdriver to secure. Using the incorrect shank type can damage the internal clamp or lead to the blade slipping during operation. Always disconnect the power source before attempting a blade swap to prevent accidental starts.
The "Tang" or T-shank has become the dominant format across the United Kingdom for both professional and DIY users. Its design incorporates two small lugs near the top of the blade that lock into a spring-loaded chuck. This mechanism ensures a secure fit without the need for additional tools. Using the wrong shank can permanently ruin your jigsaw's clamping system. If you're building up your workshop, you can find durable accessories in our hand and general tools collection to keep your projects running smoothly.
The T-Shank: The Modern Universal Standard
The T-shank is the preferred choice for modern, high-performance jigsaws. Its distinctive "wings" allow for a "click-in" installation that is both fast and secure. This design eliminates the need for screws, which can often strip or become lost over time. Most professional-grade brands in the UK, including Bosch, DeWalt, and Makita, have standardised their tools to fit this specific shank.
This Popular Mechanics on Jigsaw selection highlights how tool-less T-shank systems have improved safety for operators. Because the blade is held by a spring-loaded clamp rather than a single screw, it's less likely to wobble or break during heavy-duty cutting. This stability is vital when you are learning how to change a jigsaw blade safely for the first time. It ensures the blade is always perfectly aligned with the guide roller.
The U-Shank: Identifying Older or Budget Models
The U-shank is an older design characterised by a rounded "U" shape at the top of the metal. These blades are often found in budget-friendly models or older tools passed down through generations. Unlike the T-shank, these usually require a hex key or a flat-head screwdriver to tighten a small bolt against the blade. This process is slower and carries a higher risk of the blade coming loose if the screw isn't tightened sufficiently.
You should never attempt to force a U-shank blade into a modern quick-release T-shank chuck. The physical dimensions are different, and forcing the wrong part can snap the internal tension springs. If your jigsaw has a hole in the blade clamp, it likely requires a U-shank. For those looking to upgrade their kit, our tools and equipment range offers modern solutions that make every DIY task easier and more enjoyable.
Critical Safety Precautions for Handling Sharp Cutting Tools
To change a jigsaw blade safely, you must first disconnect the tool from all power sources to prevent accidental activation. This process involves removing the battery from cordless models or unplugging corded units before touching the blade mechanism. Always wear cut-resistant gloves to protect your fingers from the sharp metal teeth. Wait at least 60 seconds for the blade to cool down after use to avoid thermal burns. Position the tool on a flat, stable surface so it cannot fall or slip during the swap. Learning how to change a jigsaw blade safely requires focusing on these preventative measures before you ever touch the tool's chuck. These steps ensure you avoid the most common injuries associated with power tool maintenance.
The most vital part of the process is mastering power isolation. You must remove the battery or unplug the cable before you ever touch the blade release lever. This simple step prevents the motor from engaging if you accidentally squeeze the trigger while gripping the tool. For a deeper look at tool handling, see our jigsaw basics guide which covers general operation safety. Keeping your workspace organised is equally important, as a cluttered bench can lead to the tool falling during the change. The UK Health and Safety Executive guidance on woodworking machinery confirms that isolation and proper training are core competencies for any operator. Following these standards helps prevent many of the 1,500 woodworking injuries reported in the UK each year.
Why Power Isolation is Non-Negotiable
Power Isolation is the primary safety step in DIY that involves removing all energy sources from a tool to ensure it cannot start unexpectedly. For cordless jigsaws, you must depress the release clips and slide the battery out of the housing completely. Corded users should pull the plug from the wall socket and keep the plug end within their field of vision. This ensures that no one else can accidentally reconnect the power while your fingers are near the chuck. If the trigger is pressed without isolation, the reciprocating action can cause severe lacerations in a fraction of a second.
Managing Heat and Sharp Edges
Blades become incredibly hot during use because friction generates intense thermal energy against the timber. You should wait at least 60 seconds after your last cut before attempting to touch the metal. If your project requires an immediate blade swap, use a pair of long-nose pliers from our range of hand and general tools to pull the blade from the chuck safely. Never leave old blades lying on your workbench where they can cause accidental nicks. Place blunt or broken blades into a dedicated "sharps" container, such as a heavy-duty plastic tub, to protect yourself and others during waste disposal. An organised workspace is essential; clear away sawdust and offcuts so the jigsaw stays level on the bench during the change.
Solving Common Jigsaw Blade Installation Problems
To fix a loose or wobbly jigsaw blade, you must clear debris from the chuck and ensure the blade spine sits firmly within the guide roller groove. Most installation issues stem from sawdust buildup that prevents the locking mechanism from fully engaging. If your cut is slanted, the blade is likely not seated at a perfect 90-degree angle to the base plate. Learning how to change a jigsaw blade safely requires you to verify that the "click" or locking tension is secure before starting any project. Never attempt to use a blade that does not lock instantly, as this leads to tool damage or injury.
Sawdust is the primary reason for blade installation failure. In professional workshop environments, 65% of tool clamp issues are caused by fine dust interfering with internal springs. You should use a burst of compressed air to clean the clamp every time you swap accessories. This simple habit ensures the tool's locking pin can travel its full distance to grip the tang. If the blade continues to feel loose, the internal spring may have lost its tension over time.
Bent blades are a significant safety hazard and must be discarded immediately. A blade with even a 2-degree bend will create friction, causing the motor to overheat and the metal to potentially shatter at 3,000 strokes per minute. Do not try to straighten a bent blade with pliers. The structural integrity of the steel is compromised once it deforms, making it far safer to reach for a fresh, sharp replacement from your kit.
What to do if the Blade Won’t Lock
If your blade won't stay in place, check for a sheared pin inside the chuck. This is common in older manual models where the screw has been over-tightened repeatedly. Use a torch to inspect the opening for any metal shards or compacted wood fibres. If the locking mechanism feels "mushy" or fails to spring back, the tool has likely reached the end of its service life. Replacing a worn-out jigsaw is a smarter investment than risking a blade ejection during a high-speed cut.
Ensuring Perfect Alignment for Straight Cuts
Perfect cuts depend on the guide roller, which is the small wheel located just above the base plate. The rear "spine" of your blade must sit inside the groove of this roller to prevent "blade drift." If the blade is positioned in front of or beside the roller, your cuts will inevitably wander or slant. Use a small engineer's square to check that the blade is perfectly vertical to the base. This 10-second check prevents wasted materials and ensures your DIY projects look professional and polished.
Ready to upgrade your workshop setup? You can explore our range of reliable tools and equipment to find everything you need for your next home improvement task.
Choosing the Right Replacement Blades for Your Project
Selecting the correct blade ensures a professional finish and prevents your jigsaw motor from overheating. For thick timber, a low TPI (Teeth Per Inch) count of 6 to 10 provides a fast, aggressive cut. If you are working with sheet metal or plastics, a high TPI of 20 to 24 is necessary to prevent snagging. Learning how to change a jigsaw blade safely means you can transition between these materials in under 30 seconds. Using the wrong blade can increase vibration by 40%, making the tool harder to control and less safe to operate.
Material Compatibility: Wood, Metal, and Plastic
High Carbon Steel (HCS) blades are the standard choice for softwoods and MDF because they are flexible and cost-effective. For cutting through copper or aluminium, High Speed Steel (HSS) is required due to its increased hardness. Bi-Metal blades combine both materials; they often last 10 times longer than standard HCS options when used on tough hardwoods. If you are fitting kitchen worktops, use a "reverse tooth" blade to ensure the decorative laminate surface does not chip during the upward stroke.
Clean-cut blades feature ground teeth for a smooth edge, while fast-cut blades have set teeth designed to clear sawdust quickly. This variety allows you to tackle diverse tasks found in our home and garden collection with precision. Always check the blade shank type, usually a T-shank or U-shank, to ensure it fits your specific jigsaw model before starting your project. Matching the blade geometry to your specific material reduces the risk of the blade snapping or binding during a curve.
Organising Your Workshop for Success
Keeping a dedicated blade kit saves significant time and prevents the frustration of using a blunt tool. A standard 10-piece set usually covers 90% of household DIY requirements, including specialist blades for tight curves and ceramic tiles. You can find high-quality replacements and essential hardware in Klevaro’s tool range to keep your workshop ready for action. Storing blades in a dry, labelled case prevents rust and helps you identify the TPI you need at a glance.
Building your DIY confidence starts with mastering these basic maintenance tasks. Once you know how to change a jigsaw blade safely and store your gear correctly, every home improvement project becomes more manageable. Grab the right tools, follow the safety steps, and start creating something beautiful for your home today. Regular maintenance and the right accessories turn a simple power tool into a versatile asset for any UK renovation.
Ready to Start Your Next Cutting Project?
To master how to change a jigsaw blade safely, you must disconnect the power, identify your T-shank or U-shank fitting, and secure the blade firmly in the clamp according to UK safety standards. This five-step process ensures your workshop remains a productive and hazard-free environment for every 2026 project. Always wear protective gloves before handling sharp edges to prevent accidental injuries. These simple habits protect your hands and extend the life of your power tools.
Having the right equipment makes every home improvement task easier and more enjoyable. We provide Quality Guaranteed workshop gear with a 12-month warranty from trusted brands to help you achieve professional results. You can also Join the Klevaro community of over 5,000 makers today for expert project tips and creative inspiration. It's the best way to stay updated on the latest tool innovations and seasonal trends.
Don't wait to upgrade your toolkit with our Fast 24-hour UK Delivery on all workshop essentials. Explore our range of high-quality DIY tools and equipment and start transforming your home today. We're excited to see what you'll create next with the right gear in your hands.
Frequently Asked Questions
Do all jigsaw blades fit all jigsaws?
No, jigsaw blades aren't universal. Most modern tools use T-shank blades, but older models often require U-shank blades. About 90% of current professional brands like Bosch or Makita use T-shanks, so check your tool's manual to ensure compatibility before buying new gear for your project.
How do I know if my jigsaw is T-shank or U-shank?
You can identify the type by looking at the top of the blade. A T-shank blade has two small "wings" at the top, while a U-shank has a rounded, U-shaped cutout at the very end. T-shanks are now the industry standard for 95% of toolless blade change systems because they provide a much more secure fit during heavy use.
Can I change a jigsaw blade while it's still hot?
You shouldn't touch a hot blade with your bare hands. Friction from cutting through 18mm plywood can heat a blade to over 100°C in seconds. Wait at least 2 minutes for it to cool, or use heavy-duty gloves to handle the blade if you need to keep working on your home improvements.
Why does my jigsaw blade keep falling out during use?
This usually happens because the blade isn't fully seated in the clamp or you're using the wrong shank type. If you're learning how to change a jigsaw blade safely, ensure the tangs are clicked firmly into the locking mechanism. Around 80% of blade slips occur because the quick-release lever wasn't fully closed or the blade was misaligned.
Do I need a tool to change my jigsaw blade?
It depends on whether your jigsaw has a toolless "quick-change" system or an older screw-fix clamp. Most models manufactured after 2015 feature a lever or twist-lock that requires no extra tools. Older or budget models may require a 3mm or 4mm hex key to loosen the grub screw holding the blade in place.
What happens if I put a jigsaw blade in backwards?
Putting a blade in backwards will cause the tool to vibrate violently and fail to cut the material. Jigsaw teeth are designed to cut on the upstroke or downstroke depending on the specific blade type. If the teeth face the tool instead of the direction of the cut, you risk damaging your workpiece and overheating the motor within 30 seconds.
How often should I replace my jigsaw blade?
Replace your blade as soon as you notice slower cutting speeds or visible discolouration on the metal. A standard carbon steel blade typically lasts for about 5 to 10 metres of cutting through 12mm MDF. Using a blunt blade forces the motor to work 30% harder, which can lead to tool failure and rougher finishes on your DIY projects.
Leave a comment