


How to Avoid Paint Streaks on Wood: The Professional Guide to a Flawless Finish
Imagine spending your entire Saturday prepping a vintage oak sideboard only to find ugly ridges and bristle marks staring back at you once the paint dries. To master how to avoid paint streaks on wood, you must use a high-quality synthetic brush and maintain a wet edge during application. Adding a levelling conditioner to your paint extends the drying time and allows the finish to flatten naturally. Apply the paint in thin, consistent layers following the direction of the timber grain. Sanding lightly with 220-grit paper between coats ensures a factory-smooth surface every time.
It is incredibly frustrating when visible strokes spoil your hard work on a cherished home project. You deserve a professional finish. This guide provides the exact techniques and tool selections required to eliminate brush marks and roller streaks for good. We will explore the best gear for the job, how to fix mistakes mid-project, and the simple tricks that ensure your next DIY task is a total success.
Key Takeaways
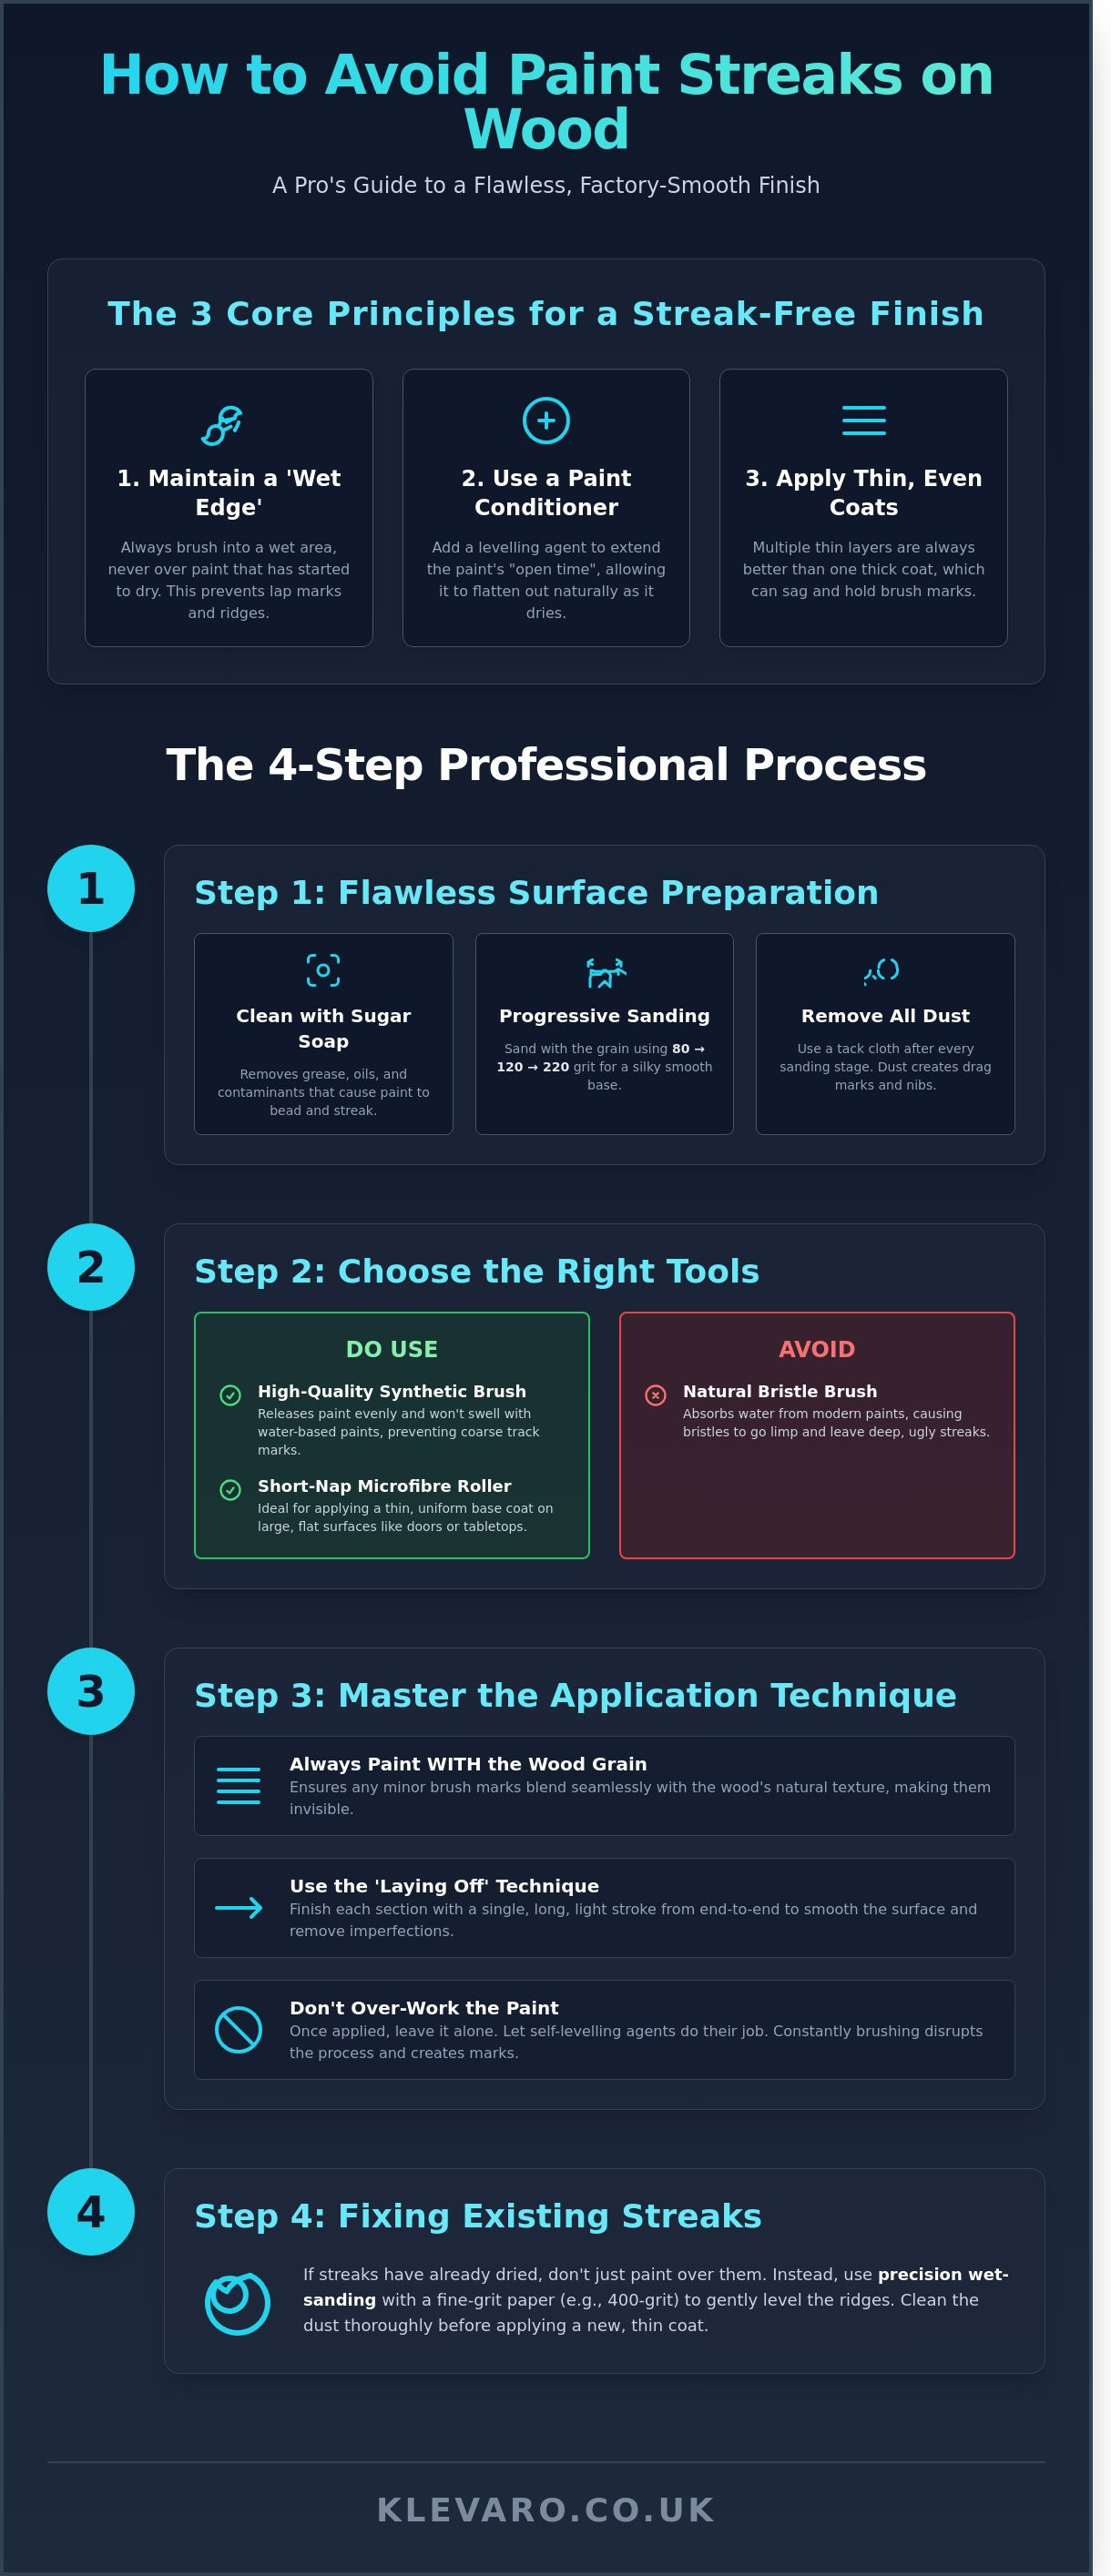
- Master the secret of maintaining a 'wet edge' to learn exactly how to avoid paint streaks on wood for a smooth, professional result.
- Discover why choosing high-quality synthetic brushes and short-nap microfibre rollers is critical for preventing deep ridges and unsightly marks.
- Prepare your surfaces like a pro by using sugar soap and progressive sanding to create the perfect smooth substrate for paint adhesion.
- Learn the expert 'laying off' technique to achieve a flawless finish by using long, continuous strokes across your furniture or woodwork.
- Find out how to safely repair existing streaks through precision wet-sanding to restore a level, uniform surface to your project.
How to avoid paint streaks on wood effectively
You prevent paint streaks on wood by maintaining a "wet edge" and using high-quality synthetic filament brushes. Professional decorators avoid "dragging" by never brushing back into paint that has already started to set. Adding a dedicated paint conditioner to water-based formulas extends the "open time" and allows the coating to self-level. Always apply paint in the direction of the wood grain to ensure any remaining marks blend with the natural texture of the timber. Following these steps eliminates the visible ridges and brush marks that often ruin DIY projects.
Understanding the 'Wet Edge' principle
The "wet edge" is the active, liquid boundary where fresh paint meets the surface you're working on. If you let this edge dry and then apply more paint over it, you create a lap mark or a visible ridge. This happens because the new layer of paint cannot blend into the semi-solid layer beneath it. Professionals refer to the "open time" as the specific window of time before the paint begins to set and lose its workability. To maintain a flawless finish, you must work quickly enough to ensure every new stroke overlaps a section that is still completely wet.
If you're working on a large surface like a dining table, plan your route to ensure you never have to "double back" over a drying area. This technique is a foundational part of any comprehensive guide to wood finishing because it dictates the final texture of the surface. You should aim to finish one complete section, such as a single plank or panel, before moving to the next. This prevents the paint from drying at different rates across the piece.
The role of self-levelling paints
Modern paint technology has introduced self-levelling formulas that are specifically designed to flatten out as they dry. While standard retail paints often have a high viscosity that holds brush marks, professional-grade enamels and water-based satins are engineered to flow. These products use specific resins that pull the wet film tight against the wood; this effectively melts away minor ridges. You can achieve professional results by choosing trade-rated paints from brands like Tikkurila or Johnstone's Trade.
It's vital that you don't "over-work" these paints. Once you've laid the paint down, leave it alone. Continually brushing the surface as it dries disrupts the levelling agents and is a primary cause of streaks. Using synthetic filament brushes is another essential step. Natural bristles often absorb water from the paint, causing them to swell and leave deep, uneven tracks. High-quality synthetic brushes release the paint more evenly. If you're looking to upgrade your kit, you can explore our range of tools and equipment to find the right applicators for your next project. Finally, always work with the grain. This ensures that any microscopic texture follows the natural patterns of the timber, making it virtually invisible to the eye.
Proper surface preparation prevents paint streaks
To understand how to avoid paint streaks on wood, you must first create a surface that is perfectly smooth and uniformly absorbent. Streaks often occur when the wood grain pulls paint unevenly or when contaminants like grease prevent the paint from bonding to the substrate. You can achieve a professional, level finish by cleaning the wood with sugar soap, sanding through progressive grits up to 220, and applying a high-quality primer-undercoat. These essential steps eliminate the physical obstacles that cause a brush to drag, skip, or leave ridges in the wet film.
Cleaning is the most overlooked step in the process. Household oils, wax, and even fingerprints can cause paint to "bead" or "crawl," creating visible streaks as the paint fails to grip. Using sugar soap is the standard professional method to chemically strip these residues. Once the surface is clean, you've removed the primary cause of poor paint flow. It's much easier to apply a smooth coat when there's nothing on the wood to disrupt the liquid's surface tension.
Sanding techniques for a smooth base
A flawless finish starts with removing any old, flaky paint or varnish that could create an uneven profile. Before you pick up your sandpaper, use a spirit level or a straight edge to check for warping or bowing in the timber. If the wood isn't flat, your brush will naturally deposit more paint in the hollows, leading to heavy streaks and pooling. Sand the wood in the direction of the grain using 80-grit to start, then move to 120-grit, and finish with 220-grit for a glass-like feel.
Dust is the enemy of a streak-free finish. Even a tiny amount of sawdust will catch the bristles of your brush and create "nibs" or drag marks. Always use a tack cloth to wipe the surface after every sanding session. These sticky cloths pick up invisible particles that a standard rag or vacuum might miss, ensuring the wood is ready for a clean application. If you need to stock up on essentials for your next project, you can explore our range of hand tools to get the job done right.
Filling and priming the grain
Open-grained woods like oak or ash have deep pores that can swallow paint, leading to an uneven texture. Using a high-quality wood filler on any cracks or deep grain ensures the surface is level before the first drop of paint touches it. This prevents the "ghosting" effect where the texture of the wood grain shows through the topcoat and makes it look like you've used a dry brush.
Applying the correct primer-undercoat is the best way to manage how to avoid paint streaks on wood. For tannin-rich woods like mahogany or cedar, use a stain-blocking primer to prevent oils from bleeding through and discolouring your work. For softwoods like pine, a standard wood primer seals the pores and provides "uniform suction." This means the wood won't thirsty-pull the moisture out of your paint, allowing the topcoat to stay wet longer and self-level naturally.
Finally, remember to sand lightly between every single coat of paint. Use a high-grit paper, such as 320-grit, to gently knock back any dust that settled while the previous coat was drying. This constant refinement ensures that each subsequent layer of paint is being applied to a surface that is as smooth as possible, which is the secret to that professional, streak-free glow.
Choosing the right tools for a flawless wood finish
Selecting the correct applicators is the most effective way to ensure a smooth, professional result. To achieve this, use synthetic bristle brushes for all water-based paints and short-nap microfibre rollers for expansive flat areas. Synthetic filaments are essential because they don't absorb water, meaning they won't swell or leave deep tracks in the wet paint film. For the best results on doors or tabletops, choose a roller with a 4mm or 6mm nap to keep the texture minimal. Using the right gear is the foundation of how to avoid paint streaks on wood.
Avoid cheap, "disposable" brushes that feature uneven bristle lengths. These budget options have poor paint retention, which forces you to press harder and creates visible ridges. Quality brushes hold a larger volume of paint and release it gradually, allowing the product to self-level before it dries. This consistent flow is what separates a DIY look from a factory-smooth finish.
Investing in a professional-grade "cutting-in" brush with an angled head is vital for precision. The angled shape helps you navigate mouldings and corners without flooding the timber with excess product. It allows for a steady hand when painting right up to the edge of a frame or panel, reducing the need for corrective strokes that cause marking.
Brushes vs Rollers: When to use which?
Rollers work best for speed on flat surfaces, but they often leave tiny air bubbles or a slight orange-peel texture. You can solve this by "laying off" the paint immediately after rolling a section. This technique involves making a single, incredibly light pass with a dry brush over the wet surface to pop bubbles and level the finish. To get started with the right equipment, explore our range of hand tools for high-quality applicators.
Maintaining your painting equipment
Streaks often occur because of dried paint buildup at the "heel" of the brush. When paint hardens near the metal ferrule, it forces the bristles to splay outward, resulting in an uneven application. To prevent this during a 20-minute break, wrap your brushes tightly in cling film or store them in airtight containers to keep the bristles supple.
A premium synthetic brush can survive 15 or more DIY projects with proper care, while a budget brush typically loses its shape or sheds bristles during its first use. Cleaning your tools thoroughly with warm, soapy water after every session ensures they remain soft. This maintenance is a simple way to ensure you're always prepared to learn how to avoid paint streaks on wood during your next project.
Mastering the 'Laying Off' technique for wood
The most effective way to learn how to avoid paint streaks on wood is by mastering the laying off technique. This professional method involves applying paint to a small area and then smoothing it with a single, continuous stroke while the film is still wet. You should work in sections roughly 10cm to 15cm wide, which is usually two or three brush-widths. Immediately after applying the paint, pull your brush from one end of the timber to the other in one fluid motion. This action levels the paint surface before it has a chance to set, resulting in a glass-like finish.
Success with laying off depends entirely on your physical contact with the surface. You must use a very light touch; the weight of the brush should do the work rather than hand pressure. Always finish the stroke in the air by lifting the brush gradually as you reach the end of the section. This prevents "stop marks" which occur when a brush is abruptly removed from a wet surface. By following these steps, you ensure the paint remains even and free from the heavy textures that cause unsightly streaks.
The physics of brush pressure
Heavy pressure is a primary cause of streaks because it squeezes paint out of the sides of the bristles. This creates raised lines, often called "tramlines," which are 1mm to 2mm high and dry into permanent ridges. To prevent this, load only the bottom 25mm to 30mm of the bristles with paint. This allows the tips to distribute the liquid evenly without over-saturating the heel of the brush.
When you move to a new section, use a "feathering" motion to blend the two wet edges together. This involves using light, overlapping strokes that mimic the shape of a bird's feather. This technique ensures there is no visible overlap or "fat edge" where the two sections meet. Maintaining a wet edge is vital for a seamless transition across large wooden surfaces like doors or table tops.
Managing environmental factors
Environmental conditions significantly impact how quickly paint dries and levels out. Painting in direct sunlight or a heavy breeze causes the paint to "flash dry," meaning the surface skins over before you can lay it off. For the best results, aim for an indoor temperature between 10°C and 20°C. Humidity levels should ideally sit between 40% and 50% to allow the paint enough "open time" to flow naturally into a flat finish.
Extreme heat can cause modern water-based paints to become tacky in less than 60 seconds. If you are working in a warm room, you may need to work in even smaller sections to keep the paint workable. To find the right tools and inspiration for your next renovation, browse our home and garden collection for high-quality gear. Having the right environment and equipment makes the difference between a DIY look and a professional result.
Fixing existing streaks and protecting your work
To fix paint streaks, allow the surface to cure for at least 24 hours before attempting any repairs. Wet-sand the visible ridges using 320-grit sandpaper until the area is perfectly level with the surrounding paint. Apply a final glaze coat thinned with 10% water or mineral spirits to restore the sheen and hide the repair. This process is the most reliable way to rectify errors while learning how to avoid paint streaks on wood. Following these steps ensures a flat, professional finish even if the initial application was uneven.
Using a sanding block during the repair phase helps maintain even pressure across the timber. Wet-sanding is preferable because it prevents the sandpaper from clogging and creates a much smoother transition between the old and new layers. Once the surface is level, wipe away all residue with a damp, lint-free cloth. Ensure the wood is completely dry before you apply the thinned glaze coat using long, continuous strokes.
Thinning the final coat creates a mixture that flows easily into micro-textures. Use a high-quality synthetic brush to 'lay off' the paint by passing the bristles lightly over the wet surface in one unbroken motion. This technique removes air bubbles and allows the pigment to settle into a mirror-like finish. It's a professional secret that makes a significant difference in the final appearance of your project.
Correcting mistakes mid-project
Resist the urge to brush out a run if the paint has already started to skin over. This usually happens within 10 to 15 minutes of application. Touching semi-dry paint creates permanent textures and clumps that are incredibly difficult to hide later. If you notice a deep sag or run after the paint is dry, use the sand-back method to level that specific area before recoating the entire panel.
Patience is the most important tool for any DIY enthusiast. If you're new to painting furniture, spend 20 minutes practicing your brush control on scrap timber first. This builds the muscle memory needed to maintain consistent pressure and speed. Most beginners find that their technique improves drastically after just one or two practice sessions.
Final protection and styling
High-traffic items like dining tables or desks benefit from a clear topcoat to prevent future scuffs. A clear layer adds visual depth and can help mask minor surface imperfections that occurred during the painting process. You can style your finished piece by pairing it with items from our home decor collection to complete the room's look.
Choose your protective finish based on the durability you require. Wax provides a soft, matte feel but needs reapplication every 6 to 12 months to remain effective. Varnish offers the toughest protection against heat and liquid spills, which is essential for kitchen furniture. Lacquer dries very quickly and provides a high-gloss finish that's popular in modern interiors. For those who want to complement their DIY projects with professional cabinetry, nispero.co.uk offers bespoke design and workshop manufacturing services to transform your home.
Master Your Next Wood Painting Project Today
Achieving a mirror-smooth surface is entirely possible when you combine the right technique with the right equipment. You now understand that how to avoid paint streaks on wood comes down to thorough surface preparation, such as sanding with 120-grit paper, and the delicate 'laying off' technique. By using a high-quality synthetic brush and working consistently in the direction of the natural grain, you'll eliminate visible brush marks for good.
Don't let poor tools hold back your creativity or ruin your hard work. As a trusted UK store, we ensure quality guaranteed on all DIY gear to help you reach a professional standard in every room of your home. We offer fast UK delivery on our entire range so you can start your next home transformation without the long wait.
Visit our shop and Shop our professional DIY Tools and Equipment for your next project to get everything you need for a flawless finish. You have the skills, the plan, and the expert tips; it's time to pick up your brush and build something you're truly proud of.
Frequently Asked Questions
Why does my paint look streaky even after two coats?
Streaks after multiple coats usually indicate poor surface preparation or using paint with low opacity. If you haven't used a primer, the wood grain often absorbs the paint unevenly, which creates a patchy and inconsistent appearance. You should always sand with 220-grit paper between coats and use a high-quality applicator to ensure the coverage remains uniform across the entire surface.
Can I fix paint streaks without sanding?
It's nearly impossible to fix visible paint ridges without sanding because the texture is physically dried into the film. Attempting to paint over a streak will only highlight the unevenness rather than hiding it. You must wait for the paint to dry completely, sand the area flat with fine-grit paper, and then apply a fresh, thin coat to level the finish.
Is a brush or a roller better for a smooth finish on wood?
A microfibre roller is best for large, flat surfaces like tabletops, while a high-quality synthetic brush is superior for detailed trim or furniture legs. For the ultimate professional result, use a 4-inch microfibre roller to apply the paint and immediately 'lay off' the surface by lightly dragging a brush over the wet film. This technique removes any orange peel texture left by the roller.
Does thinning the paint help avoid streaks?
Thinning water-based paint with 10% water or a commercial conditioner like Floetrol is an excellent way to learn how to avoid paint streaks on wood. This process lowers the paint's viscosity and slows the drying time, which allows the liquid more time to flow and level out before it sets. It's a simple trick that prevents the brush from pulling at the surface as you work.
Why is my paint 'dragging' as I apply it?
Paint dragging occurs when you try to brush over an area that has already begun to dry, a process known as 'flashing'. This disrupts the forming film and creates deep, permanent marks that ruin the finish. To prevent this, work in small sections of about 30cm and always maintain a wet edge by overlapping your strokes into fresh paint.
What is the best brush for a streak-free finish?
The best brush for a streak-free finish is a synthetic bristle brush with 'flagged' or split ends. These soft tips hold a larger volume of paint and release it more gradually onto the wood surface. Trusted brands like Purdy or Wooster are the standard choice for UK DIY enthusiasts who want to achieve a professional, mirror-like result on their projects.
Leave a comment