


Common DIY Mistakes to Avoid: A Guide to Successful UK Home Improvements
Did you know UK homeowners spend an estimated £4.4 billion each year fixing DIY projects gone wrong? It’s a staggering figure, but the good news is that most blunders are preventable. The most common diy mistakes to avoid uk homeowners make almost always stem from three key areas: inadequate preparation, using the wrong tools for the job, and rushing through crucial safety checks. Getting these fundamentals right is the secret to a successful project.
It’s completely understandable to want that professional-looking finish without the professional price tag; the frustration of a wonky shelf or a patchy paint job is all too real. This guide is your new partner in home improvement, giving you the practical knowledge to sidestep those frequent pitfalls. We'll cover everything from selecting the right gear to mastering the prep work, ensuring your next project is safe, successful, and something you can be proud of.
Key Takeaways
- Learn why professional decorators spend up to 70% of their time on preparation to guarantee a flawless, long-lasting finish on any project.
- Discover how matching the right tool to the material not only prevents costly damage but also significantly improves your safety and the quality of your work.
- Master the art of measuring in older UK homes, where walls are rarely square, to prevent wasted materials and ensure a perfect fit every time.
- Wearing the right safety gear is one of the simplest ways to avoid the most common DIY mistakes to avoid UK, protecting you from preventable accidents.
Common DIY mistakes include poor preparation and using incorrect tools for the task
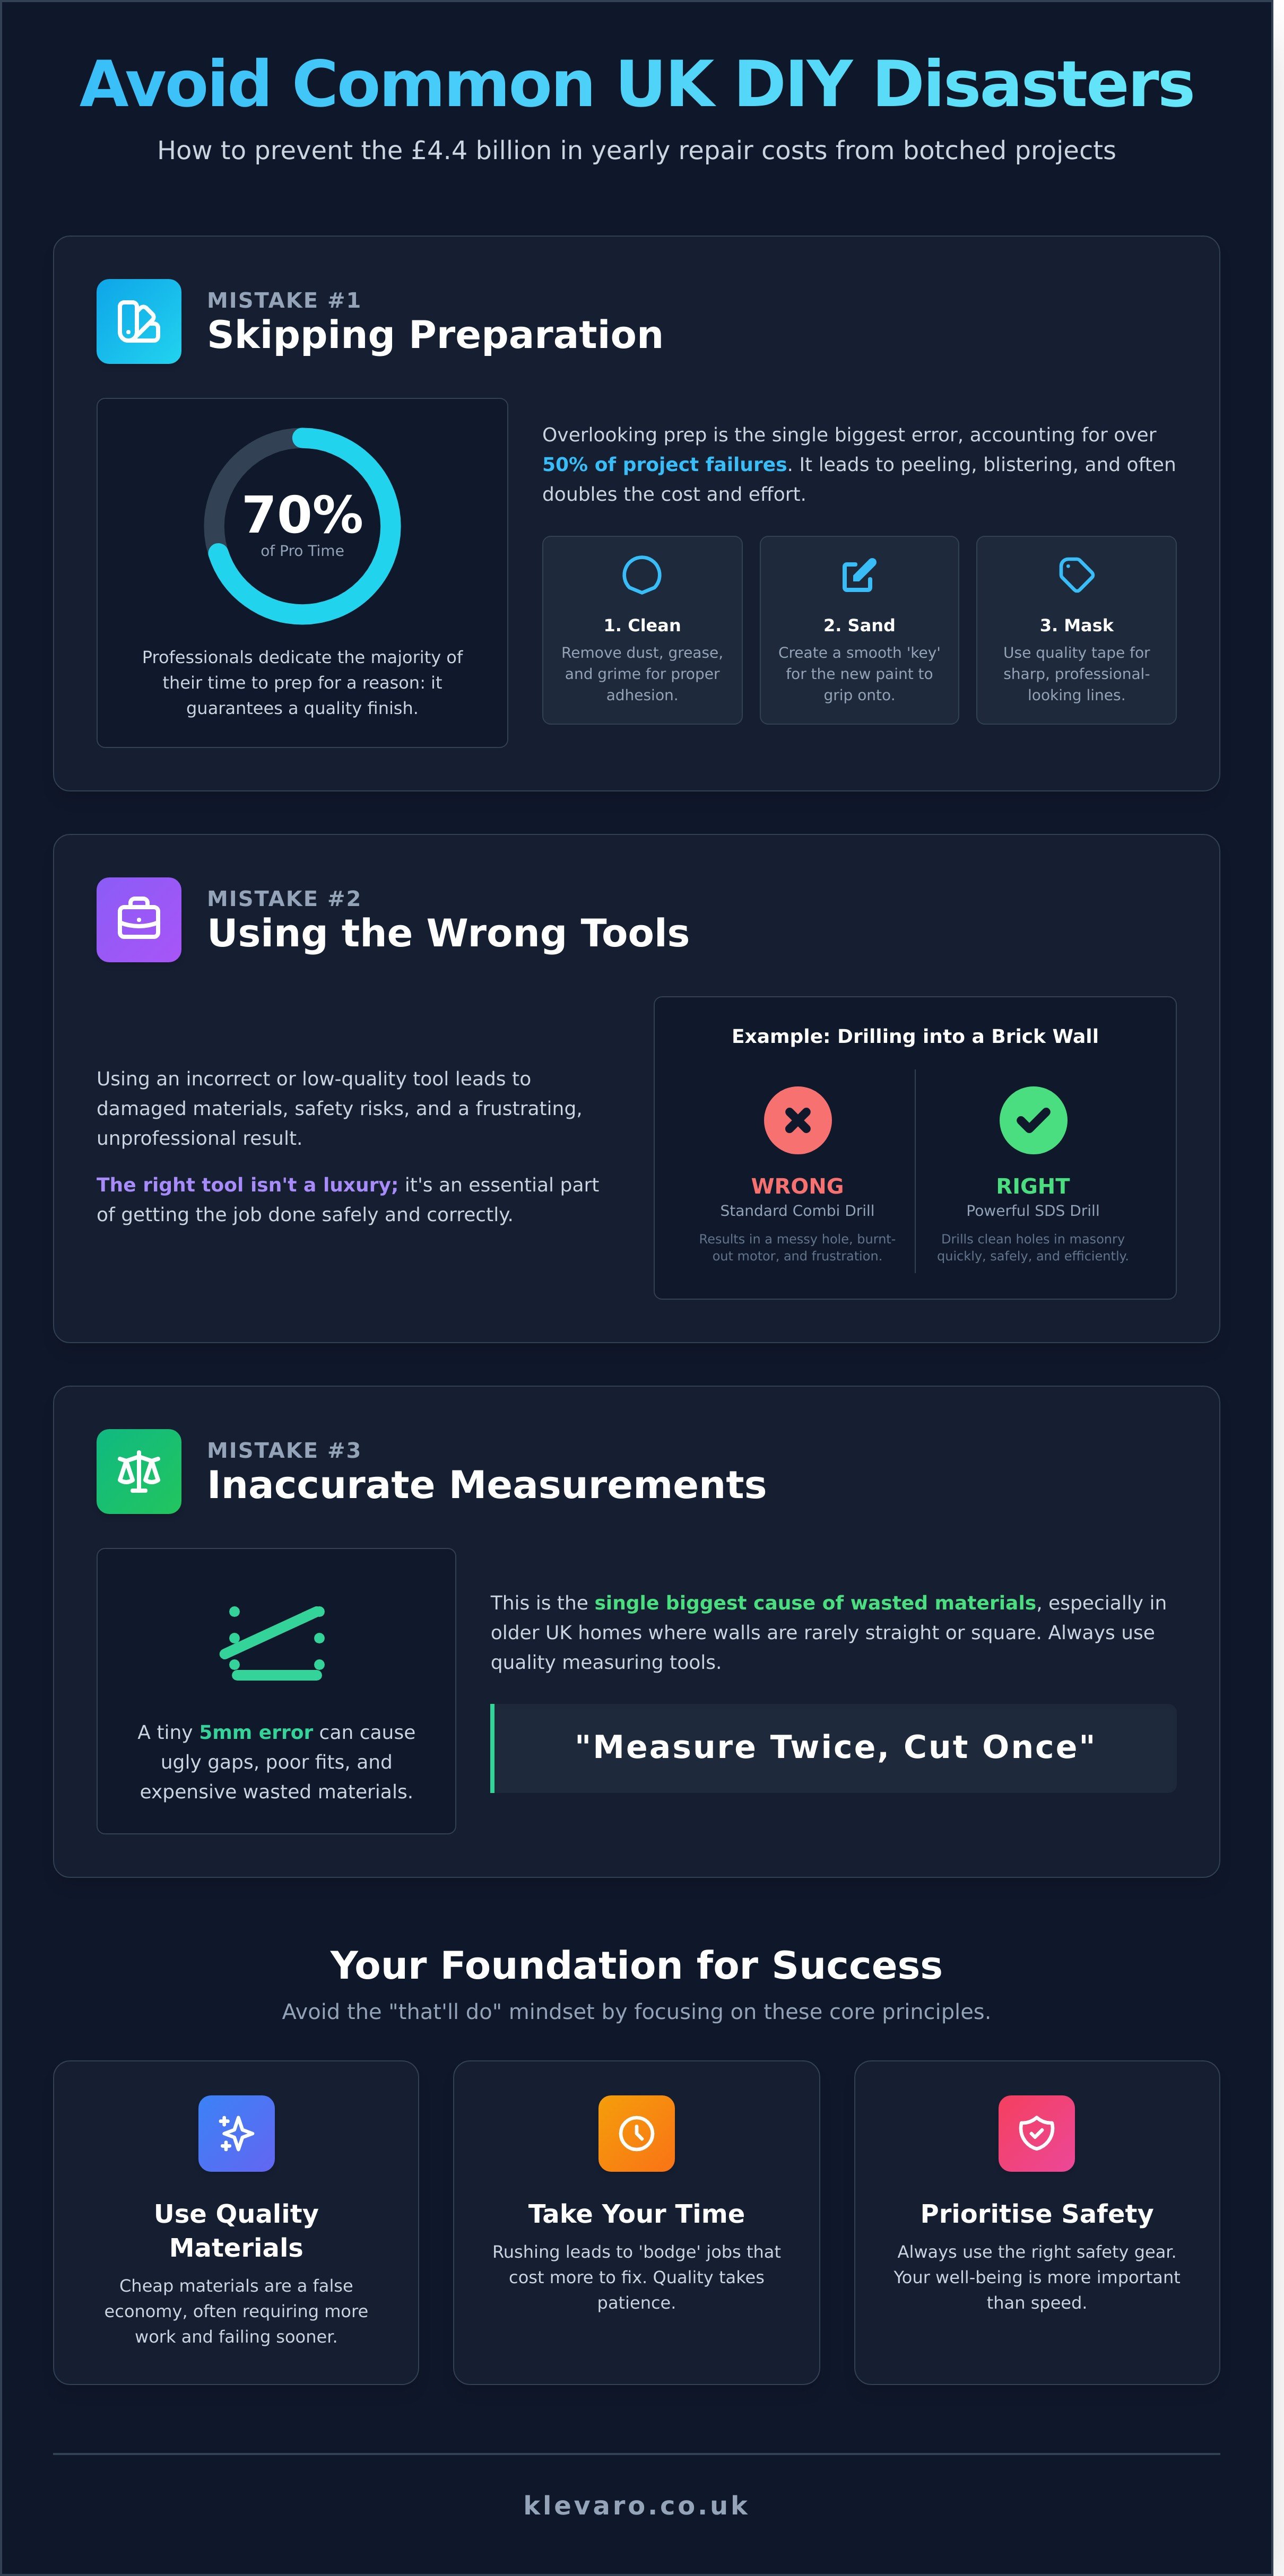
The most frequent DIY errors in the UK stem from three core issues: skipping surface preparation, using the wrong tools, and making inaccurate measurements. Failing to properly clean or sand a surface before painting or decorating accounts for over 50% of all project failures, leading to peeling paint and a poor finish. The spirit of Do it yourself (DIY) is about empowerment, but true success hinges on avoiding these pitfalls. These issues are the most common diy mistakes to avoid uk homeowners make, often turning a weekend project into a costly repair job.
Using the wrong tool for the task is a classic misstep that guarantees frustration. For example, attempting to drill into a brick wall with a standard combi drill instead of a powerful SDS drill will likely result in a burnt-out motor, a blunt drill bit, and a messy, oversized hole. The right tool isn't a luxury; it's an essential part of getting the job done safely and correctly.
Inaccurate measurements are the single biggest cause of wasted materials, especially in carpentry and shelving projects. A simple "measure twice, cut once" mantra can save you hundreds of pounds in timber, tiles, or flooring. A miscalculation of just 5mm can mean a shelf won't fit or a floorboard will have a noticeable gap. Investing in quality measuring equipment, like a sturdy tape measure and a reliable spirit level, is non-negotiable for a professional result.
Why preparation is the foundation of every project
Think of preparation as the 90% of the work that nobody sees but everyone notices if it's skipped. Before any paint or finish is applied, surfaces must be completely free of dust, grease, and loose old paint. A simple wipe-down with a sugar soap solution can make the difference between paint that adheres for years and paint that flakes off within months.
The 'rubbing down' phase, or sanding, is crucial for creating a smooth 'key' for the new paint to grip onto. Skipping this step is a primary cause of uneven textures and bubbling or peeling paint down the line. It ensures your hard work looks great and lasts.
For a truly sharp finish, proper masking is essential. Using high-quality masking tape prevents 'paint creep' onto areas you want to protect. In the UK, this is especially important for getting clean lines around detailed skirting boards, window frames, and electrical sockets, transforming a good job into a great one.
The high cost of the 'that'll do' mindset
Rushing a job with a 'that'll do' attitude often leads to a 'bodge' repair that needs fixing later, usually by a professional. These quick fixes can hide underlying problems or fail completely, costing far more to rectify than it would have to do the job properly from the start. Taking your time is an investment in quality.
It's tempting to opt for cheaper materials to save money, but this is often a false economy. Low-quality paint may require three or four coats instead of two, and cheap flat-pack furniture may lack the durability for daily use. Investing in quality, durable materials ensures your project will stand the test of time, which is especially true for outdoor work. For example, when it comes to fencing, sourcing materials from a dedicated supplier like Romford Fencing Ltd can make all the difference in durability and finish.
Finally, safety should never be compromised for speed. Working on unstable ladders, ignoring safety goggles, or failing to disconnect the power when working on electrics can have devastating consequences. The right safety gear is a small price to pay for your well-being. Always prioritise your safety over finishing a project an hour earlier.
Skipping surface preparation is the most expensive DIY error you can make
Overlooking proper surface preparation is the single most significant mistake in any decorating project. It directly impacts the final look, durability, and cost of your work. While it may seem tedious, preparation is not an optional step; it is the foundation of a professional-quality finish that lasts. Professional decorators in the UK often spend up to 70% of their project time on preparation alone because they know it prevents peeling, blistering, and the need for costly rework down the line. Failing to prepare a surface correctly is one of the most common diy mistakes to avoid uk renovators make.
A perfect example is painting new plaster. This highly porous surface will absorb litres of expensive emulsion if not sealed first, effectively doubling your paint costs. Similarly, dust left over from sanding is the ultimate enemy of a smooth finish. It mixes with your paint or varnish, creating a gritty, uneven texture that is impossible to fix without starting over. Taking the time to prep properly saves you money, time, and a huge amount of frustration.
How to prepare walls for a flawless finish
Your first step is a thorough inspection. Identify every crack, dent, and hole in the surface you plan to decorate. Fill these imperfections using a high-quality multi-purpose or wood filler, slightly overfilling the area to account for shrinkage as it dries. Once cured, sand the filler and the surrounding wall until it feels completely smooth to the touch. This sanding process creates a 'key', a slightly roughened surface that gives the new paint a solid grip, ensuring strong adhesion.
Finally, you must clean the walls. Over time, surfaces accumulate grease, dust, and oils that paint simply cannot stick to. Wash the entire area with a sugar soap solution and a sponge, then rinse with clean water and allow it to dry completely. This simple step removes invisible contaminants and is essential for a long-lasting, professional result.
Essential prep tools every UK home needs
You don't need a workshop full of gear, but a few quality items are non-negotiable for getting the prep right. Building a reliable kit is the best way to avoid the common diy mistakes to avoid uk homeowners report.
- A Variety of Sandpaper: Your toolkit should include several grits. Use a coarse 80-grit paper for removing old paint or smoothing rough filler, a medium 120-grit for general surface keying, and a fine 240-grit for achieving an ultra-smooth finish between paint coats.
- Quality Masking Tape: Low-tack masking tape is crucial for protecting light switches, sockets, and what decorators call 'door furniture' (handles and hinges). Investing in a quality brand prevents paint from bleeding underneath and ensures you get crisp, clean lines every time.
- Reliable Dust Sheets: Protecting your carpets and furniture is a must in British homes. Heavy-duty cotton or plastic-backed dust sheets are far more effective than old bedsheets, which can allow paint to soak through. Before you start any sanding, always consult the latest UK government DIY safety guidance to ensure you're working safely.
Having the right tools on hand before you begin makes the entire process smoother and more efficient. Explore our curated selection of DIY essentials to build your perfect preparation kit and start your next project with confidence.
Using the wrong tool for the job leads to damaged materials and safety risks
One of the most frequent and costly errors in home improvement is trying to make one tool fit every task. Forcing the wrong equipment to work not only damages your materials but also puts you at risk of injury. A single, ill-fitting screwdriver will strip screw heads, and an underpowered drill will burn out its motor when pushed too hard. These are among the most basic but widespread common diy mistakes to avoid uk homeowners report, often turning a simple job into a frustrating and expensive repair.
Matching your tool to the material is non-negotiable for a professional finish. Imagine trying to cut a metal pipe with a wood blade; the teeth would be destroyed in seconds, rendering the saw useless. The same principle applies across all tasks. Power tools, in particular, demand specific attachments for different jobs. Tackling the dense, hard brickwork found in many older UK properties requires the percussive power of an SDS drill and corresponding bits, something a standard combi drill will struggle with.
Even your trusted hand tools need proper care to remain effective. A dull chisel won't slice cleanly through wood but will crush the fibres, and a rusty spanner is more likely to slip and round off a nut than loosen it. Keeping your tools clean, sharp, and well-maintained is essential for both safety and quality of work.
Common drill and driver blunders
Drills and drivers are toolkit essentials, but simple errors can lead to split wood and weak fixings. Understanding which tool to grab and how to prepare your surface is key to success.
- Using a drill instead of an impact driver: A standard drill is perfect for creating holes, but for driving long, thick screws into dense wood, an impact driver is the superior choice. It delivers high-torque rotational bursts that drive screws with ease, preventing cam-out (where the bit slips out of the screw head) and reducing strain on your wrist.
- Forgetting to drill a pilot hole: Driving a screw directly into wood, especially near the edge, forces the fibres apart and often causes the wood to split along the grain. A pilot hole, slightly smaller than the screw's diameter, removes this material and provides a clean channel, ensuring a strong fixing without damage.
- Choosing the wrong drill bit: UK homes feature a mix of wall types. A general-purpose bit might get you through plasterboard, but it will be useless against solid brick or a concrete lintel. Always use a sharp masonry bit for brick and concrete to avoid blunting your bit and overheating your drill.
Sawing and cutting mistakes to avoid
A clean, straight cut is the foundation of good joinery and construction. Rushing the process or misunderstanding your material will result in rough, splintered edges that are difficult to fix.
A major error is applying too much pressure. You should guide the saw and let its sharp teeth do the cutting, not force it through the material with brute strength. This allows for a more accurate cut, reduces fatigue, and prevents the blade from buckling or wandering off your line. Similarly, pay attention to the wood's grain. Cutting across the grain (a cross-cut) without a sharp blade or proper support can cause tear-out, leaving a ragged finish. Having the right saw is half the battle. If your current tools are struggling, explore our range of tools and equipment to find the perfect saw for your project.
Inaccurate measurements cause most project failures in UK homes
Inaccurate measurements are the leading reason DIY projects go wrong. The old saying "measure twice, cut once" is often ignored, leading directly to wasted timber, misaligned shelves, and costly trips back to the hardware store. A single miscalculation is the root cause of the most frustrating common diy mistakes to avoid uk homeowners face. This simple error can turn a weekend project into a prolonged and expensive headache.
The financial impact is significant. A standard 2.4m length of oak kitchen worktop can cost over £150; one wrong cut renders it useless. Even small errors compound quickly. Mixing up metric and imperial systems, for example by reading 2 inches as 5cm instead of the correct 5.08cm, creates a persistent error that ruins precision work like joinery or cabinet fitting.
You must also account for the saw blade's width, known as the 'kerf'. A typical circular saw blade vaporises about 3mm of wood with every pass. If you cut directly on your line, your final piece will be 1.5mm too short. Always mark your line and cut on the 'waste' side to preserve your exact measurement.
Mastering the art of the level and tape
A wonky shelf is a tell-tale sign of a rushed job. To get it right first time, use a high-quality spirit level to ensure shelves, cabinets, and picture frames are perfectly horizontal. Don't just trust your eyes; a bubble doesn't lie. This one tool transforms your finish from amateur to professional.
That little metal hook on your tape measure wiggles for a reason. It's designed to move to compensate for its own thickness, giving you a precise reading for both internal and external measurements. When pushed against a surface, it moves in; when hooked over an edge, it pulls out. For ultimate precision, use a sharp pencil or a marking knife to create a fine, exact line that eliminates guesswork.
Dealing with wonky UK walls
Very few UK homes, particularly period properties, have perfectly straight walls or square corners. Instead of leaving an ugly gap, learn to 'scribe' your material. This simple technique involves tracing the wall's uneven profile onto the edge of your timber or worktop, allowing you to cut it for a seamless, custom fit.
Never assume a corner is a perfect 90 degrees. Use a protractor or an adjustable T-bevel to find the true angle before cutting materials for alcove shelving or corner units. Finally, always perform a 'dry fit'. Place all your cut pieces in position before using any screws or adhesive. This is your last chance to spot and correct any measurement errors, and it's a vital step in avoiding the most common diy mistakes to avoid uk renovators make.
Ready to measure with confidence and achieve a flawless result? Explore our full range of reliable measuring tools and hand essentials to get the precision you need for your next project.
Quality tools and safety gear prevent common DIY accidents
Investing in quality tools and wearing the correct Personal Protective Equipment (PPE) are the most critical steps to prevent DIY accidents. A reliable tool is safer, more ergonomic, and less likely to fail during a project. Proper safety gear, like goggles and gloves, protects you from immediate and long-term harm. Maintaining a clean, organised workspace eliminates trip hazards, while knowing your limits and calling a professional for gas or complex electrical work is the ultimate safety precaution. These practices directly reduce the risk of injury and ensure your project finishes smoothly.
Many DIY enthusiasts skip PPE for "quick jobs," viewing it as an unnecessary hassle. This is a dangerous oversight. A single wood chip flying from a saw can cause permanent eye damage, a risk completely negated by a simple pair of safety goggles. Similarly, sanding old paintwork in UK homes built before the 1980s can release harmful lead particles, making a quality dust mask essential for protecting your long-term health.
Your tools are your partners in any project, and their quality directly impacts your safety. Cheaper tools often use inferior materials that can break under pressure, causing the tool to slip or shatter. A well-made hammer has better balance to reduce wrist strain, while a quality power drill provides consistent torque, preventing sudden jolts that can lead to accidents. Investing in ergonomic designs doesn't just feel better; it reduces fatigue, which is a leading cause of careless mistakes.
A tidy workspace is a safe workspace. It’s a simple rule that's easy to forget in the middle of a complex task. Trailing power cables, scattered tools, and piles of offcuts create obvious trip hazards that can cause a serious fall. Keeping your area organised also protects your tools from damage and makes you more efficient, as you’re not wasting time searching for the right screwdriver.
Recognising the limits of your skills is not a failure; it’s one of the smartest decisions you can make. One of the most serious common diy mistakes to avoid uk homeowners make is attempting regulated work. In the UK, all gas work, including boiler and hob installation, legally requires a Gas Safe registered engineer. For major electrical tasks like replacing a consumer unit, always hire a qualified electrician to ensure the work is safe and compliant with regulations.
This principle also extends to significant structural jobs, such as installing new windows or doors, where a professional finish is crucial for security and energy efficiency. For homeowners looking to undertake such a project, you can click here to explore options from a specialist supplier.
The essential safety kit for every project
Every DIYer should have a basic safety kit ready to go. Don't start a job without these essentials:
- Eye Protection: Mandatory for any task involving drilling, sawing, grinding, or using chemical strippers.
- Dust Masks: Crucial for preventing the inhalation of harmful particles from wood, plaster, or old paint.
- Work Gloves: A good pair provides better grip and protects your hands from splinters, cuts, and blisters.
Building a reliable toolkit with Klevaro
Your confidence to tackle any project starts with having tools you can depend on. Avoid the frustration of a tool breaking mid-task by building a collection of quality equipment. This is one of the easiest common diy mistakes to avoid uk, and it pays dividends in both safety and satisfaction.
Start with a solid foundation of hand and general tools that you can trust for years to come. By choosing brands with a reputation for durability and performance, you ensure your toolkit is always ready for action. Once the hard work is done, you can complete your home transformation by browsing our home and garden collections for those perfect finishing touches.
Fix, Build, and Create with Confidence
Your next home improvement project doesn't have to end in frustration. By focusing on meticulous preparation and double-checking every measurement, you're already sidestepping the most frequent and costly pitfalls. Understanding these common diy mistakes to avoid uk homeowners make is the first step toward achieving a flawless, professional-quality finish.
The next step is equipping yourself with the right gear. Having reliable tools isn't just about getting the job done right; it’s about keeping you safe and making the work more enjoyable from start to finish. You have the vision, now it's time to get the tools to match.
Ready to get started? Build your perfect toolkit and avoid DIY disasters with Klevaro's trusted tools. We offer fast UK delivery on all our expert-picked essentials, with quality guaranteed from the best brands in the business. Go on, bring your next project to life with pride.
Frequently Asked Questions
What is the most common DIY mistake in the UK?
The most common DIY mistake in the UK is inadequate preparation before painting. Skipping crucial steps like thoroughly cleaning and sanding a surface is the number one cause of poor paint adhesion. This oversight often leads to a finish that peels or flakes within months. Professionals know that spending up to 80% of their time on prep work is the secret to a durable, flawless result.
Can I do my own electrical work in the UK?
You can only perform basic electrical tasks yourself, like changing a light fitting or a socket cover. Most significant electrical work is governed by Part P of the Building Regulations, meaning it must be completed by a qualified electrician or be inspected by local building control. Attempting complex wiring yourself is one of the most critical common DIY mistakes to avoid in the UK, as it can invalidate your home insurance and create a serious fire hazard.
Why does my wood split when I drive a screw into it?
Wood usually splits because you haven't drilled a pilot hole first. A screw's body forces the wood fibres apart, causing them to crack under the pressure. A pilot hole removes a small amount of material, giving the screw space to grip without forcing the wood. For the best results, always use a drill bit with a diameter slightly smaller than the shank of your screw.
How do I avoid getting paint on my carpets?
The best way to protect carpets is by using heavy-duty, plastic-backed dust sheets. The absorbent top layer catches spills, while the plastic backing provides an impermeable barrier that stops any liquid from soaking through to the floor below. Don't rely on thin plastic sheets alone, as they can tear easily and become dangerously slippery when wet.
Is it worth buying expensive tools for a one-off DIY job?
For a single project, it's often more cost-effective to hire specialised machinery or invest in quality mid-range tools. The cheapest options often lack the power and precision to do the job right, leading to frustration. Buying a durable hand tool from a trusted tools and equipment range ensures you have reliable gear that will last for dozens of future projects.
What is the 'measure twice, cut once' rule?
This is a classic carpentry saying that reminds you to always verify your measurements a second time before making a permanent cut. It's a simple habit that prevents costly and frustrating errors. Spending an extra 30 seconds with a tape measure is significantly cheaper than replacing a piece of timber that you've accidentally cut too short. Always double-check your marks before you start your saw.
Leave a comment