


Beginner's Guide to Using a Mitre Saw: Master Accurate Cuts Safely
That mitre saw in your workshop isn't just a powerful tool; it’s your secret weapon for achieving professional-level DIY results. But let's be honest, staring at that spinning blade can be intimidating, and the fear of making a wrong cut often leads to wasted wood and frustration. It's easy to feel stuck when you can't tell a mitre from a bevel, or you're unsure how to secure your workpiece properly.
This is the definitive beginner's guide to using a mitre saw, designed to replace that uncertainty with skill and confidence. We promise to show you exactly how to operate your saw safely, from understanding its core components to making your very first cut. You'll master the art of setting precise angles for flawless joints, transforming your home projects from 'good enough' to truly impressive. Get ready to build that picture frame or fit that skirting board perfectly, every single time.
Key Takeaways
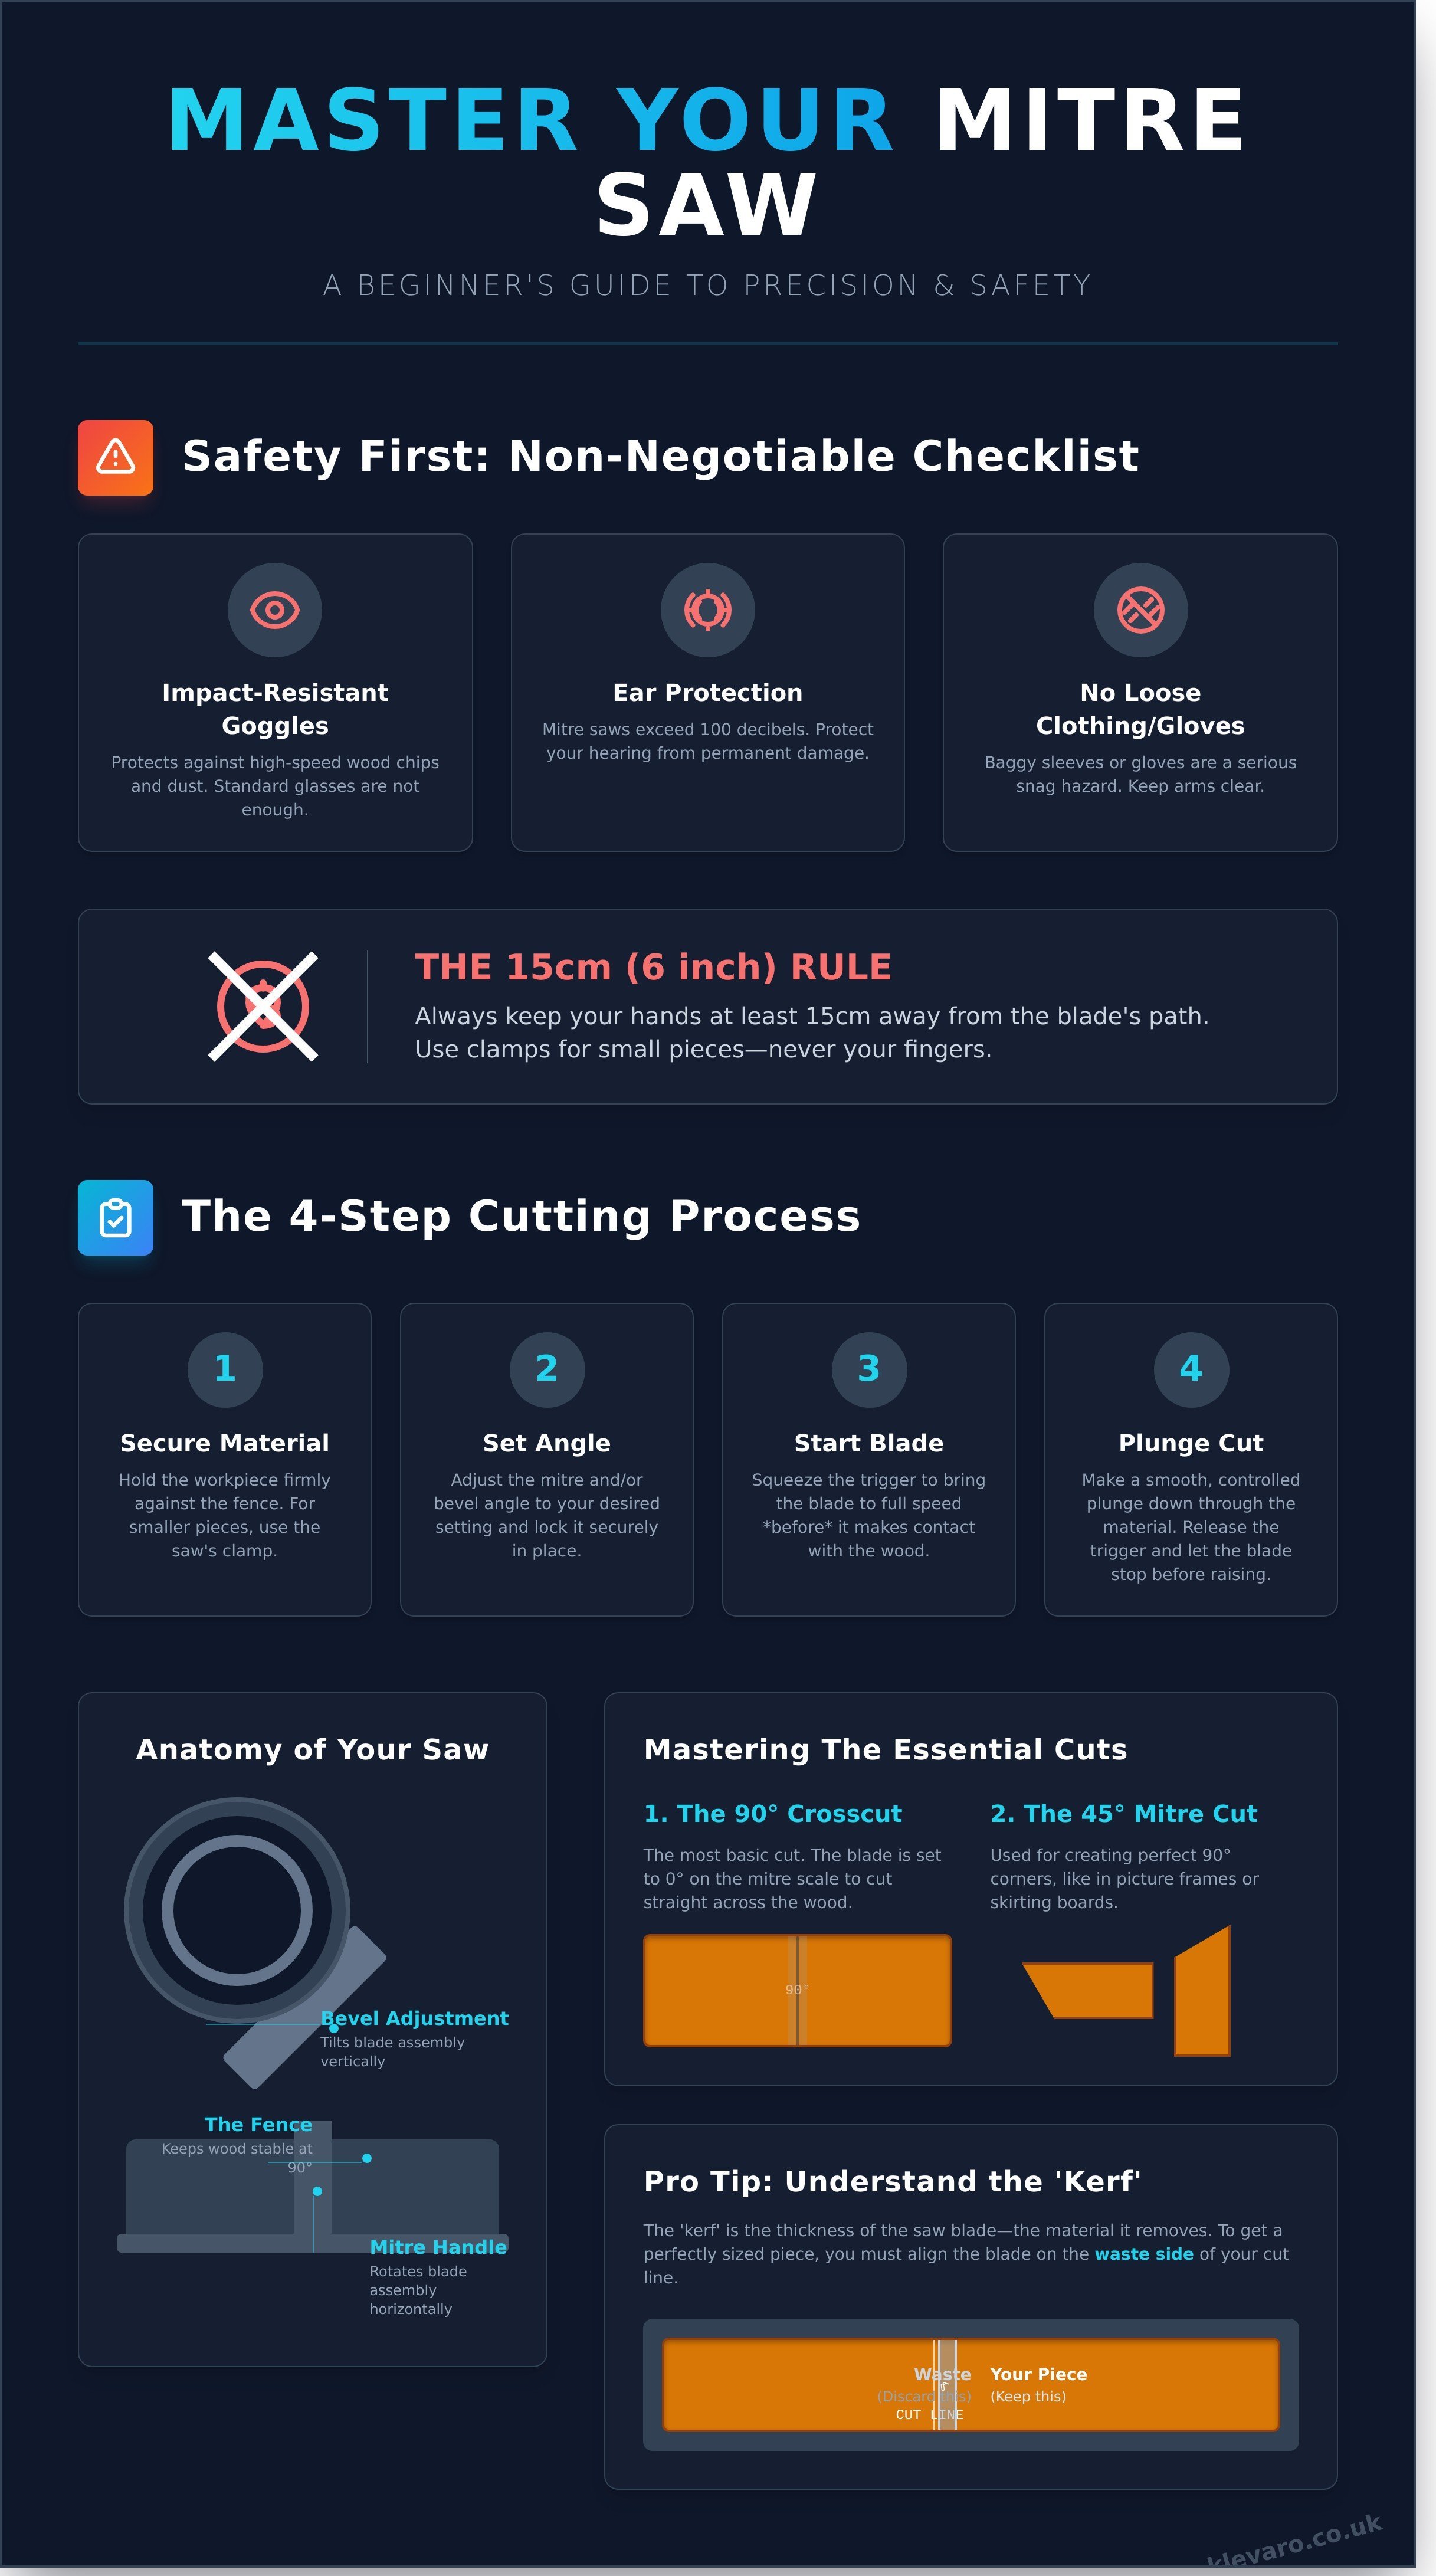
- Learn the fundamental four-step process for operating your mitre saw safely, from securing your material to making a clean, controlled plunge cut.
- Discover why understanding your saw blade's 'kerf'-its thickness-is the secret to achieving perfectly measured cuts for a professional finish.
- Master the two most essential cuts for any DIY project: the simple 90-degree crosscut and the angled 45-degree mitre cut for perfect corners.
- This beginner's guide to using a mitre saw covers how to properly set up your workspace to ensure both safety and accuracy from your very first cut.
What is a Mitre Saw and How Do You Use It Safely?
A mitre saw is a specialised power tool used for making fast, accurate crosscuts and mitres by pulling a circular blade down onto a workpiece. Its core operation is straightforward: secure your wood against the fence, set your desired angle, start the blade away from the material, and plunge down in one smooth, controlled motion. This precision makes it the go-to tool for UK DIY projects that demand perfect joints, from fitting stylish skirting boards to crafting custom picture frames. This section of our beginner's guide to using a mitre saw covers the essential knowledge you need before making your first cut.
Before you even plug it in, understand the primary safety rule: always keep your hands at least 15cm (6 inches) away from the blade's path. Never hold the wood near the cut line. Your saw has a designated "no-go" zone for a reason. For a deeper technical overview, you can explore the history and different types of saws by reading more about What is a Miter Saw? online. Mastering this tool starts with respecting its power and understanding its basic functions.
The Essential PPE Checklist for UK Workshops
Getting the right safety gear isn't optional; it's the first step to building with confidence. Your personal protective equipment (PPE) is your first line of defence against workshop hazards. Don't make a single cut without these essentials.
- Impact-Resistant Goggles: These are non-negotiable. A mitre saw can send tiny wood chippings and dust flying at high speed. Your standard glasses won't do; you need sealed, impact-rated goggles to protect your vision fully.
- Ear Protection: Most mitre saws operate well over 100 decibels, a level that can cause hearing damage with repeated exposure. Use quality ear defenders or earplugs to protect your hearing for years to come.
- No Loose Clothing or Gloves: This might seem counterintuitive, but gloves are a serious snag hazard. A spinning blade can catch a loose glove or baggy sleeve in an instant, pulling your hand towards it. Keep sleeves rolled up and avoid wearing any gloves while operating the saw.
Identifying the Key Parts of Your Saw
Understanding your saw's anatomy is crucial for making accurate cuts safely. While models vary, nearly all mitre saws share three fundamental components that you'll use for every project. Familiarise yourself with these parts before you begin.
- The Fence: This is the flat, vertical backstop that your workpiece rests against. The fence is critical because it keeps your wood stable and perfectly square (at 90 degrees) to the blade, ensuring a straight crosscut every time. Always make sure your material is held firmly against it.
- The Mitre Handle and Scale: This allows you to rotate the entire blade and motor assembly horizontally. The scale, marked in degrees, lets you set precise angles for corner joints. Loosen the handle, swing the saw to a common angle like 45° for a standard corner, and lock it in place for a perfect mitre cut.
- The Bevel Adjustment: This feature allows you to tilt the blade and motor vertically to the left or right. It's used for creating angled cuts through the thickness of the wood, essential for projects like fitting crown moulding or creating complex compound joints where both a mitre and a bevel are needed.
Preparing Your Workspace and Setting Up Your Saw for Success
A successful mitre saw cut begins long before the blade starts spinning. Your first step is to establish a safe, stable, and well-lit workspace. Secure your mitre saw on a level, waist-high surface, like a dedicated mitre saw stand or a sturdy workbench, to ensure both control and comfort. Before plugging in the power, you must clear the area behind and to the sides of the saw, check that the blade is tight, and set up adequate lighting. These non-negotiable steps are fundamental to accuracy and are the foundation of this beginner's guide to using a mitre saw.
Your work surface should be approximately 90-95 cm high, allowing you to operate the saw without bending over or reaching up, which can compromise your balance. For maximum stability, bolt the saw directly to your workbench or stand. Next, check the saw's "swing path" by moving the saw head through its full range of mitre and bevel angles. Ensure it doesn't hit a wall, a tool, or a stack of timber. This simple check prevents unexpected jolts that can ruin a cut.
With the saw still unplugged, inspect the blade. Gently try to wiggle it side-to-side; there should be no movement. Check that all carbide teeth are present and feel sharp. A dull or damaged blade is a common cause of burn marks and rough, splintered cuts. Finally, position a bright task light to shine directly onto the saw's table, eliminating any shadows on your measurement marks. A clear line of sight is essential for aligning your cut perfectly.
Securing the Workpiece Properly
Always secure your timber before making a cut. Most mitre saws include at least one integrated clamp, which is the safest method for holding the wood. For any piece of wood shorter than 15cm, using the clamp is mandatory to keep your hands clear. While you can hold longer pieces by hand, ensure your hand is at least 15cm away from the blade's path and outside of any red "no-go" zones marked on the saw.
Long lengths of timber require extra support to prevent the "teeter-totter" effect, where the wood lifts off the saw table during the cut. This will always result in an inaccurate angle. Use adjustable roller stands or even stacks of scrap wood of the same height as the saw's table to support both ends of your workpiece. For projects involving longer boards, having a pair of reliable roller stands is a game-changer. You can find sturdy options in our collection of workshop essentials.
For a perfectly square cut, the workpiece must sit completely flush against two surfaces: flat on the saw's table and tight against the vertical fence at the back. Even a tiny gap will compromise the angle of your cut. Press the wood firmly into this corner before clamping it down.
The "Dry Run" Technique for Beginners
Before making your first real cut on a marked piece of wood, perform a "dry run" with the power off. This is a fantastic habit that builds confidence and catches potential mistakes before they happen. With the saw unplugged, line up your pencil mark with the blade and perform a full plunge, bringing the blade all the way down. This allows you to see exactly where the teeth will make contact and confirm your alignment is perfect.
During the dry run, pay close attention to the blade guard. As you lower the saw head, the clear plastic guard should retract smoothly and automatically. When you raise the saw, it should snap back into its protective position immediately. If it sticks or moves slowly, it likely needs cleaning. This simple habit reinforces the core principles found in official Mitre Saw Safety Guidelines and prevents careless mistakes. Finally, use the dry run to confirm your hand placement is correct and well outside the danger zones, building crucial muscle memory for safe operation.
Executing the Four Essential Cuts Every Beginner Must Master
Once your saw is set up and you're familiar with its safety features, it's time to make some sawdust. Your mitre saw is designed for precision, but mastering it starts with four fundamental cuts. These are the building blocks for nearly every project, from framing a wall to crafting a stylish picture frame. We'll walk you through each one, starting with the simplest and building your confidence for more complex tasks.
This section of our beginner's guide to using a mitre saw will transform you from a complete novice into someone who can cut with accuracy and confidence. Let's get started.
Step 1: The Crosscut - Your First Perfect 90-Degree Cut
The crosscut is the most basic and common cut you'll make. It’s a straight, 90-degree cut across the grain of a piece of wood. Think of cutting a 2x4 for a wall stud or trimming decking boards to length; that's a crosscut. Your saw's mitre angle should be set to 0 degrees for this.
Step-by-Step: Making Your First Crosscut
Precision starts with your pencil mark. Instead of a single line, use a speed square to draw your line and then add a small "V" with the point landing exactly on your measurement. This gives you a precise target to align the saw blade with, eliminating any guesswork.
With your wood held firmly against the fence, squeeze the trigger and allow the blade to reach its maximum RPM. Don't rush this part. A blade at full speed cuts cleaner and safer. Lower the blade smoothly through the wood in one fluid motion. Once the cut is complete, follow the "Stop and Release" rule: keep the blade down, release the trigger, and wait for it to stop spinning completely before you raise the head. This simple habit prevents the blade from catching the wood on its way up, which could ruin your cut or cause a dangerous kickback. For a complete overview of safe operation, always refer to established Mitre Saw Safety Guidelines before starting a project.
Step 2: The Mitre Cut - Creating Flawless Angled Joints
A mitre cut is an angled cut across the face of the board. The most common angle is 45 degrees, which allows you to join two pieces together to form a perfect 90-degree corner. This is the go-to cut for making picture frames, door casings, and window trim.
Mastering Angled Mitre Joints
Your saw has "positive stops," which are preset detents that the mitre table clicks into at common angles like 0, 22.5, and 45 degrees. These are your best friend for instant accuracy. Simply unlock the table, swing it to your desired angle, and let it lock into place. For certain projects like decorative moulding, you may need to cut pieces "upside down and backwards" against the fence to get the correct orientation. Always double-check your setup. Before you cut your final, expensive piece of oak or walnut, make a test cut on a piece of scrap wood. Fit the two test pieces together to ensure the joint is tight and accurate. This five-minute check can save you hours of frustration and wasted material.
Step 3: The Bevel Cut - Adding a Sloped Edge
While a mitre cut adjusts the saw's table left or right, a bevel cut involves tilting the entire blade head. This creates a sloped or angled edge on your workpiece. It's fantastic for creating clean joints on baseboards for inside corners or for unique joinery projects. Most saws tilt to the left, but dual-bevel models can tilt both left and right, offering greater flexibility.
Step 4: The Compound Cut - The Ultimate Combination
Now, let's combine the two. A compound cut is a mitre and a bevel cut made at the same time. This advanced technique is essential for jobs where the wood needs to fit into a corner that isn't square on one plane, like installing crown moulding. Crown moulding sits at an angle against both the wall and the ceiling, requiring this special cut to meet perfectly in the corners. It takes practice, but mastering it unlocks a new level of professional-looking finish for your DIY projects.
Achieving Professional Accuracy by Understanding the Kerf and Blade Alignment
You've set the perfect angle and secured your workpiece, but true precision goes beyond the saw's settings. To get professional-quality results, you need to account for the blade itself. The two biggest secrets to flawless cuts are understanding the blade's "kerf" and preventing "tear-out." Master these, and you'll eliminate frustrating gaps and rough edges for good.
This part of our beginner's guide to using a mitre saw focuses on those fine details that separate amateur results from professional craftsmanship. It's about working with your tool, not just turning it on.
Accounting for Blade Thickness
Have you ever measured a piece of wood perfectly, only to find it's a couple of millimetres too short after cutting? The culprit is almost always the blade's kerf. The kerf is the width of the slot a saw blade makes while cutting. This isn't just a thin line; the blade vaporises a small section of wood, typically between 2.5mm and 3mm wide.
If you centre the blade on your pencil mark, you will remove the line plus 1.5mm of the wood you intended to keep. This small error quickly compounds, leading to poorly fitting joints. The solution is the "save the line" rule. Always position the blade so that its teeth will cut on the waste side of your mark, leaving the pencil line fully intact on your final piece. Your board will be exactly the length you measured.
Many modern saws feature laser guides or LED shadow lines to help with alignment. These are fantastic aids, but don't trust them blindly. They can get knocked out of alignment. The most reliable method is to lower the non-spinning blade to your workpiece and visually check that the outer edge of a tooth just kisses the edge of your pencil line. This guarantees perfect placement every time.
Dealing with Splintering and Tear-out
Tear-out is the messy splintering that occurs where the saw blade exits the wood, especially on the back edge of your workpiece. It can ruin an otherwise perfect cut. Fortunately, preventing it is simple with the right technique and equipment.
The most effective method is to provide support for the wood fibres. You can do this in two ways:
- Use a Sacrificial Board: Place a flat piece of scrap wood (MDF or plywood works well) firmly behind your workpiece. As you cut, the blade will pass through your project piece and into the scrap board. This backing supports the wood fibres at the point of exit, preventing them from blowing out and leaving a crisp, clean edge.
- Install a Zero-Clearance Insert: This is a replacement for the standard plastic plate on your mitre saw's base. You make the first cut directly into the blank insert, creating a slot that perfectly matches your blade's kerf. This provides ultimate support right at the cut line on the bottom of your material.
Your choice of blade also has a huge impact. Blades with a higher tooth count (80 teeth or more) take smaller "bites" from the wood, resulting in a much smoother finish. For delicate jobs like cutting skirting boards or decorative moulding, a high-quality, fine-finish blade is essential for achieving that flawless look. To get the best possible results, you can explore our range of precision cutting tools and find the perfect blade for your next project.
Essential Maintenance and the Best Tools to Complete Your Workshop
You've mastered the basics of making clean, accurate cuts. Now, it's time to protect your investment and expand your capabilities. Proper mitre saw maintenance ensures your tool performs reliably for years, while the right accessories will transform your workshop from a simple space into a creative hub. Keeping your saw in top condition is a simple, non-negotiable part of workshop safety and precision.
Regular cleaning is your first line of defence. Fine sawdust can clog the sliding rails and pivot points, leading to jerky movements and inaccurate angles. After each session, use a soft brush and a shop vac to clear debris from all moving parts. For a deeper clean every few months, use compressed air to blow out dust from the motor housing and internal mechanisms.
Your saw's blade won't last forever. A dull blade is inefficient and dangerous, increasing the risk of kickback and leaving ugly burn marks on your wood. You'll know it's time for a replacement when you feel increased resistance during cuts or notice the motor straining. Don't push a dull blade; a sharp one cuts cleaner, faster, and safer.
Finally, protect your saw from the elements. The machined table is a precision surface, and rust is its worst enemy. Store your saw in a dry environment, away from damp corners of a garage or shed. Applying a thin coat of paste wax to the table every few months will prevent moisture from causing rust and helps your workpiece glide smoothly.
Must-Have Accessories for Your Mitre Saw
A few key tools will elevate your work from good to great. Think of these as your mitre saw's essential support team. A quality tape measure and a reliable spirit level are your saw's best friends. Precision starts with accurate measurements and a perfectly level setup; without them, even the best saw will produce sloppy results.
Dust extraction is a must for your health and cleanliness. Connecting a simple shop vac to your saw's built-in dust port can capture over 90% of airborne particles. This keeps your cutting line visible and, more importantly, protects your lungs from harmful fine dust. Your workshop also needs a sturdy, dedicated workbench. A solid, flat surface provides the stability required for safe operation and accurate cuts, especially when working with long or heavy materials.
Your Next Steps in DIY
Congratulations on completing this beginner's guide to using a mitre saw! The best way to solidify your new skills is to start building. Begin with a simple, rewarding project like a classic birdhouse or some basic floating shelves. These projects use straight and mitred cuts, allowing you to practice everything you've learned in a practical, low-stakes way.
Feeling proud of your creation? Looking for your next challenge? Join the Klevaro community to share your projects, get expert tips, and find endless inspiration from fellow DIY enthusiasts. It’s the perfect place to grow your confidence and your skills.
You have the knowledge and the plan. Now it's time to build your dream workshop and tackle those projects you've been dreaming about. Shop our full collection of workshop tools to get started today.
Ready to Build? Put Your Mitre Saw Skills into Action
You're now equipped with the essential knowledge to operate a mitre saw safely and effectively. Remember that a clean, organised workspace is your first step to success, and mastering the four fundamental cuts-cross-cut, mitre, bevel, and compound-unlocks a world of creative potential. Precision is within your reach when you account for blade kerf and ensure proper alignment.
By completing this beginner's guide to using a mitre saw, you’ve built a solid foundation. The next step is to get the right equipment to support your ambition. It's time to fix, build, and create with total confidence.
Equip your workshop with our trusted range of DIY tools, featuring quality guaranteed brands like Rolson. We make getting started simple with Fast UK Delivery on all your workshop gear and offer Easy Returns for complete peace of mind.
Your next project is waiting. Go on, bring your vision to life!
Frequently Asked Questions
Can a beginner safely use a mitre saw?
Yes, a beginner can absolutely use a mitre saw safely by following the correct procedures. The key is to thoroughly read the manufacturer's manual before your first cut. Always wear essential personal protective equipment (PPE), including safety glasses and ear defenders. Make sure the blade guard is functioning correctly and keep your hands at least 150mm away from the blade's path. Following this beginner's guide to using a mitre saw will build your confidence quickly.
What is the difference between a mitre saw and a compound mitre saw?
A standard mitre saw's blade pivots left and right to make angled cuts, known as mitres. A compound mitre saw does this too, but its blade can also tilt (or bevel) to make angled cuts on the face of the wood. This feature is essential for complex joinery like cutting crown moulding or skirting for non-square corners. A dual-bevel compound saw can tilt in both directions, saving you time by not having to flip your workpiece over.
Do I need a sliding mitre saw for home DIY?
For most common home DIY projects, you likely don't need a sliding mitre saw. A standard 254mm (10-inch) non-sliding saw can typically cut timber up to 152mm (6 inches) wide, which is perfect for picture frames, skirting boards, and most trim. A sliding saw is only necessary if you plan to regularly cut wider materials like laminate flooring, decking boards, or shelving wider than 150mm.
How do I stop my mitre saw from splintering the wood?
The best way to stop splintering, or tear-out, is to use a high-quality blade with a high tooth count, typically between 60 and 80 teeth for fine finishing. You should also lower the blade slowly and smoothly through the material. For an extra clean cut on delicate surfaces, apply painter's tape along the cut line before you saw. This simple trick helps hold the wood fibres together as the blade exits the cut.
What size mitre saw blade is best for a beginner?
A 254mm (10-inch) blade is the most practical and versatile size for a beginner. This size provides an excellent balance of cutting capacity and affordability, and replacement blades are widely available. It's more than capable of handling over 90% of common DIY tasks, from cutting 2x4s to decorative moulding. While a 305mm (12-inch) saw offers more capacity, it's often more expensive and not essential for starting out.
Can you cut metal or plastic with a mitre saw?
Yes, you can cut certain materials other than wood, but you must use a specialised blade designed for the specific material. To cut non-ferrous metals like aluminium or copper tubing, you need a blade with a negative hook angle and a high tooth count. For plastics like PVC pipe or trim, a blade designed for laminates or plastics will prevent melting and chipping. Never use a standard wood blade on metal.
How much space do I need to use a mitre saw safely?
You need a clear, stable workspace with at least 1.5 metres of room on both the left and right sides of the saw. This allows you to safely support standard 2.4-metre lengths of timber without them becoming unbalanced. Ensure you have a minimum of 1 metre of clear space behind the saw for motor ventilation and about 2 metres in front for you to stand and operate it without being cramped or creating a trip hazard.
Leave a comment