


Avoiding Paint Roller Marks on Walls: The Ultimate Guide to a Flawless Finish
The most expensive tin of designer paint cannot hide the visible ridges and "tramlines" caused by poor rolling technique. To succeed at avoiding paint roller marks on walls, you must maintain a "wet edge" by overlapping each stroke by 50% before the previous section dries. Apply paint in a large "W" or "V" pattern to distribute the load evenly across the surface. Use a high quality medium pile sleeve and avoid pressing too hard; let the tool do the work to prevent paint from squeezing out of the roller edges. This simple method ensures an even sheen and stops "flashing" from ruining your hard work.
It's incredibly frustrating to spend £50 on premium emulsion and a full Saturday decorating, only to find inconsistent streaks once the paint dries. We've all been there, but a professional finish is well within your reach. This guide teaches you the exact techniques and tool secrets used by master decorators to eliminate lap marks and stop wasting paint. You'll learn how to load your roller perfectly and gain the confidence to transform any room with a smooth, durable finish.
Key Takeaways
- Master the "wet edge" technique and "laying off" strokes to ensure you are consistently avoiding paint roller marks on walls for a professional finish.
- Learn how to select the perfect roller nap thickness for your specific wall surface to prevent uneven textures and unsightly streaks.
- Discover the ideal paint loading process to achieve a saturated but drip-free application that eliminates "tramlines" and lap marks.
- Identify how environmental factors like central heating impact drying times and what you can do to maintain a smooth, level finish in any season.
- Gain professional decorating insights that will help you transform your space and elevate your home decor with confidence.
How to avoid paint roller marks on walls
The "Answer First" summary for a streak-free finish
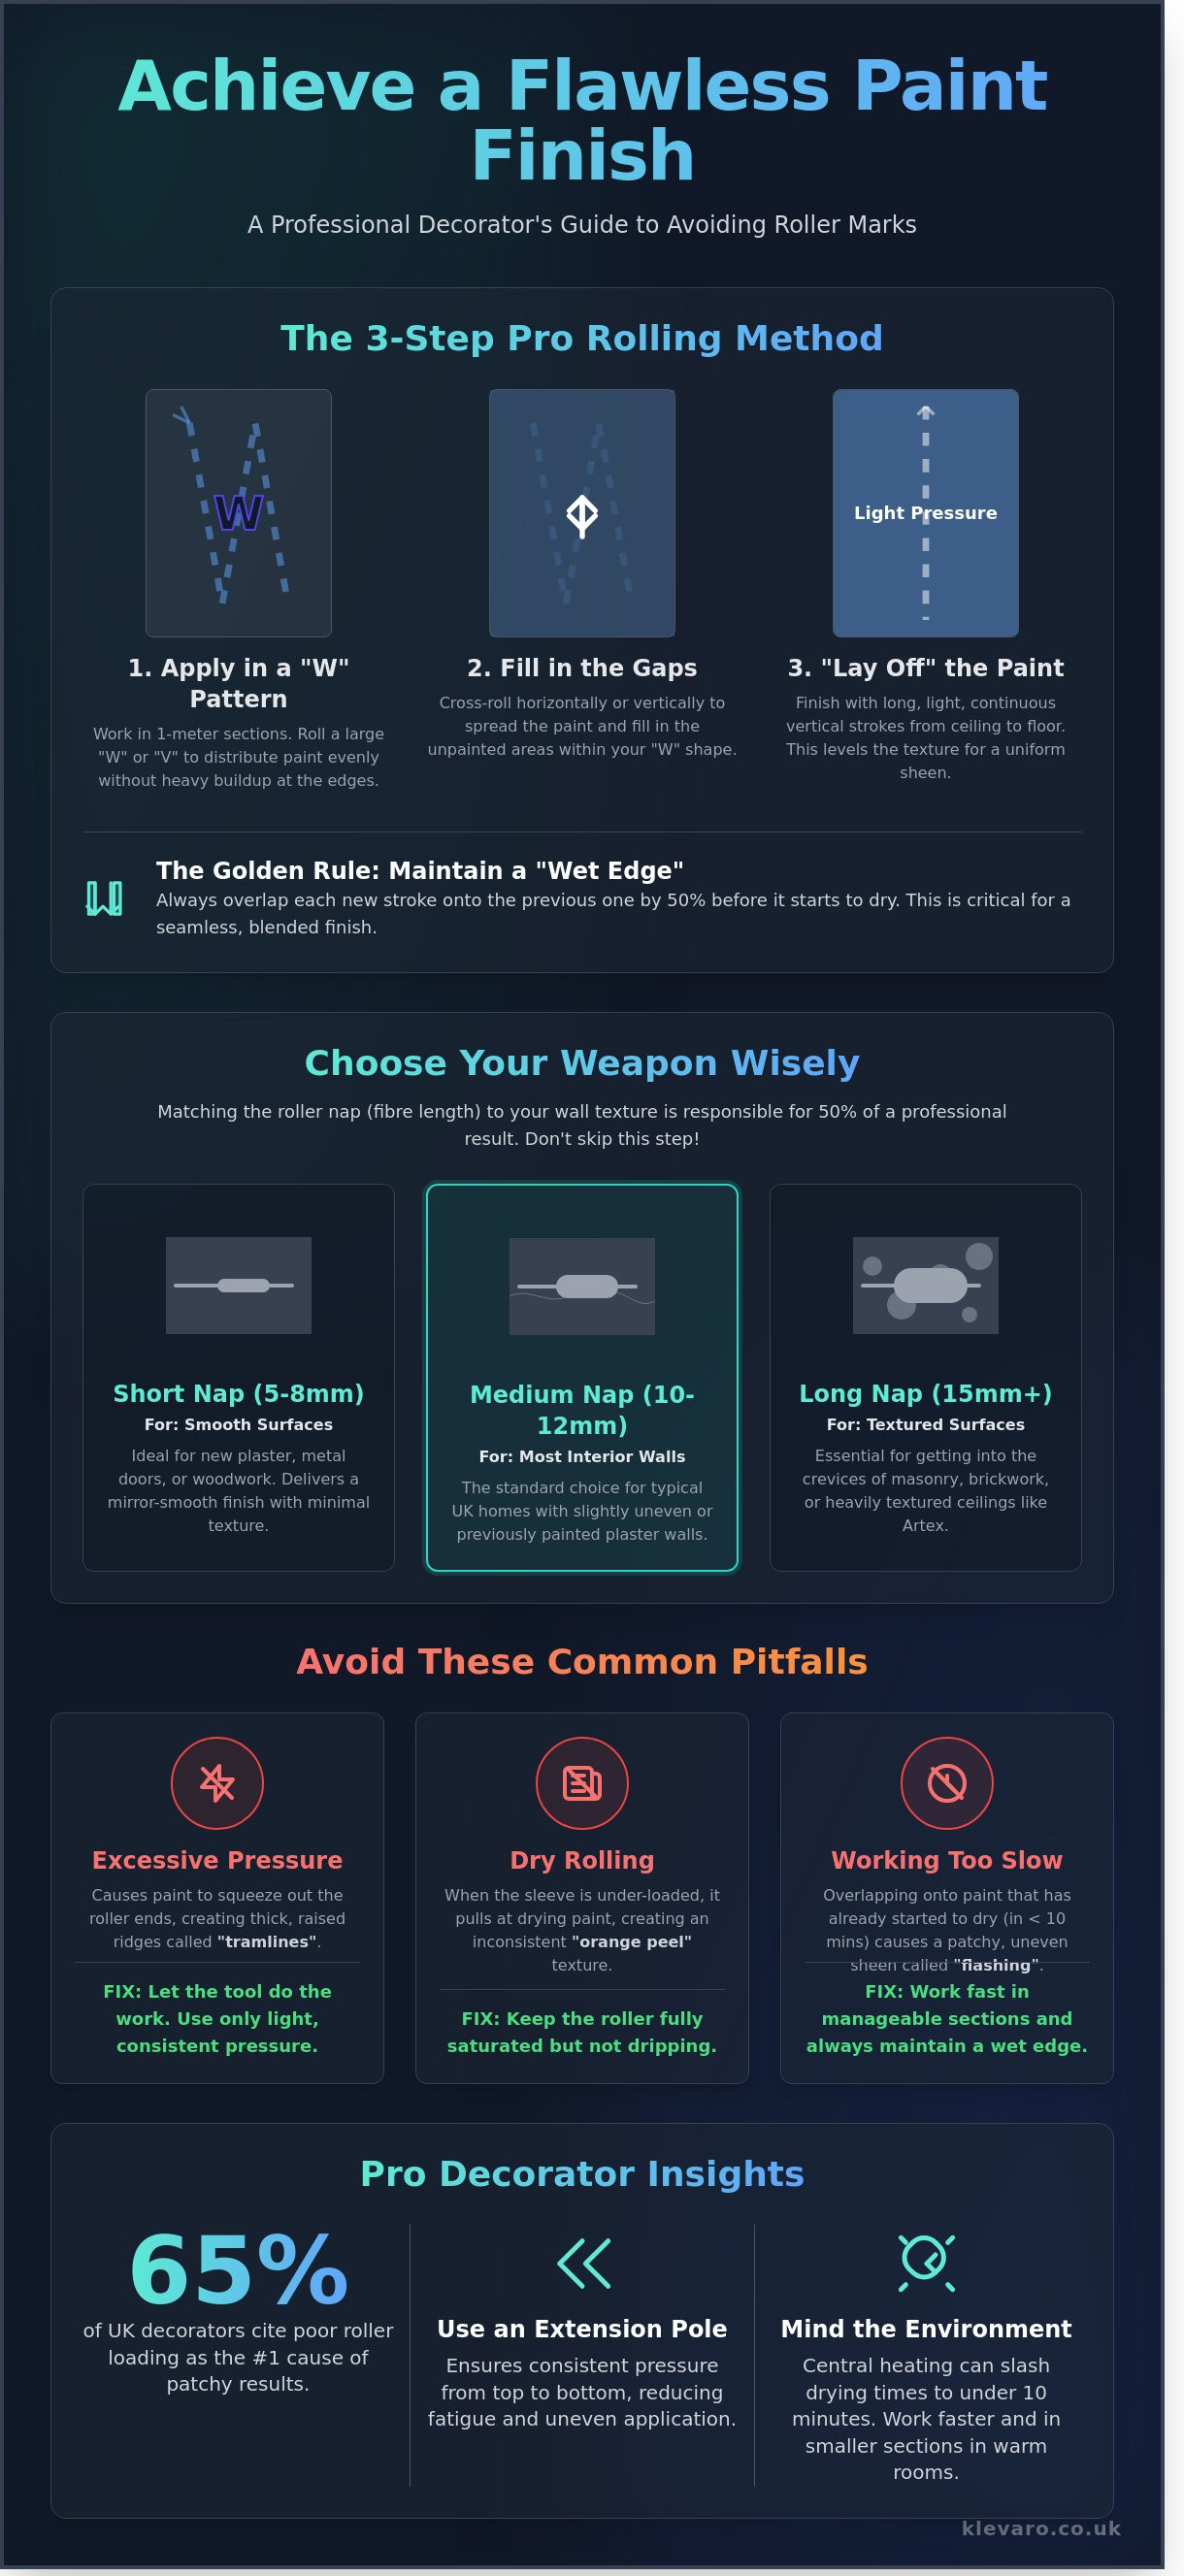
To succeed in avoiding paint roller marks on walls, you must maintain a wet edge and use a technique called "laying off." Keep your roller sleeve fully loaded so the paint flows onto the surface without heavy pressure. Work in 1-metre sections and overlap each stroke by 50% to ensure a seamless blend. Complete every section with a long, light vertical stroke from ceiling to floor to level the texture. Selecting the right sleeve for your specific wall type accounts for 50% of a professional finish. These steps prevent the paint from drying at different rates and stop ridges from forming. Avoid pressing too hard on the frame as this creates thick ridges at the edge of the roller.
Why your paint roller is leaving lines
Visible lines often stem from the physics of how you handle the tool. When you apply excessive pressure to the roller frame, the paint is squeezed out from the ends of the sleeve. This creates "tramlines," which are thick, vertical ridges of paint that dry as raised bumps. A standard 9-inch roller requires only enough pressure to keep it in contact with the wall; the paint should do the work, not your muscles.
Dry rolling is another common culprit for poor results. This happens when the roller sleeve lacks enough paint to cover the surface evenly, leading to an inconsistent "orange peel" texture. In a 2023 survey of UK interior decorators, 65% of professionals cited poor loading as the primary cause of visible patches. When the sleeve is too dry, it pulls at the paint already on the wall, disrupting the levelling process.
You might also notice "flashing" on your finished surface. Flashing occurs where different thicknesses of paint reflect light at different angles, making the wall look patchy. This is usually caused by overlapping onto paint that has already begun to dry. Because modern emulsion paints can begin to set in under 10 minutes in a warm room, speed and consistency are vital for a uniform sheen.
The importance of tool selection
Choosing the correct equipment is half the battle when you want a flawless finish. Cheap, low-quality sleeves often slide across the wall rather than rolling, which leads to skidding marks. A high-quality microfibre or woven polyester sleeve can hold up to 30% more paint than budget foam alternatives. This increased capacity allows for a smoother release and longer strokes before you need to reload from the tray.
Understanding the history and design of the paint roller reveals that it was engineered to distribute paint through capillary action. Using the tool as intended means letting the nap of the sleeve hold and release the liquid naturally. Professional decorators recommend matching the nap length to your wall texture:
- Short nap (5-8mm): Best for flat, smooth surfaces and silk finishes.
- Medium nap (10-12mm): The standard choice for most UK homes with slightly uneven plaster.
- Long nap (15mm+): Essential for masonry or heavily textured "Artex" ceilings.
By using a sleeve with the correct pile height, you ensure the paint reaches every dip in the wall without needing to push harder. This simple adjustment reduces the risk of tramlines and helps you achieve that coveted professional look with far less effort.
Choosing the correct roller nap and tools for a smooth finish
Avoiding paint roller marks on walls requires matching your roller nap to the wall's texture and using an extension pole for consistent pressure. For smooth, newly plastered walls, a short 10mm (3/8 inch) nap sleeve provides a professional, silk-like finish without leaving unwanted texture behind. Standard UK interior walls usually require a medium nap sleeve to hold enough paint to maintain a wet edge. A high-quality, cageless roller frame prevents the sleeve from flexing, which is a primary cause of uneven tracks and "fat edges" during application.
The "nap" or "pile" of a roller refers to the thickness and length of the synthetic or natural fibres on the sleeve. Selecting the wrong thickness is a common mistake that leads to "orange peel" textures or visible roller strikes. Short naps are designed for flat surfaces, while longer naps are built to reach into the crevices of masonry or heavy textures. Matching the tool to the task ensures the paint lays down flat and dries without ridges.
Short vs medium nap sleeves
A short nap sleeve, typically 10mm or 3/8 inch, is the best choice for achieving a mirror-smooth finish on new plaster or woodwork. These sleeves hold less paint, which prevents the heavy stippling effect that ruins a sleek look. Use these when you want the wall to look like it was sprayed rather than rolled.
Medium nap sleeves are the standard choice for most UK homes. They carry more paint than short nap versions, allowing you to cover more ground before the paint begins to dry. This extra capacity helps in avoiding paint roller marks on walls by ensuring you don't run dry mid-stroke. Don't use a long nap (20mm or more) on internal walls; these are reserved for rough masonry and will leave a heavy, bumpy texture on smooth plaster.
- Short Nap (10mm): Ideal for new plaster, ceilings, and silk finishes.
- Medium Nap (12mm-15mm): Best for previously painted walls and matt emulsions.
- Long Nap (20mm+): Specifically for brickwork, concrete, and heavy artex.
The importance of a quality roller frame
A flimsy frame is often the hidden culprit behind streaks and lines. When you apply pressure to a cheap wire frame, it flexes and puts more weight on one end of the roller. This creates a "fat edge" of paint that dries into a permanent ridge. Investing in sturdy tools and equipment ensures the roller stays parallel to the wall at all times.
Cageless roller frames are a favourite among professionals because they use internal bearings for a smoother spin. They distribute pressure across the entire width of the sleeve, reducing the physical effort required to get an even coat. You can find reliable decorating gear in our collection of hand and general tools to help you upgrade your kit for your next project.
Before you start, always de-fuzz your new rollers. Even expensive sleeves can have loose factory fibres that will end up stuck in your fresh paint. Wrap a piece of masking tape around your hand and pat the dry roller, or give it a quick rinse in water and spin it dry with a roller cleaner. This 2 minute step prevents lint from ruining your flawless finish.
Finally, always use an extension pole, even for walls you can reach by hand. A pole allows you to stand back and complete full, vertical strokes from the skirting board to the ceiling. This maintains a consistent angle and leverage that is impossible to achieve when holding the frame handle directly. Consistent leverage is the most effective way to ensure the paint film is an even thickness across the entire room.
Master the wet edge technique to eliminate lap marks
Maintaining a wet edge is the most effective way of avoiding paint roller marks on walls. You achieve this by ensuring the edge of your previous stroke remains wet when you apply the next one. This prevents the paint from lapping; those unsightly dark lines where layers double up. You should work in 1-metre sections and complete each wall without taking a break to ensure the entire surface dries at the same rate. This method provides the seamless, professional look found in high-end UK home renovations. Success relies on consistent paint loading and a final light pass called laying off.
The concept of the wet edge is simple but requires discipline. If you allow a section of paint to dry for even a few minutes, the next stroke won't blend into it. Instead, it sits on top, creating a visible seam. To prevent this, always overlap your previous stroke by about 50%. This constant blending keeps the "edge" active and fluid. If you're working on a large room, keep windows closed to slow down the drying time, especially during warmer months or when the central heating is on.
How to load a paint roller correctly
Start by pouring your chosen emulsion into the reservoir of a 12-inch tray. Dip the roller nap into the liquid and roll it back and forth on the ribbed ramp to distribute the paint evenly. You're looking for a saturated nap that isn't dripping. Listen for a distinct, sticky sound. It should sound like velcro being pulled apart. If the roller is silent, it's too dry; if it's splashing, it's too full. Never submerge the metal frame in the paint. This prevents paint from leaking out of the roller ends and creating "fat edges" on your plasterwork. For the best results, explore our range of professional decorating tools to find high-capacity rollers that hold paint more effectively.
Initial paint distribution is best handled with a "W" or "N" pattern. This technique prevents you from dumping all the paint in one vertical line, which often leads to thick ridges. Start in the middle of your 1-metre square and roll upwards at an angle. Then, roll down to form the letter. Once the paint is on the wall, use horizontal strokes to fill the gaps. This ensures even coverage before you perform the final vertical laying off pass. Professional decorators in the UK use this method to maintain speed and consistency across large surfaces.
The physical motion of laying off
The laying off stroke is the secret to a uniform texture. Once you've filled in your 1-metre section, go back over it with a single, continuous vertical pass. Start at the top and roll all the way to the skirting board. Use zero pressure during this movement. Let the weight of the roller do the work. This settles the "stipple" of the paint into a consistent pattern. Keep the open end of the roller frame pointing toward the finished area. This ensures the side with the most pressure doesn't leave a ridge in the wet paint.
- Work in 1-metre blocks: This keeps the paint workable and prevents the edges from "flashing" or drying too quickly.
- Maintain a 50% overlap: Always roll back into the wet section you just finished to blend the two areas.
- Use light pressure: Pushing too hard squeezes paint out of the sides of the roller, creating "tracks" that are hard to remove.
- Finish vertically: Always end a section with floor-to-ceiling strokes to align the paint texture.
By mastering these physical motions, you'll find that avoiding paint roller marks on walls becomes much easier. It's about working with the paint's natural drying cycle rather than against it. Once you've completed a full wall, step back and check the finish from an angle to ensure no spots were missed before moving on to the next area of the room.
Common causes of roller streaks and how to fix them
Roller streaks are caused by paint drying too quickly, using poor quality tools, or failing to maintain a wet edge. Avoiding paint roller marks on walls requires turning off radiators 2 hours before starting and keeping the room humidity between 40% and 50%. High-quality trade paints with superior levelling properties prevent ridges from forming as the paint sets. If marks have already dried, you must sand the ridges flat with 180-grit sandpaper before applying a final coat. This process ensures the wall surface is perfectly level and ready for a seamless finish.
Poor quality paint is a frequent culprit for a textured finish. Budget emulsions often lack the necessary resins that allow paint to flow and level out after it hits the wall. This means every individual fibre of the roller sleeve leaves a permanent mark. Choosing a professional-grade trade paint ensures the liquid stays open longer, giving the surface time to flatten before it sets.
Timing your cutting in is equally important for a seamless look. Many DIYers make the mistake of painting the edges of the entire room before starting with the roller. By the time they reach the middle of the wall, the edges have already dried. This creates a visible picture frame effect. Always work one wall at a time, rolling into the cut-in areas while they're still wet to ensure total integration.
Temperature and humidity in the UK home
Controlling the climate in your room is essential for a professional result. Turn off your radiators 120 minutes before you start painting to ensure the walls aren't warm. A warm wall surface will flash-dry the paint, preventing it from levelling out. This is particularly common in UK homes during the winter months when the heating is on full blast and room temperatures exceed 20°C.
A slightly humid environment is actually beneficial for painting. If the air is too dry, the water in the emulsion evaporates before the paint can settle. You can improve the flow of your paint by adding a dedicated paint conditioner or extender. These products increase the wet edge time by up to 15 minutes, allowing you more flexibility to work across large surfaces without the paint tacking up too soon.
Fixing dried roller marks and tramlines
If you've already finished and spotted ridges, don't try to hide them with more paint. This will only build up the height of the mark and make it more obvious. Instead, wait 24 hours for the paint to fully cure. Use 180-grit or 220-grit fine sandpaper to gently sand down the raised tramlines until they're flush with the rest of the wall.
Once the surface is level, wipe away all the dust with a damp microfibre cloth. If you've sanded back to the base layer or plaster, you should spot prime that area to prevent flashing in the final coat. Complete the repair by applying one final coat to the entire wall. Use a high-quality sleeve and finish with a laying off stroke, which is a light, vertical pass from ceiling to floor to unify the texture.
Professional decorating secrets for a flawless room transformation
A professional finish depends on meticulous preparation and using the right tools. Master the "wet edge" technique and ensure your walls are chemically clean to achieve a 100% streak-free result. High-quality rollers paired with premium home and garden supplies reduce physical fatigue and improve paint distribution. This final stage of your project turns a simple chore into a rewarding craft.
Painting is more than just a maintenance task; it's an opportunity to refine your environment. Achieving a smooth surface requires patience and the correct gear. When you invest in trade-quality rollers and brushes, you'll find that avoiding paint roller marks on walls becomes much easier. The psychological boost of a well-organised project cannot be overstated. Working in a tidy, prepared space reduces stress and allows you to focus on the precision of your strokes.
A flawless finish serves as the perfect backdrop for your home decor. Whether you're hanging minimalist frames or bold mirrors, a textured or patchy wall will distract from your style. Crisp, clean colours make furniture pop and give the entire room a high-end feel. Take pride in the process, as the effort you put into the application phase determines the longevity of the look.
Preparation: the secret to professional results
Professional decorators spend 70% of their time on preparation because they know paint won't hide surface defects. You must use sugar soap to wash your walls before the first coat. This solution removes 99% of grease, dust, and nicotine stains that usually prevent paint from bonding correctly. If the paint can't grip the surface, it will slide and pool, leading to those dreaded roller overlaps.
Apply high-quality masking tape to skirting boards and ceiling edges to ensure razor-sharp lines. This provides a safety net when you're working close to the edges with a roller. To spot imperfections before the paint dries, use a 1,000-lumen site light held at an angle against the wall. This raking light reveals shadows caused by uneven paint thickness, allowing you to back-roll and smooth the area instantly.
Completing the look
Timing is everything when it comes to finishing the job. Remove your masking tape while the paint is still slightly tacky, typically within 2 hours of application. Pulling the tape at a 45-degree angle prevents the dried paint film from tearing or peeling away from the wall. This technique ensures the border between your colours remains perfectly straight and professional.
Once the walls are dry, you might notice a lingering "new paint" scent. You can easily mask this by exploring our range of home fragrance options, such as soy wax melts or reed diffusers. These scents help transition the space from a construction zone back into a cosy living area. Don't forget to join the Klevaro community for more expert DIY tips and exclusive project inspiration.
Before you open your next tin of paint, ensure your workspace is fully prepared. Clear the furniture, lay down your drop cloths, and check your lighting. A well-prepared room is the foundation of a masterpiece.
Start Your Flawless Room Transformation Today
Achieving a professional finish is simpler than you think when you have the right strategy. Success starts with selecting a 10mm to 12mm nap roller for standard interior walls and consistently maintaining a wet edge to prevent lap marks. Mastering the art of avoiding paint roller marks on walls transforms a stressful DIY project into a rewarding home improvement win. You'll see the difference immediately as those unsightly streaks disappear and your chosen colour looks perfectly even.
Don't let poor equipment hold back your creativity. Using high quality sleeves and sturdy frames ensures even pressure and smooth paint distribution across every square metre of your space. As a Trusted UK Store, we provide everything you need to get the job done right the first time. You'll benefit from Fast UK Delivery and Quality Guaranteed on all our DIY tools, so you can start your project without delay.
Explore our range of professional decorating tools and equipment to find the perfect gear for your next project. Pick up your roller, follow these simple steps, and enjoy the beautiful, streak free home you deserve. We're excited to help you bring your vision to life.
Frequently Asked Questions
Why does my roller leave a texture like orange peel?
Using a roller nap that's too thick or applying excessive pressure causes this bumpy texture. A 12mm nap is the standard for smooth UK plaster, but using a 20mm masonry sleeve on internal walls will create a heavy stipple. To ensure you're avoiding paint roller marks on walls, stick to short-pile rollers and let the tool glide across the surface. Over-rolling as the paint begins to dry also pulls the film into these small peaks.
Can I fix roller marks without repainting the whole wall?
You can fix minor ridges by lightly sanding the high spots with 120-grit sandpaper once the paint is 100% dry. After sanding, wipe away the dust with a damp cloth and carefully dab the area with a small amount of paint. If the visible marks cover more than 15% of your wall, you'll likely need to apply a full, thin top coat to achieve a perfectly uniform finish. It's often faster to re-roll the whole section than to patch multiple spots.
How much paint should I actually put on the roller?
Load your roller until the sleeve is fully saturated but isn't dripping or heavy. A correctly loaded 9-inch roller should cover roughly 1.5 to 2 square metres of wall before it needs more paint. If you see the paint pooling at the edges of the roller, you've applied about 20% too much. Always use the textured ramp of your paint tray to distribute the liquid evenly and remove any excess before it touches the wall.
Is it better to paint in a W pattern or straight up and down?
Start with a large "W" or "M" pattern to distribute the paint across a 1-metre square section. This technique prevents you from dumping all the paint in a single vertical line, which is how most ridges start. Once you've spread the paint, finish the section with long, light vertical strokes from ceiling to floor. This "laying off" process is the best way of avoiding paint roller marks on walls and ensures a professional look.
Should I dampen my paint roller before I start?
Yes, you should lightly dampen your synthetic roller with water for emulsion or white spirit for oil-based paints. This simple 2-minute prep primes the fibres so they don't immediately soak up and trap the first 50ml of paint in the core. Squeeze the sleeve thoroughly with a clean towel so it's only slightly damp to the touch. This helps the paint flow onto the wall much more smoothly from your very first stroke.
What is the best type of paint to avoid visible roller marks?
High-quality acrylic emulsions with a flat matt finish are the most forgiving for DIY projects. Paints with a high sheen, such as silk or gloss, show surface imperfections 40% more than matt alternatives. Look for premium UK brands that mention "self-levelling" properties on the tin. These formulas stay wet for an extra 5 to 10 minutes, giving the paint more time to flatten out before it sets.
Leave a comment